A/B Linux OS update using RAUC and GRUB
v1.1.0
Table of contents
- Overview
- Versions
- Initial setup on the device
- Create update
- Install update
- Linux Cockpit with the A/B Update page
- How to use Linux Cockpit A/B Update
Overview
This repository is a guide on how to build an A/B update system with RAUC and GRUB2 on x86_64 UEFI platforms and how to set up Linux Cockpit with the A/B Update page. An A/B update mechanism makes it possible to update the OS without booting into a separate minimal OS (e.g. a recovery system), and keeps the device bootable if an update turns out to be broken. It has been tested on an ASUS AAEON board with an Intel x86_64 CPU.
Versions
Table 1 - Document versions.
| Version | Release date | What’s new |
|---|---|---|
| 1.0.0 | 14.08.2026 | - Initial v1.0.0 release. |
| 1.1.0 | 20.08.2026 | - Added a guide on how to enable the network and set a static IP. - Added a guide on how to create a home directory. - Added a guide on how to install Linux Cockpit and a custom page for A/B Update. |
Initial setup on the device
Partition the disk
This guide uses four partitions on a single GPT disk: the ESP, the two rootfs slots and /home. Repartitioning destroys everything on the disk, and it cannot be done on the disk you are running from, so boot from a live or rescue system first.
sgdisk comes from the gdisk package:
sudo sgdisk --zap-all /dev/sda
sudo sgdisk \
  -n 1:0:+512M -t 1:ef00 -c 1:esp \
  -n 2:0:+6G   -t 2:8300 -c 2:slotA \
  -n 3:0:+6G   -t 3:8300 -c 3:slotB \
  -n 4:0:0     -t 4:8300 -c 4:home \
  /dev/sda
sudo partprobe /dev/sda
ef00 is the EFI system partition type code, which is what the firmware looks for, and 8300 is the one for a plain Linux filesystem. The -c values are only labels.
Create the filesystems:
sudo mkfs.vfat -F 32 /dev/sda1
sudo mkfs.ext4 /dev/sda2
sudo mkfs.ext4 /dev/sda3
sudo mkfs.ext4 /dev/sda4
Both slots should be the same size, and each of them has to be at least as large as the rootfs image built later in this guide, which is 6 GiB. The ESP is 512 MiB here, the same size as the esp.img of the bootloader image. /dev/sda4 takes whatever is left and holds /home.
If you write the bootloader image with dd, it replaces the filesystem on /dev/sda1, and slot B is replaced by the clone of slot A, so mkfs on those two only leaves the partitions in a usable state until then. The one that really needs its own filesystem is /dev/sda4: /home is mounted from the fstab with an fsck pass, and an unformatted partition there drops the boot into emergency mode, which in turn keeps rauc-mark-good from running.
The fstab further down needs the PARTUUID values of these partitions. sudo blkid prints them.
Set up the bootloader
There are two ways to set up the bootloader. The first one is to install it on a live device:
mkdir /tmp/grub
sudo mount /dev/sda1 /tmp/grub
sudo grub-install --target=x86_64-efi \
  --efi-directory=/tmp/grub --boot-directory=/tmp/grub \
  --bootloader-id=ab --no-nvram --recheck
sudo efibootmgr -c -d /dev/sda -p 1 -L "AB GRUB" -l '\EFI\ab\grubx64.efi'
The second one is to create a bootloader image:
dd if=/dev/zero of=esp.img count=512 bs=1M
mkfs.vfat -F 32 esp.img
mkdir /tmp/grub
sudo mount -o loop esp.img /tmp/grub
sudo mkdir -p /tmp/grub/EFI/ab
sudo grub-mkimage --format=x86_64-efi --output=/tmp/grub/EFI/ab/grubx64.efi --prefix='(hd0,1)/grub' part_gpt part_msdos chain boot ext2 fat test search search_fs_uuid configfile echo linux normal loadenv
sudo mkdir /tmp/grub/grub
Instead of sda1 and 1 you can use something else, for example sda4 and 4. The number of the ESP partition appears in several places, and all of them have to agree: /dev/sda1 in the mount and dd commands, -p 1 in efibootmgr, (hd0,1) in the --prefix of grub-mkimage, and the /etc/grub line of the fstab below. GRUB counts partitions from 1, so /dev/sda4 is (hd0,4).
Set up the bootloader environment:
sudo grub-editenv /tmp/grub/grub/grubenv set A_OK=0 B_OK=0 A_TRY=0 B_TRY=0 ORDER="A B"
Put the following content into /tmp/grub/grub/grub.cfg:
# set default menuentry (Slot A) and timeout (5s)
default=0
timeout=5
terminal_output console

any_ok=0

set ORDER="A B"
set A_OK=0
set B_OK=0
set A_TRY=0
set B_TRY=0
load_env

# select bootable slot
for SLOT in $ORDER; do
    if [ "$SLOT" == "A" ]; then
        INDEX=0
        OK=$A_OK
        TRY=$A_TRY
        A_TRY=1
    fi
    if [ "$SLOT" == "B" ]; then
        INDEX=1
        OK=$B_OK
        TRY=$B_TRY
        B_TRY=1
    fi
    if [ "$OK" -eq 1 -a "$TRY" -eq 0 ]; then
        default=$INDEX
        any_ok=1
        break
    fi
done

# reset booted flags in case both sides have failed to boot
if [ "$any_ok" -eq 0 ]; then
    if [ "$A_OK" -eq 1 -a "$A_TRY" -eq 1 ]; then
        A_TRY=0
    fi
    if [ "$B_OK" -eq 1 -a "$B_TRY" -eq 1 ]; then
        B_TRY=0
    fi
fi

save_env A_TRY B_TRY

CMDLINE="panic=60 quiet"

menuentry "Slot A (OK=$A_OK TRY=$A_TRY)" {
    linux (hd0,2)/boot/vmlinuz root=/dev/sda2 $CMDLINE rauc.slot=A
    initrd (hd0,2)/boot/initrd.img
}

menuentry "Slot B (OK=$B_OK TRY=$B_TRY)" {
    linux (hd0,3)/boot/vmlinuz root=/dev/sda3 $CMDLINE rauc.slot=B
    initrd (hd0,3)/boot/initrd.img
}
Then execute sudo umount /tmp/grub.
initrd is optional; add it if your OS needs it.
If you created an image, write it to your device and add the boot entry:
sudo dd if=esp.img of=/dev/sda1 bs=4M status=progress conv=fsync
sudo efibootmgr -c -d /dev/sda -p 1 -L "AB GRUB" -l '\EFI\ab\grubx64.efi'
Both commands have to run on the target device. efibootmgr writes the entry into the firmware of the machine it runs on, so running it where the image was built adds an entry there instead. Another way is to skip the entry altogether and copy grubx64.efi to EFI/BOOT/BOOTX64.EFI inside the image while it is still mounted, because the firmware looks for that path on its own.
Remember that the image must not be larger than the target partition.
Set up the OS
Mount your slot A. It can be either a partition or an image.
Creating an ext4 image:
dd if=/dev/zero of=disk.img count=6144 bs=1M
mkfs.ext4 -F disk.img
The image must not be larger than the slot partition it is written to, and both slots have to be able to hold it. RAUC writes such an image to the slot as is, so the filesystem keeps the size of the image: on a larger partition the remaining space stays unused until you grow the filesystem with sudo resize2fs /dev/sda2. The simplest way to avoid that is to make the image the same size as the slot.
Here is a partition mount example:
mkdir /tmp/slotA
sudo mount /dev/sda2 /tmp/slotA
Here is an image mount example:
mkdir /tmp/slotA
sudo mount -o loop disk.img /tmp/slotA
Create a minimal OS (Ubuntu):
sudo debootstrap --components=main,universe --arch=amd64 noble /tmp/slotA
Create the config directories:
sudo mkdir -p /tmp/slotA/etc/rauc /tmp/slotA/etc/grub /tmp/slotA/mnt/rauc
Put the following content into /tmp/slotA/etc/rauc/system.conf:
[system]
compatible=rauc-demo-x86
bootloader=grub
mountprefix=/mnt/rauc
bundle-formats=-plain
grubenv=/etc/grub/grub/grubenv

[keyring]
path=demo.cert.pem

[slot.rootfs.0]
device=/dev/sda2
type=ext4
bootname=A

[slot.rootfs.1]
device=/dev/sda3
type=ext4
bootname=B
Instead of sda2 and sda3 you can use something else. The slot devices also appear in several places, and all of them have to agree: device= in this file, (hd0,2) and (hd0,3) together with root=/dev/sda2 and root=/dev/sda3 in the menuentries of the grub.cfg above, and the mount, e2image and tune2fs commands in this guide.
Add a systemd service to /tmp/slotA/etc/systemd/system/rauc-mark-good.service:
[Unit]
Description=RAUC Good-marking Service
ConditionKernelCommandLine=|rauc.slot
Wants=rauc.service
After=rauc.service dbus.socket
RequiresMountsFor=/etc/grub

[Service]
Type=oneshot
RemainAfterExit=yes
ExecStart=/usr/bin/rauc status mark-good

[Install]
WantedBy=multi-user.target
Generate the keys:
openssl req -x509 -newkey rsa:4096 -nodes -keyout demo.key.pem -out demo.cert.pem -subj "/O=rauc Inc./CN=rauc-demo"
The -subj values are only an example: put your own /O= and /CN= there. You can also change the key and certificate names.
After that, copy demo.cert.pem:
cp demo.cert.pem /tmp/slotA/etc/rauc/demo.cert.pem
Modify the fstab at /tmp/slotA/etc/fstab:
PARTUUID=766fa522-8195-4568-b4cb-527e95d3a6f0  /home  ext4  defaults,nodev,nosuid  0  2
PARTUUID=0666bffd-d8ec-4475-83d2-dcd0a6688fa0  /etc/grub  vfat  umask=0077  0  0
You can get the PARTUUID values for fstab via sudo blkid. You can also add other partitions, or just use /dev/sdaN instead of PARTUUID:
/dev/sda4  /home  ext4  defaults,nodev,nosuid  0  2
/dev/sda1  /etc/grub  vfat  umask=0077  0  0
Chroot into the slot:
cd /tmp/slotA
sudo mount -t proc /proc proc/
sudo mount -t sysfs /sys sys/
sudo mount -o bind /dev dev/
sudo mount -o bind /run run/
sudo chroot /tmp/slotA /bin/bash
Install the packages:
apt update
apt install linux-image-generic
apt install netplan.io network-manager systemd-resolved
apt install grub-common rauc rauc-service
Enable the rauc-mark-good service:
systemctl enable rauc-mark-good.service
Create the file /etc/netplan/01-network-manager-all.yaml to enable networking:
network:
  version: 2
  renderer: NetworkManager
To enable an SSH connection, you need to:
- Install OpenSSH:
apt install openssh-server openssh-client
- Generate a UUID:
uuidgen
# Example output: 11418e32-9af0-11f1-969d-00155d9773ef
- Put the following content into
/etc/netplan/90-NM-your-uuid.yaml:
network:
  version: 2
  ethernets:
    NM-your-uuid:
      renderer: NetworkManager
      match:
        name: "your-network-interface"
      addresses:
      - "192.168.0.200/24"
      dhcp6: true
      wakeonlan: true
      networkmanager:
        uuid: "your-uuid"
        name: "Wired connection 1"
        passthrough:
          connection.autoconnect-priority: "-999"
          connection.timestamp: "1786092581"
          ethernet._: ""
          ipv6.addr-gen-mode: "default"
          ipv6.ip6-privacy: "-1"
          proxy._: ""
Example /etc/netplan/90-NM-11418e32-9af0-11f1-969d-00155d9773ef.yaml:
network:
  version: 2
  ethernets:
    NM-11418e32-9af0-11f1-969d-00155d9773ef:
      renderer: NetworkManager
      match:
        name: "enp2s0"
      addresses:
      - "192.168.0.200/24"
      dhcp6: true
      wakeonlan: true
      networkmanager:
        uuid: "11418e32-9af0-11f1-969d-00155d9773ef"
        name: "Wired connection 1"
        passthrough:
          connection.autoconnect-priority: "-999"
          connection.timestamp: "1786092581"
          ethernet._: ""
          ipv6.addr-gen-mode: "default"
          ipv6.ip6-privacy: "-1"
          proxy._: ""
You can also change the IP address 192.168.0.200 to another one, for example, 192.168.0.150.
If you need to add a user, run the following commands:
useradd -s /bin/bash -G sudo user_name
passwd user_name
The home directory is not created here (there is no -m flag) because /home is a separate partition that is mounted only on the running system. Create the directory after the first boot.
Exit the chroot via exit and unmount everything:
sudo umount /tmp/slotA/run /tmp/slotA/dev /tmp/slotA/sys /tmp/slotA/proc
sudo umount /tmp/slotA
If you are doing the initial setup on a live device, clone slot A to slot B. e2image works on the block devices themselves, and both slots must be unmounted, so boot from a live or rescue system if slot A is the rootfs you are currently running from:
sudo e2image -ra -p /dev/sda2 /dev/sda3
The clone also copies the filesystem UUID, so assign a new one to slot B to keep both slots distinguishable:
sudo tune2fs -U random /dev/sda3
Also remember that you can create .img files for the rootfs and the bootloader. After that you can write the images to your live device via dd:
sudo dd if=disk.img of=/dev/sdaN bs=4M status=progress conv=fsync
One-shot boot for testing
# Show all EFI entries and find the number of "AB GRUB"
sudo efibootmgr
# Put your number instead of 0000
sudo efibootmgr -n 0000
After the first boot
If you added a new user, create the home directory on the mounted /home partition:
sudo mkhomedir_helper user_name
It creates /home/user_name.
Create update
If you did the initial setup on a live device, clone the rootfs into an .img file first, because that clone is what future updates are built from. Otherwise you already have the .img file.
The slot must not be mounted while it is copied, otherwise the image catches the filesystem mid-write and comes out inconsistent. Boot from a live or rescue system, the same as for the slot cloning in Set up the OS, and copy the partition:
sudo dd if=/dev/sda2 of=disk.img bs=4M status=progress conv=fsync
e2image does the same job faster, because it copies only the blocks that are in use and leaves the rest of the file sparse:
sudo e2image -ra -p /dev/sda2 disk.img
Chroot into your image. After that you can add, remove or modify files.
Exit the chroot and unmount it.
mkdir update1
mv disk.img update1/disk.img
touch update1/manifest.raucm
Put the following content into update1/manifest.raucm:
[update]
compatible=rauc-demo-x86
version=demo.update1
build=11.08.2026;12:16

[bundle]
format=verity

[image.rootfs]
filename=disk.img
You can write any data in the version and build fields. More information about the data available in the manifest is here.
Also copy demo.cert.pem and demo.key.pem to your work folder (not the update folder), and build the bundle:
rauc --cert demo.cert.pem --key demo.key.pem bundle update1/ update1-11.08.2026-1.raucb
After that you will get the update file update1-11.08.2026-1.raucb.
Install update
RAUC can install an update not only from a local file: a URL works in place of a file path as well.
Via rauc
Just execute:
sudo rauc install path/to/generated_file.raucb
After installing an update, you need to reboot the device.
Via D-Bus
More information about using the D-Bus API is here.
sudo busctl call de.pengutronix.rauc / de.pengutronix.rauc.Installer InstallBundle sa{sv} "path/to/generated_file.raucb" 0
After installing an update, you need to reboot the device.
Linux Cockpit with the A/B Update page
Install Cockpit
Cockpit is set up in two places, and it is worth keeping them apart. The package and the A/B Update page belong in the slot image, so that every update carries them. The certificate is made on the running device instead, because its private key must not end up in the image or in every update bundle built from it.
Install the package in the chroot of slot A, entered the same way as in Set up the OS:
apt install cockpit
Cockpit is socket-activated and listens on port 9090. Enable the socket so that it starts on the next boot:
systemctl enable cockpit.socket
--now is left out because nothing can be started inside a chroot. On a running device the equivalent command is sudo systemctl enable --now cockpit.socket.
Once the device has booted, the web console is available at https://your-device-ip:9090. It uses a self-signed certificate, so the browser shows a warning on the first visit.
To get rid of the warning, add your own certificate. Cockpit uses the alphabetically last .cert file in /etc/cockpit/ws-certs.d, so the 10- prefix wins over the generated 0-self-signed.cert.
Execute the following commands on the running device, once per device - the /etc/cockpit/ws-certs.d directory and the cockpit-ws group come with the package. Do not do this in the chroot; otherwise the private key ends up in the slot image and in every update bundle built from it. Note that /etc/cockpit is part of the rootfs slot, so an update replaces the certificate along with the rest of the slot: either repeat these commands after an update, or keep the pair on the /home partition and copy it into place at boot.
sudo openssl req -x509 -newkey rsa:2048 -nodes \
  -keyout /etc/cockpit/ws-certs.d/10-device.key \
  -out    /etc/cockpit/ws-certs.d/10-device.cert \
  -days 3650 \
  -subj "/CN=your.domain" \
  -addext "subjectAltName=DNS:your.domain,IP:192.168.0.200"
sudo chown root:cockpit-ws /etc/cockpit/ws-certs.d/10-device.key
sudo chmod 640 /etc/cockpit/ws-certs.d/10-device.key
sudo chmod 644 /etc/cockpit/ws-certs.d/10-device.cert
sudo systemctl restart cockpit
Instead of your.domain and 192.168.0.200 you need to put your own domain and IP address. The IP address is what matters if you open the web console by address rather than by name. Note that macOS and iOS refuse TLS server certificates issued on or after 1 September 2020 with a validity period longer than 398 days. Apple exempts certificates that come from a manually added root, which is what a self-signed certificate placed in the trust store amounts to, so -days 3650 normally works; lower it to -days 397 if you do run into the error.
After that, copy /etc/cockpit/ws-certs.d/10-device.cert to the machine you open the web console from, and add it to the trust store of that machine. The 10-device.key file is the private key of the certificate; it must never leave the device.
Install the A/B Update page for Cockpit
The page consists of static files only, so it belongs in the slot image next to the package. Copy the cockpit/abupdate folder to /usr/share/cockpit/abupdate:
sudo cp -r cockpit/abupdate/. /usr/share/cockpit/abupdate
This repository is not reachable from inside the chroot, so run the command from outside it and prefix the destination with the mount point of the slot, for example /tmp/slotA/usr/share/cockpit/abupdate.
The page appears in the Cockpit menu only if /usr/bin/rauc exists, so make sure rauc is installed in the same slot. Otherwise the menu item is silently hidden.
You can also modify the page settings in /usr/share/cockpit/abupdate/abupdate.config. Reload the page to apply the changes.
Table 2 - A/B Update page settings.
| Variable | Default | Description |
|---|---|---|
staging_directory | /var/tmp/abupdate | Directory on this system where uploaded bundles are stored. It is created if it does not exist. |
bundle_extensions | .raucb | File name extensions the file chooser offers and the page accepts, separated by commas. Matching ignores case. Leave the value empty to accept any file. |
free_space_margin | 64M | How much room to leave free on the target filesystem. An upload is refused when the bundle would not fit within this reserve. Plain bytes or a K, M or G suffix. |
chunk_bytes | 8M | Bytes per chunk. This is also the upper bound of data in flight, so it trades memory against per-chunk round-trip overhead. Plain bytes or a K, M or G suffix. |
superuser | try | How the upload helpers run. try uses administrative access when the session has it and stays unprivileged otherwise; require refuses to upload without it. |
The superuser setting covers the upload only. Installing a bundle, switching the primary slot and rebooting always need administrative access, whatever it is set to. When the session does not have it, the page says so as soon as a file is picked, so a large bundle is not transferred just to be refused at the install step.
It is recommended to change staging_directory if your update bundles are large. The default directory is on the rootfs slot, which is only a few gigabytes in this guide, so the /home partition is a better place, for example /home/abupdate.
How to use Linux Cockpit A/B Update
Upload update bundle
Here is the OS update menu. Drag an update bundle onto the drop zone, or click Choose file and pick the file.
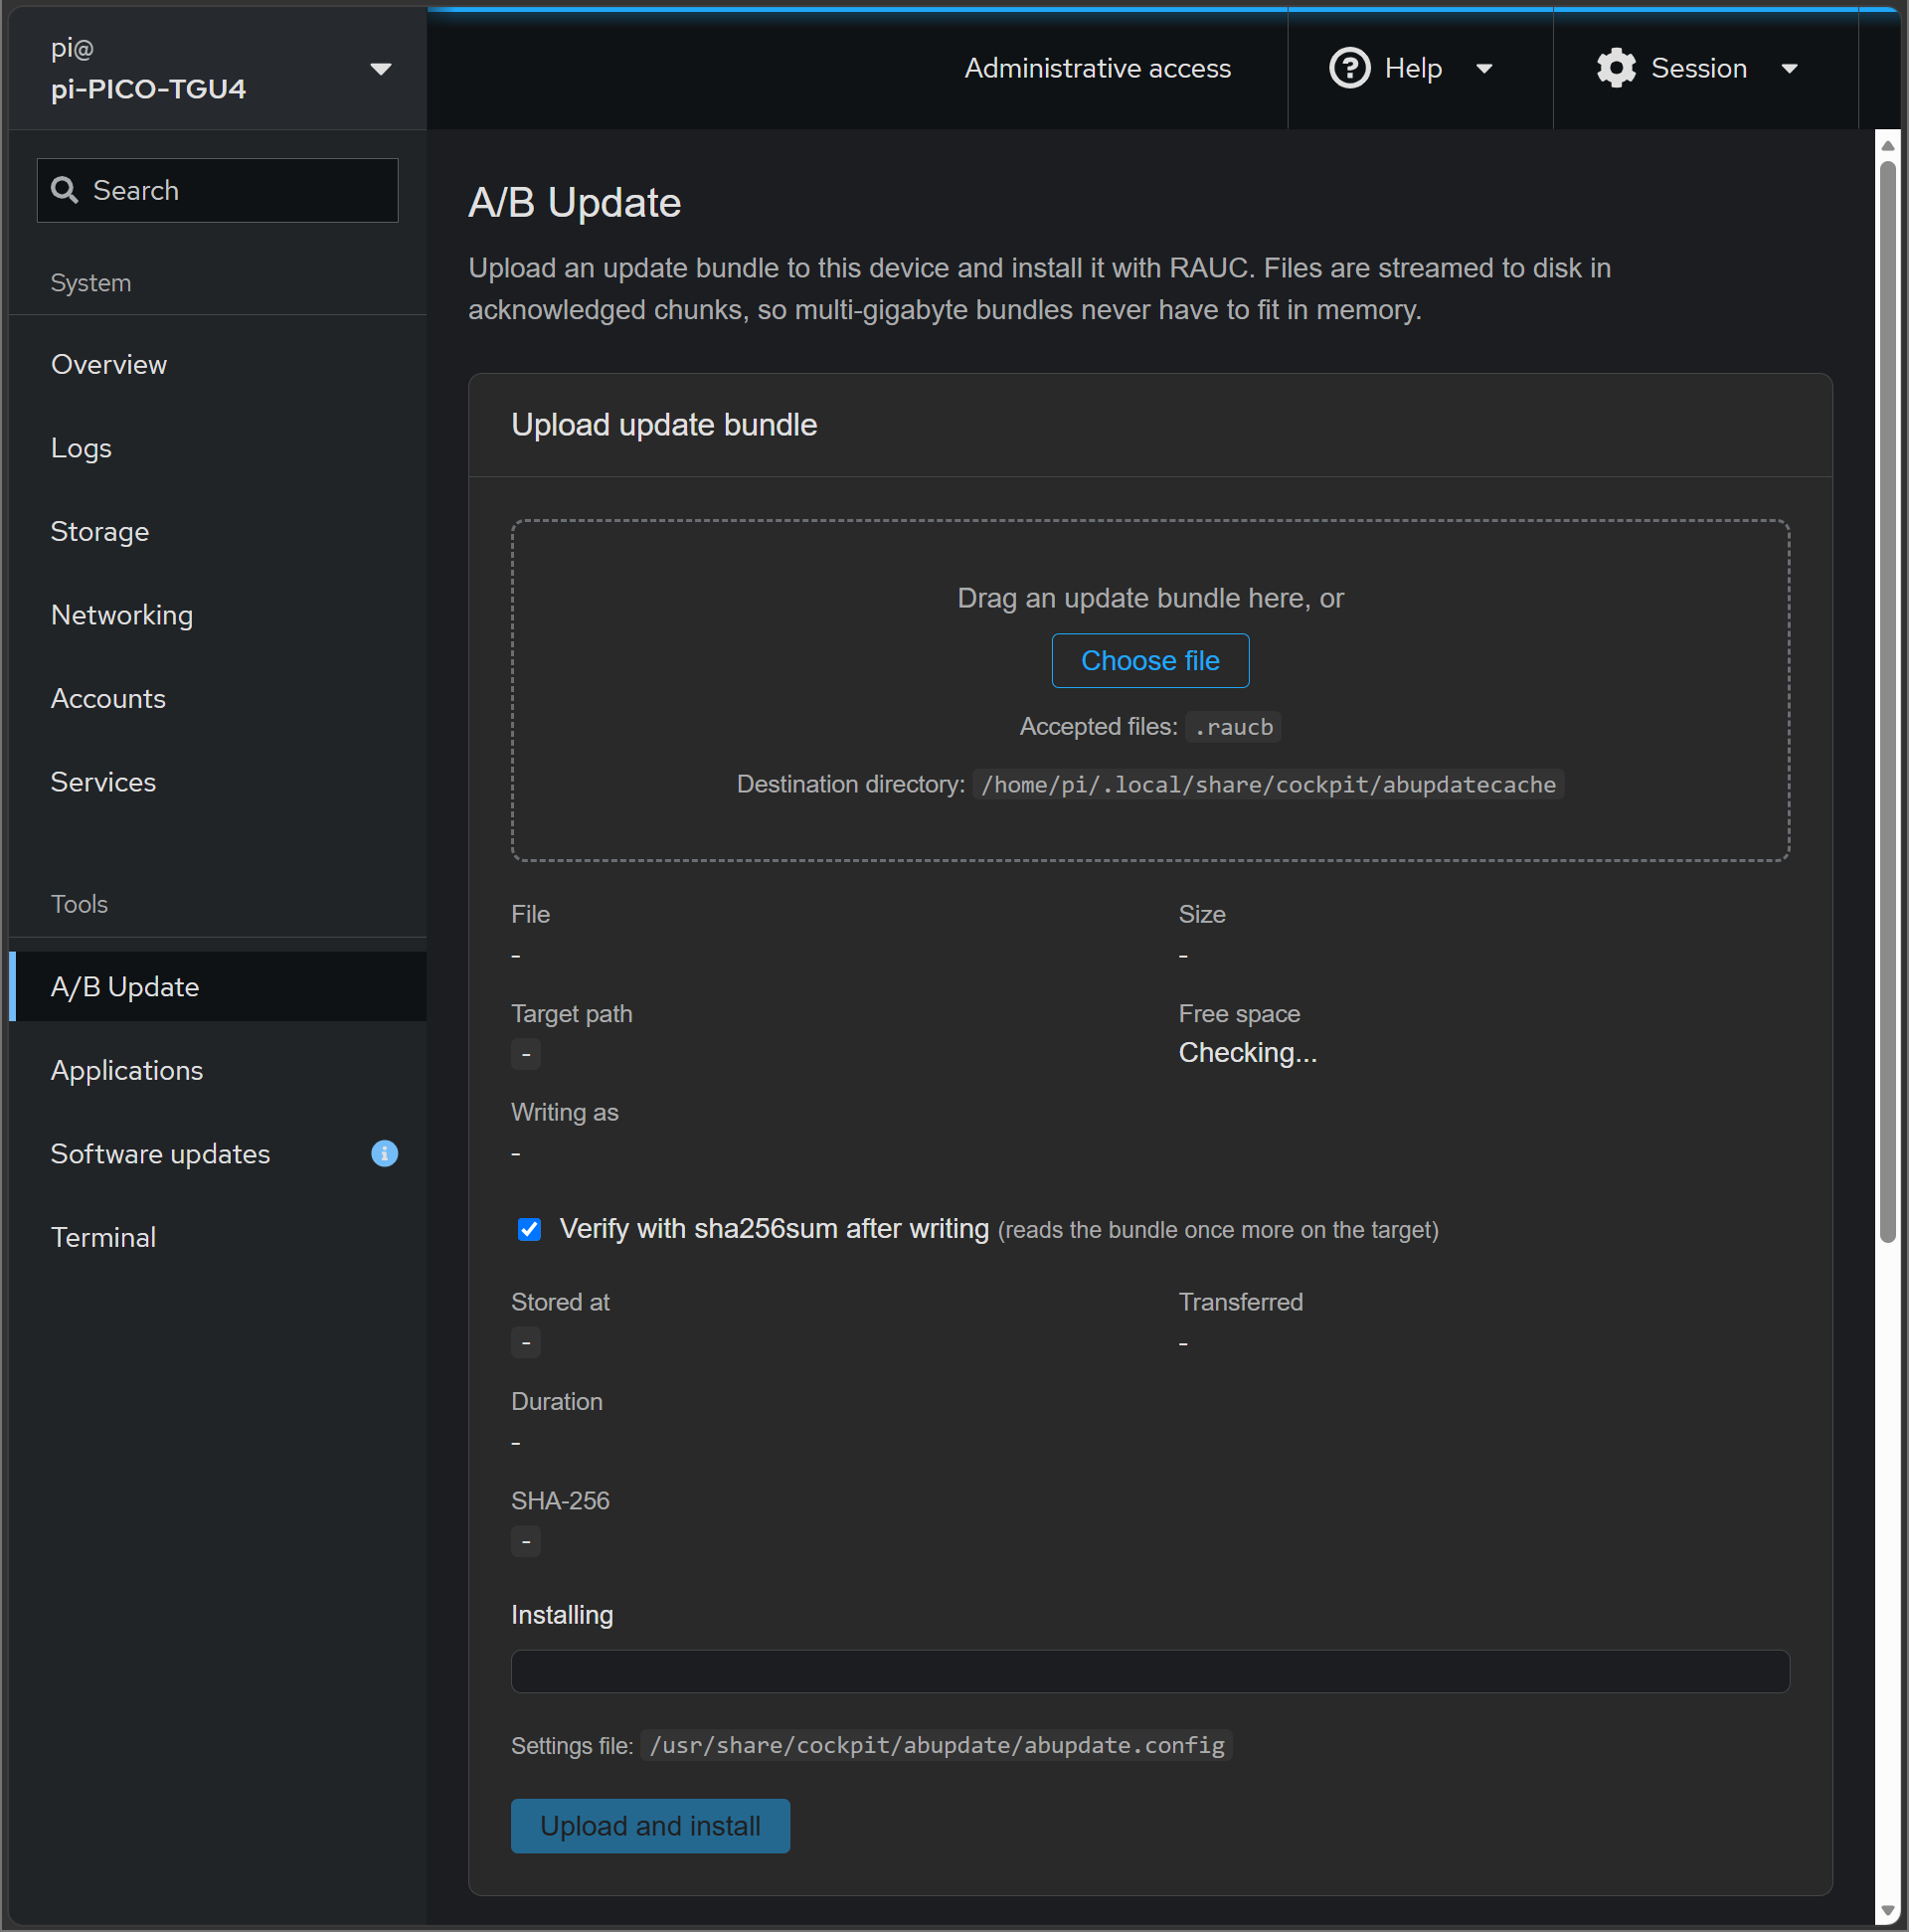
The menu shows the following information:
- File - the file name.
- Size - the file size.
- Target path - where the file is stored.
- Free space - the free space on the filesystem that holds the target directory.
- Writing as - the user the file is written as.
If a file with the same name already exists in the target directory, the menu warns that it will be replaced once the upload completes.
The Verify with sha256sum after writing checkbox is selected by default. It reads the bundle once more on the device and compares the checksum. You can clear it to save time on large bundles.
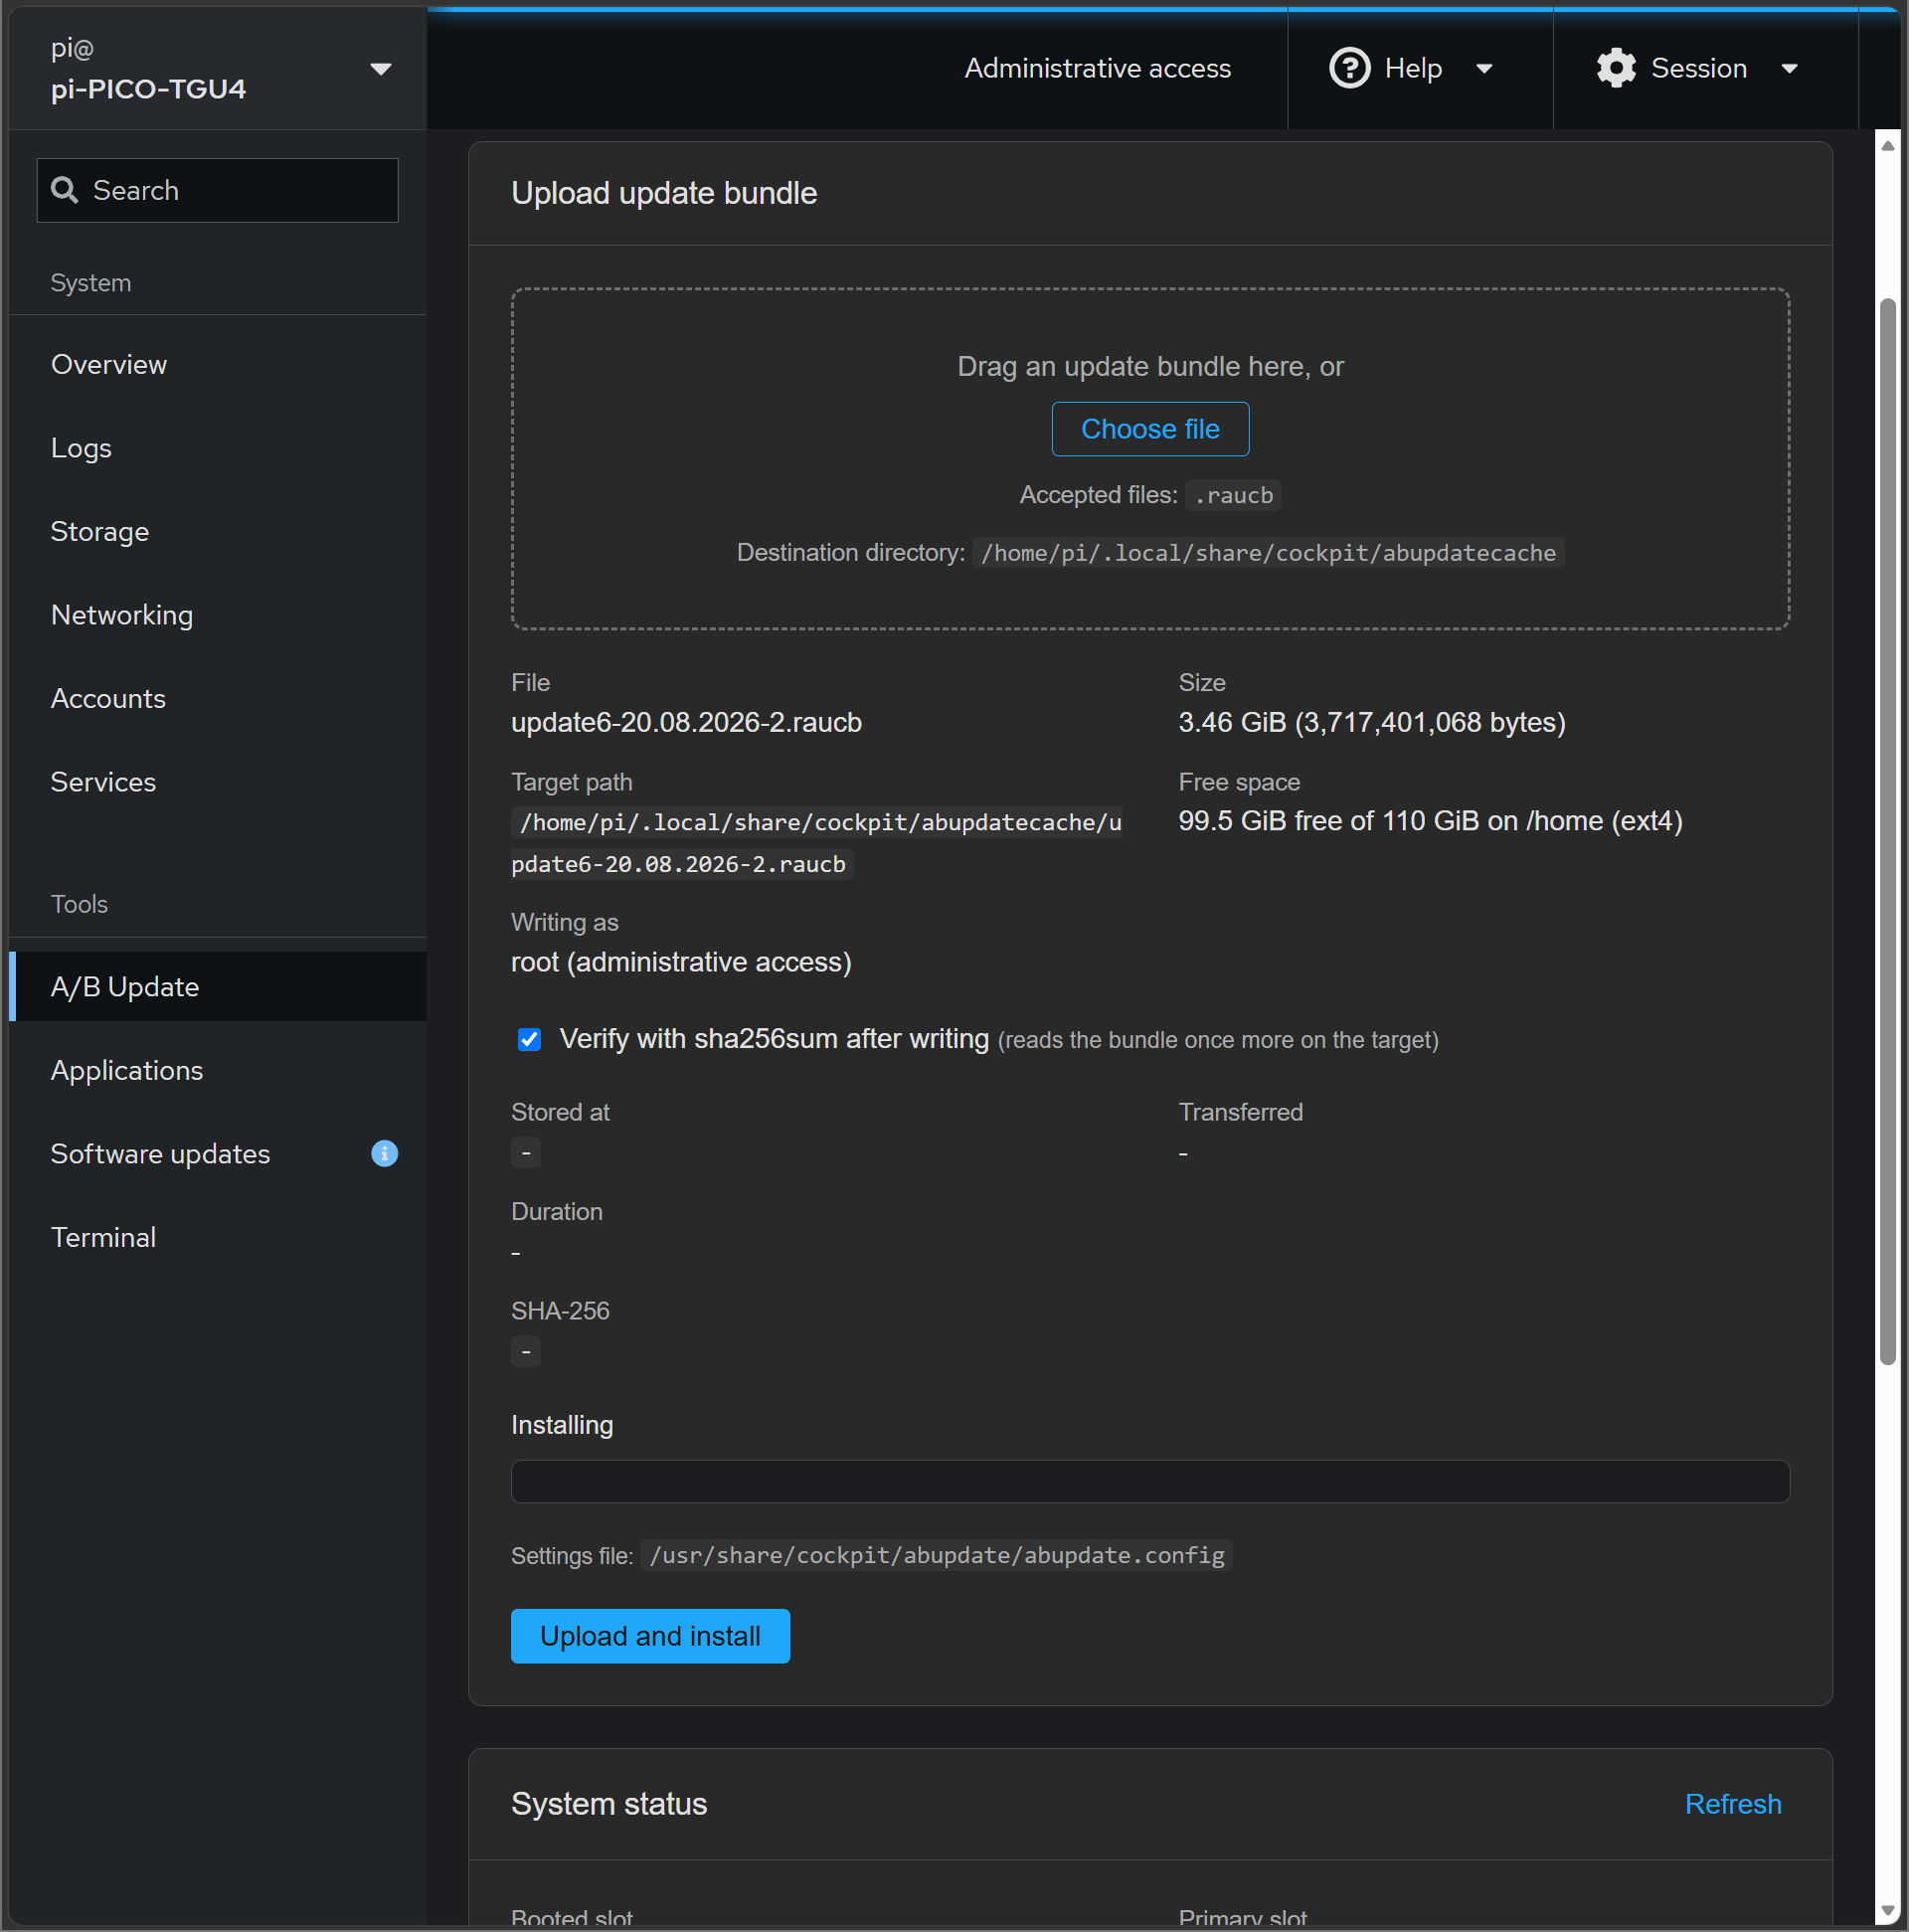
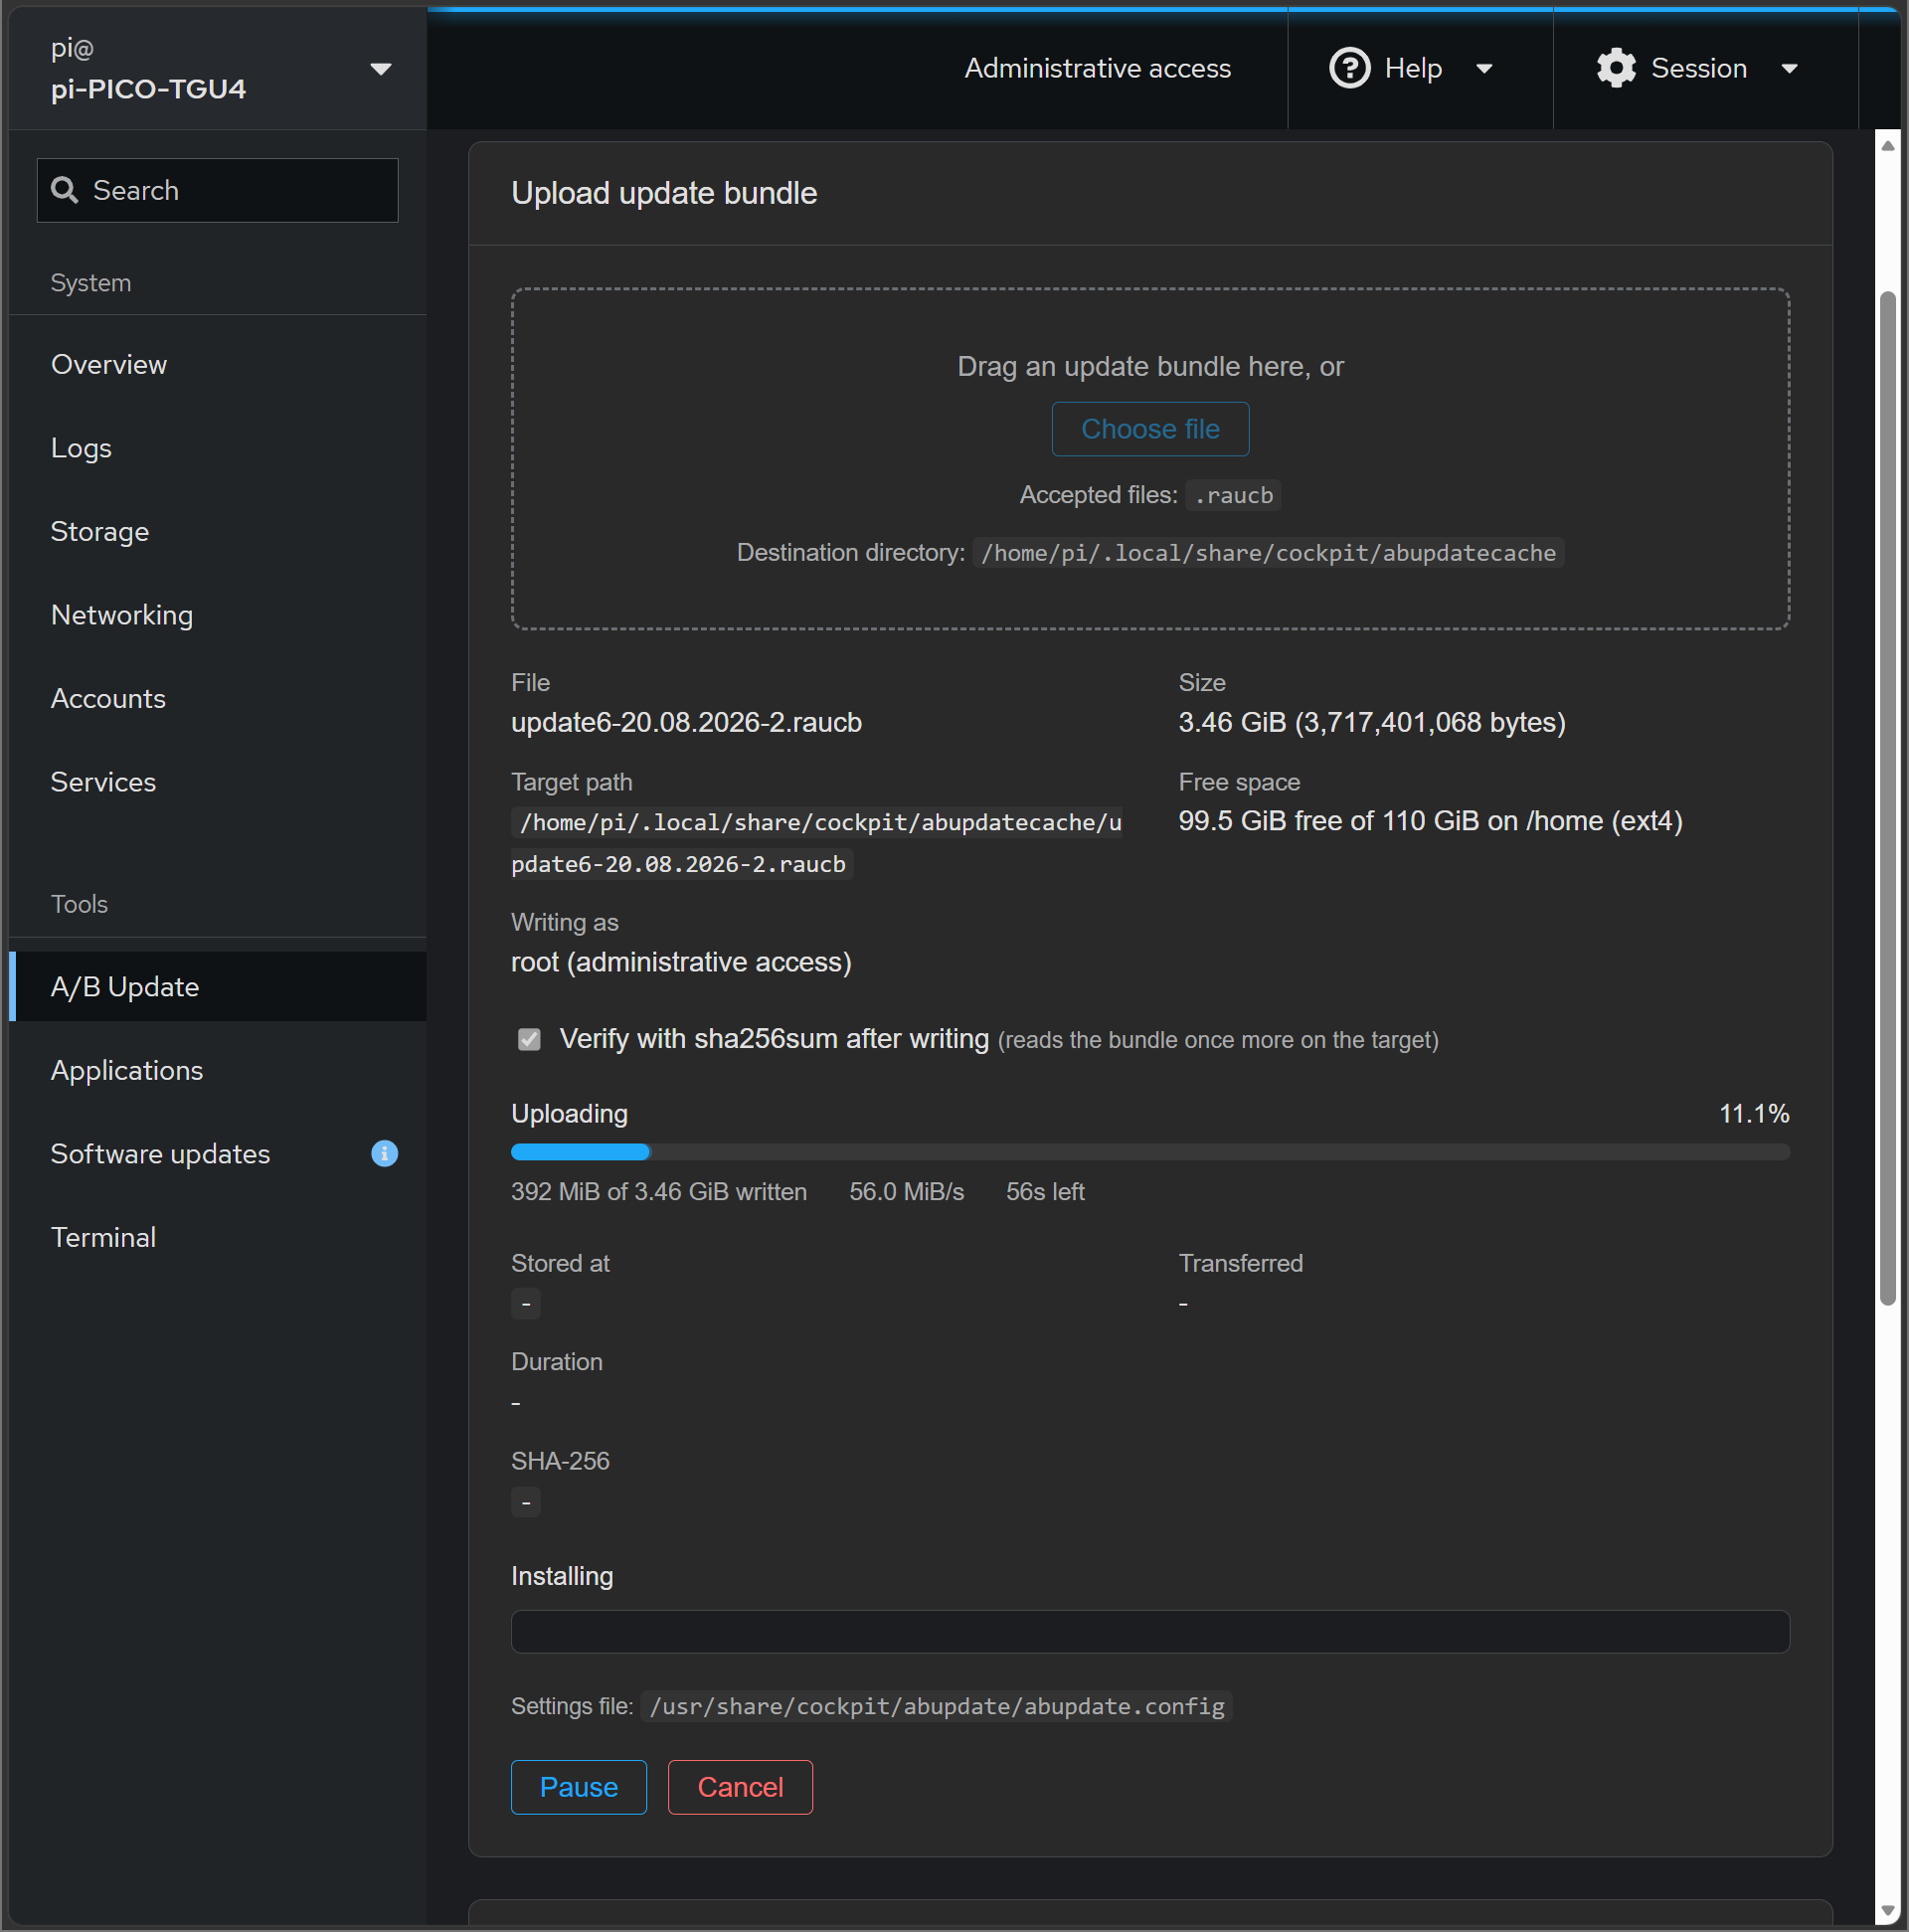
Click Upload and install. The file is uploaded to the device in chunks, so the menu shows the progress, the transfer rate and the remaining time. You can suspend the transfer with Pause and stop it with Cancel.
After a successful upload and check, the menu shows the SHA-256 checksum and starts installing the update.
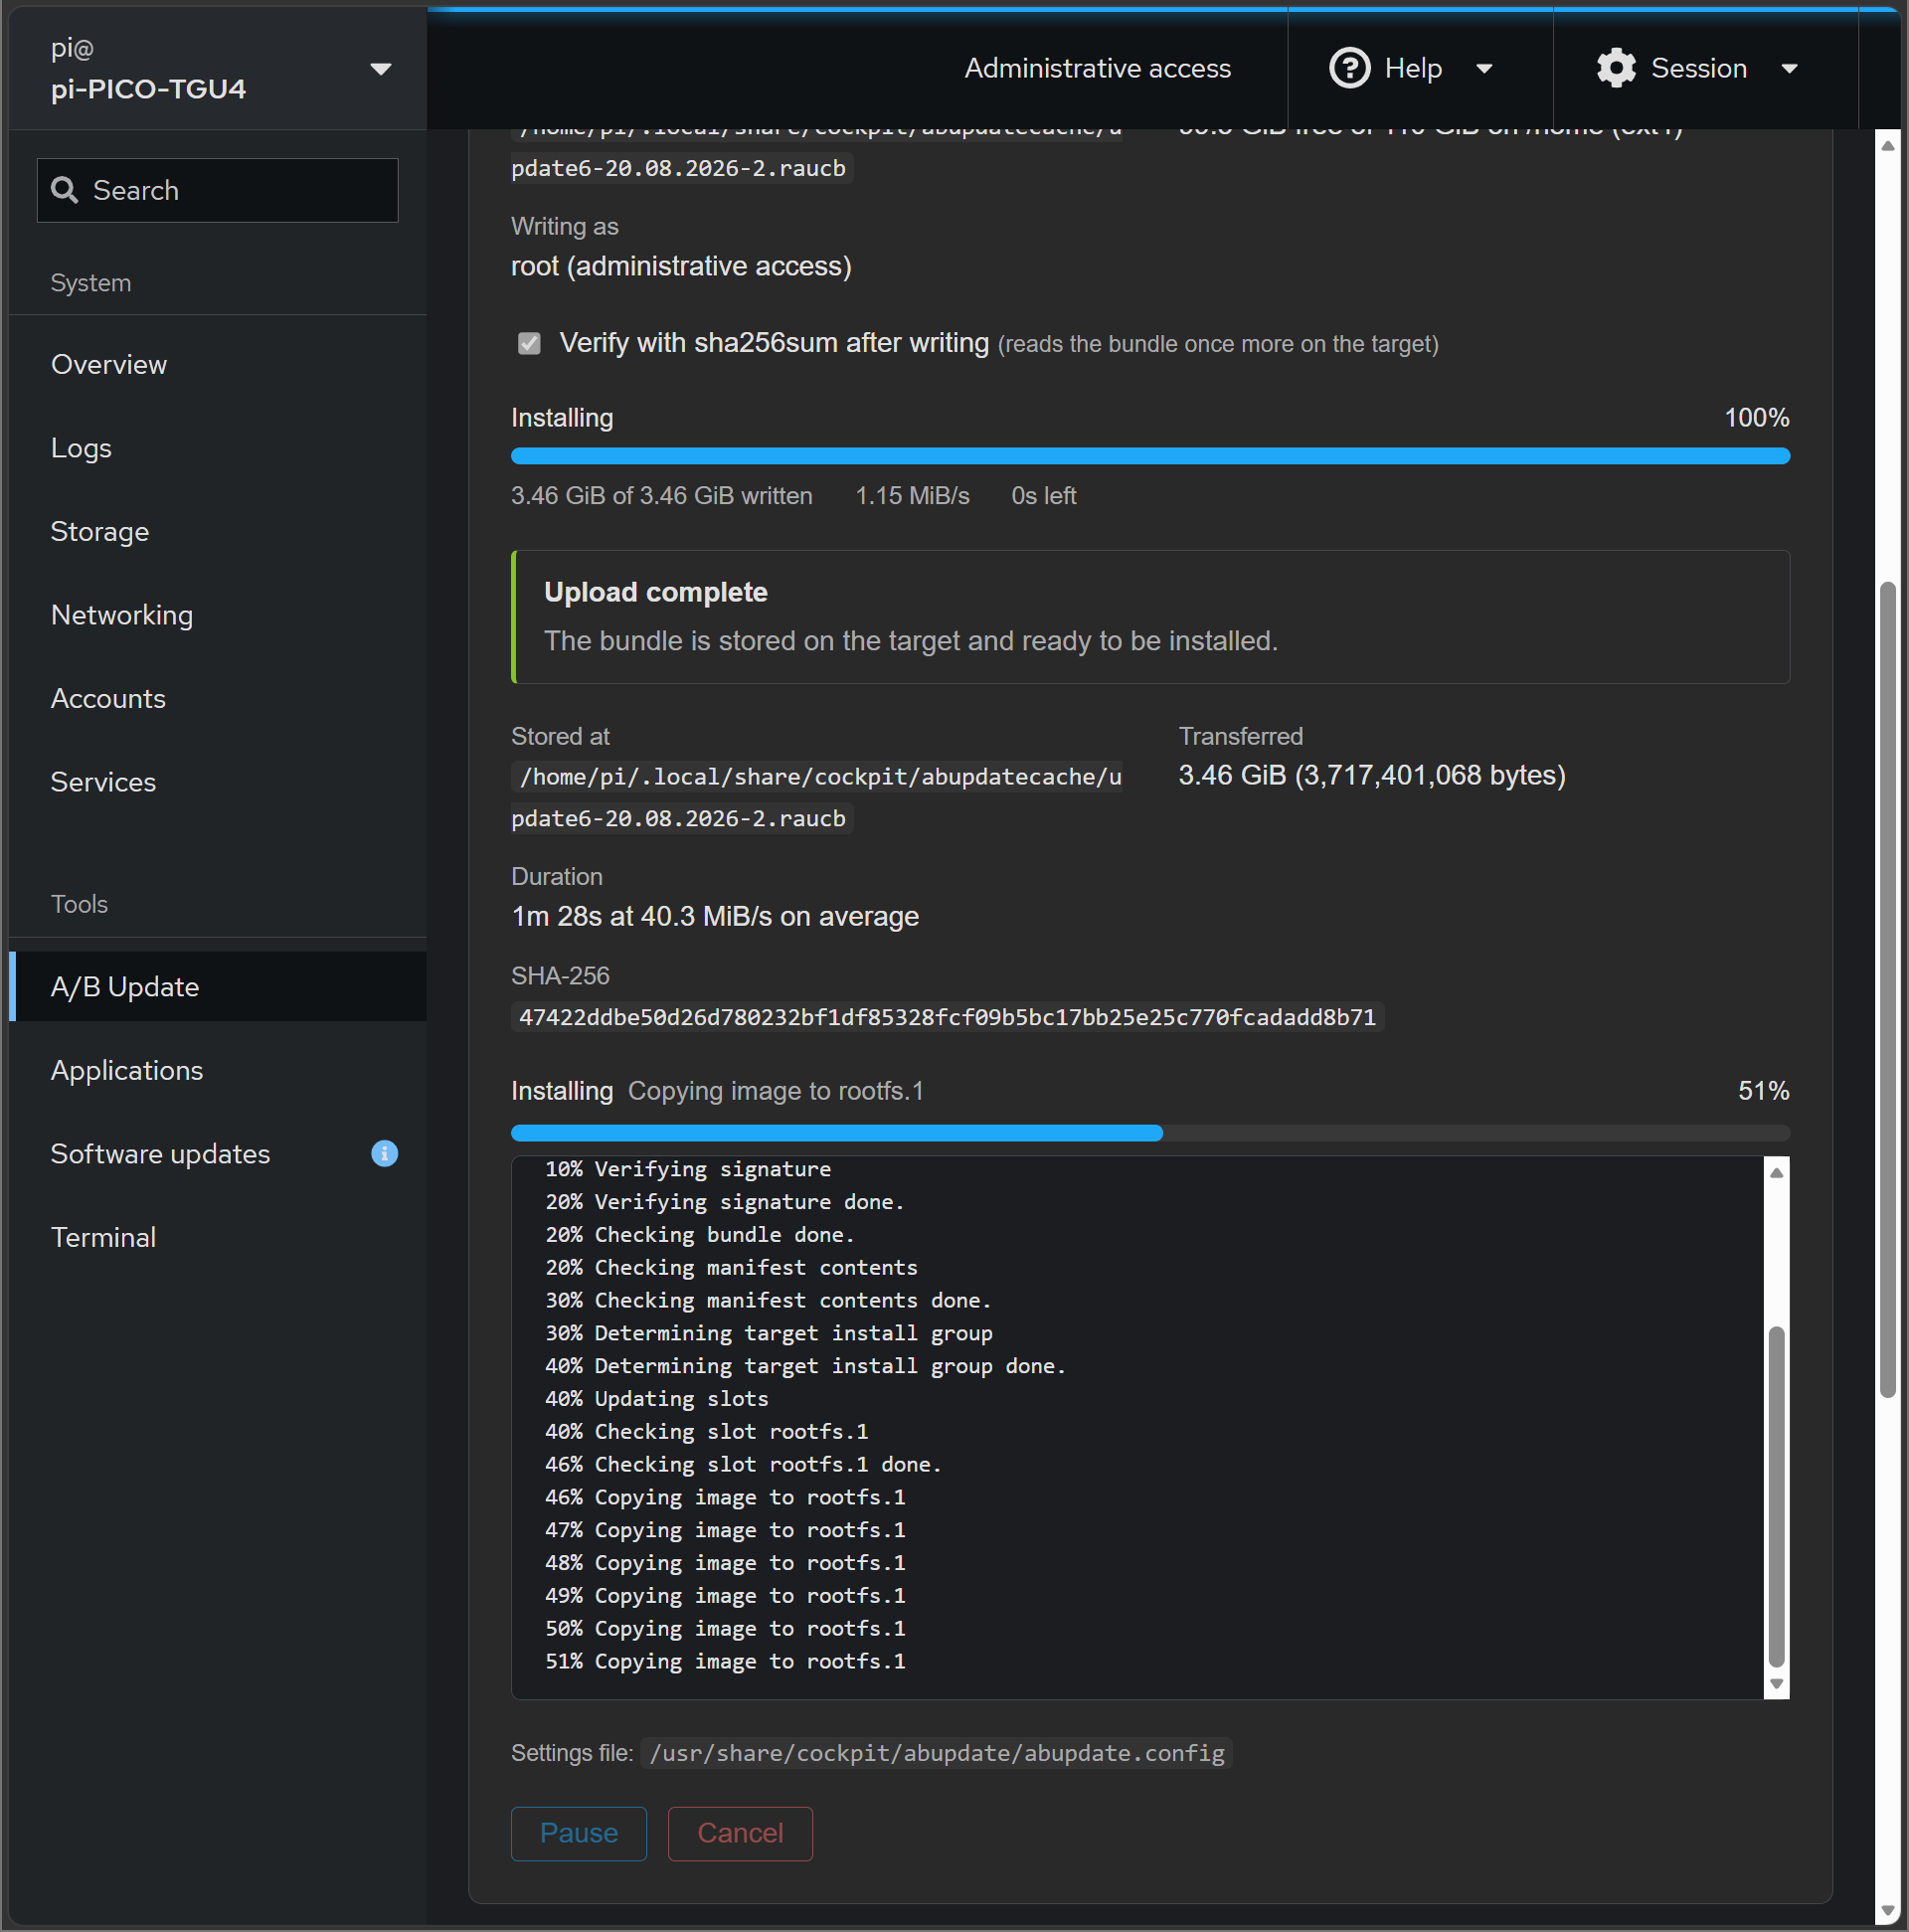
After a successful installation, the menu shows the result: where the bundle is stored, how much data was transferred and how long it took. Upload another file clears the form for the next bundle.
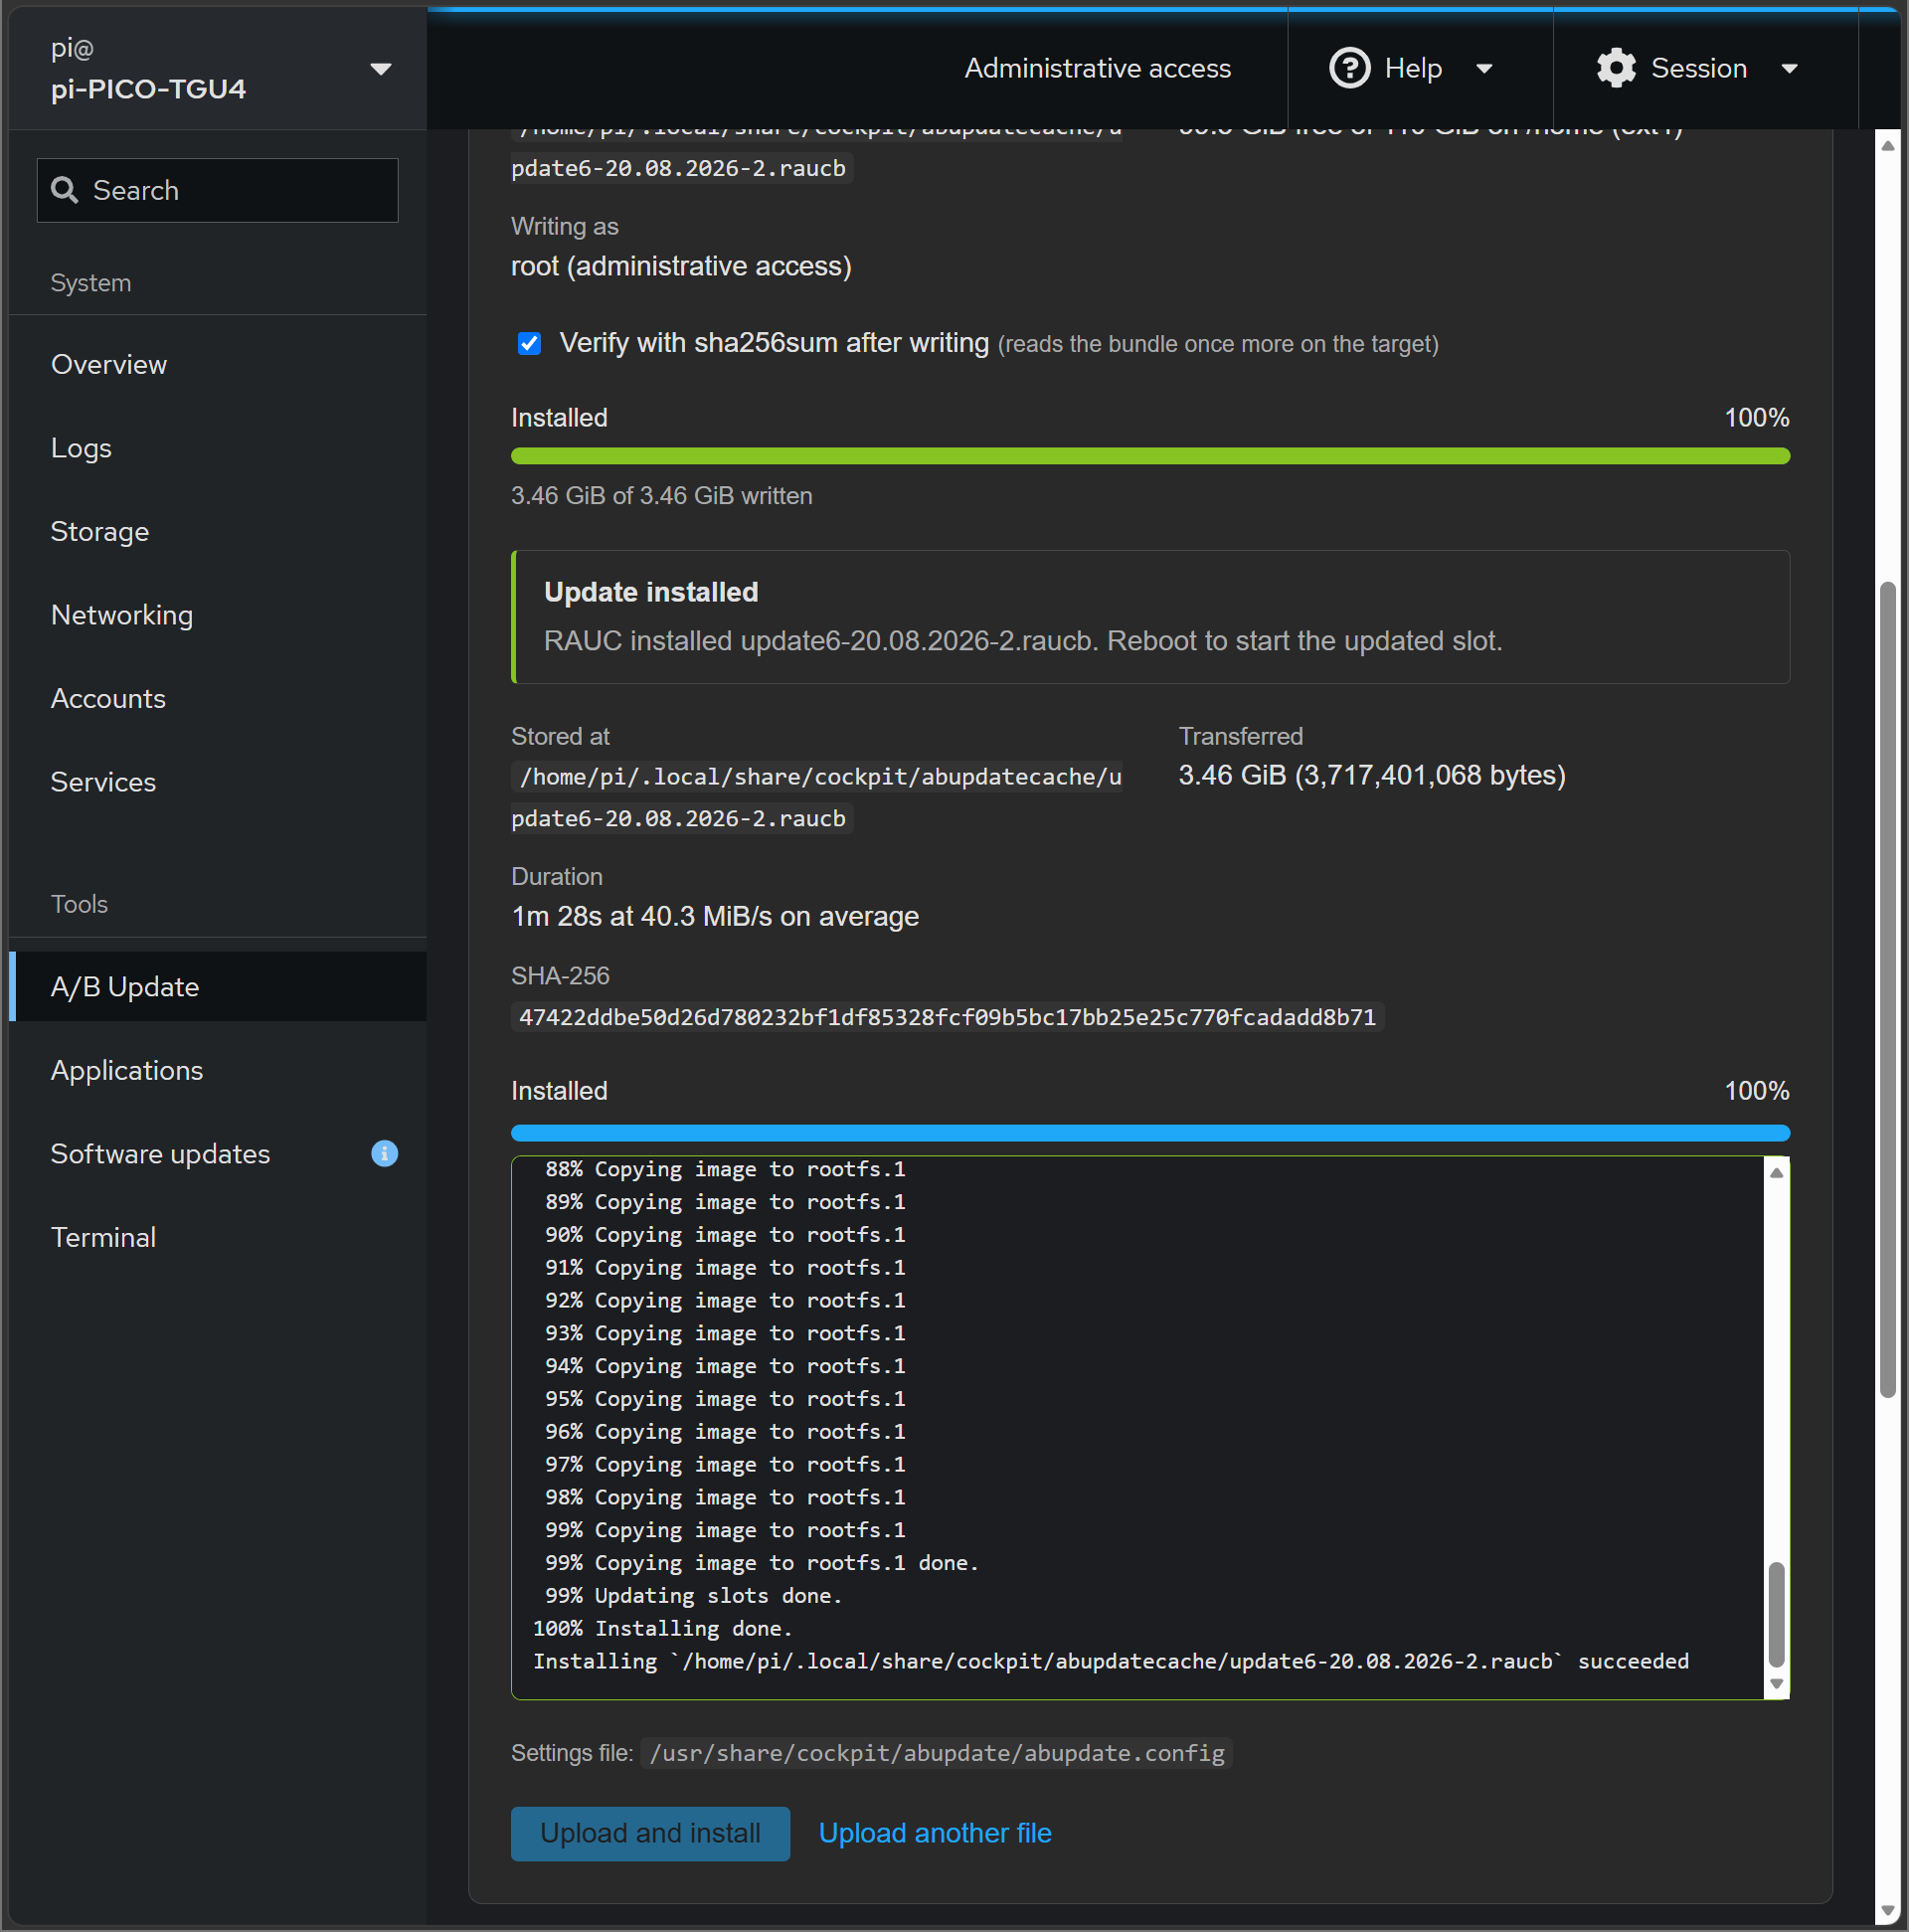
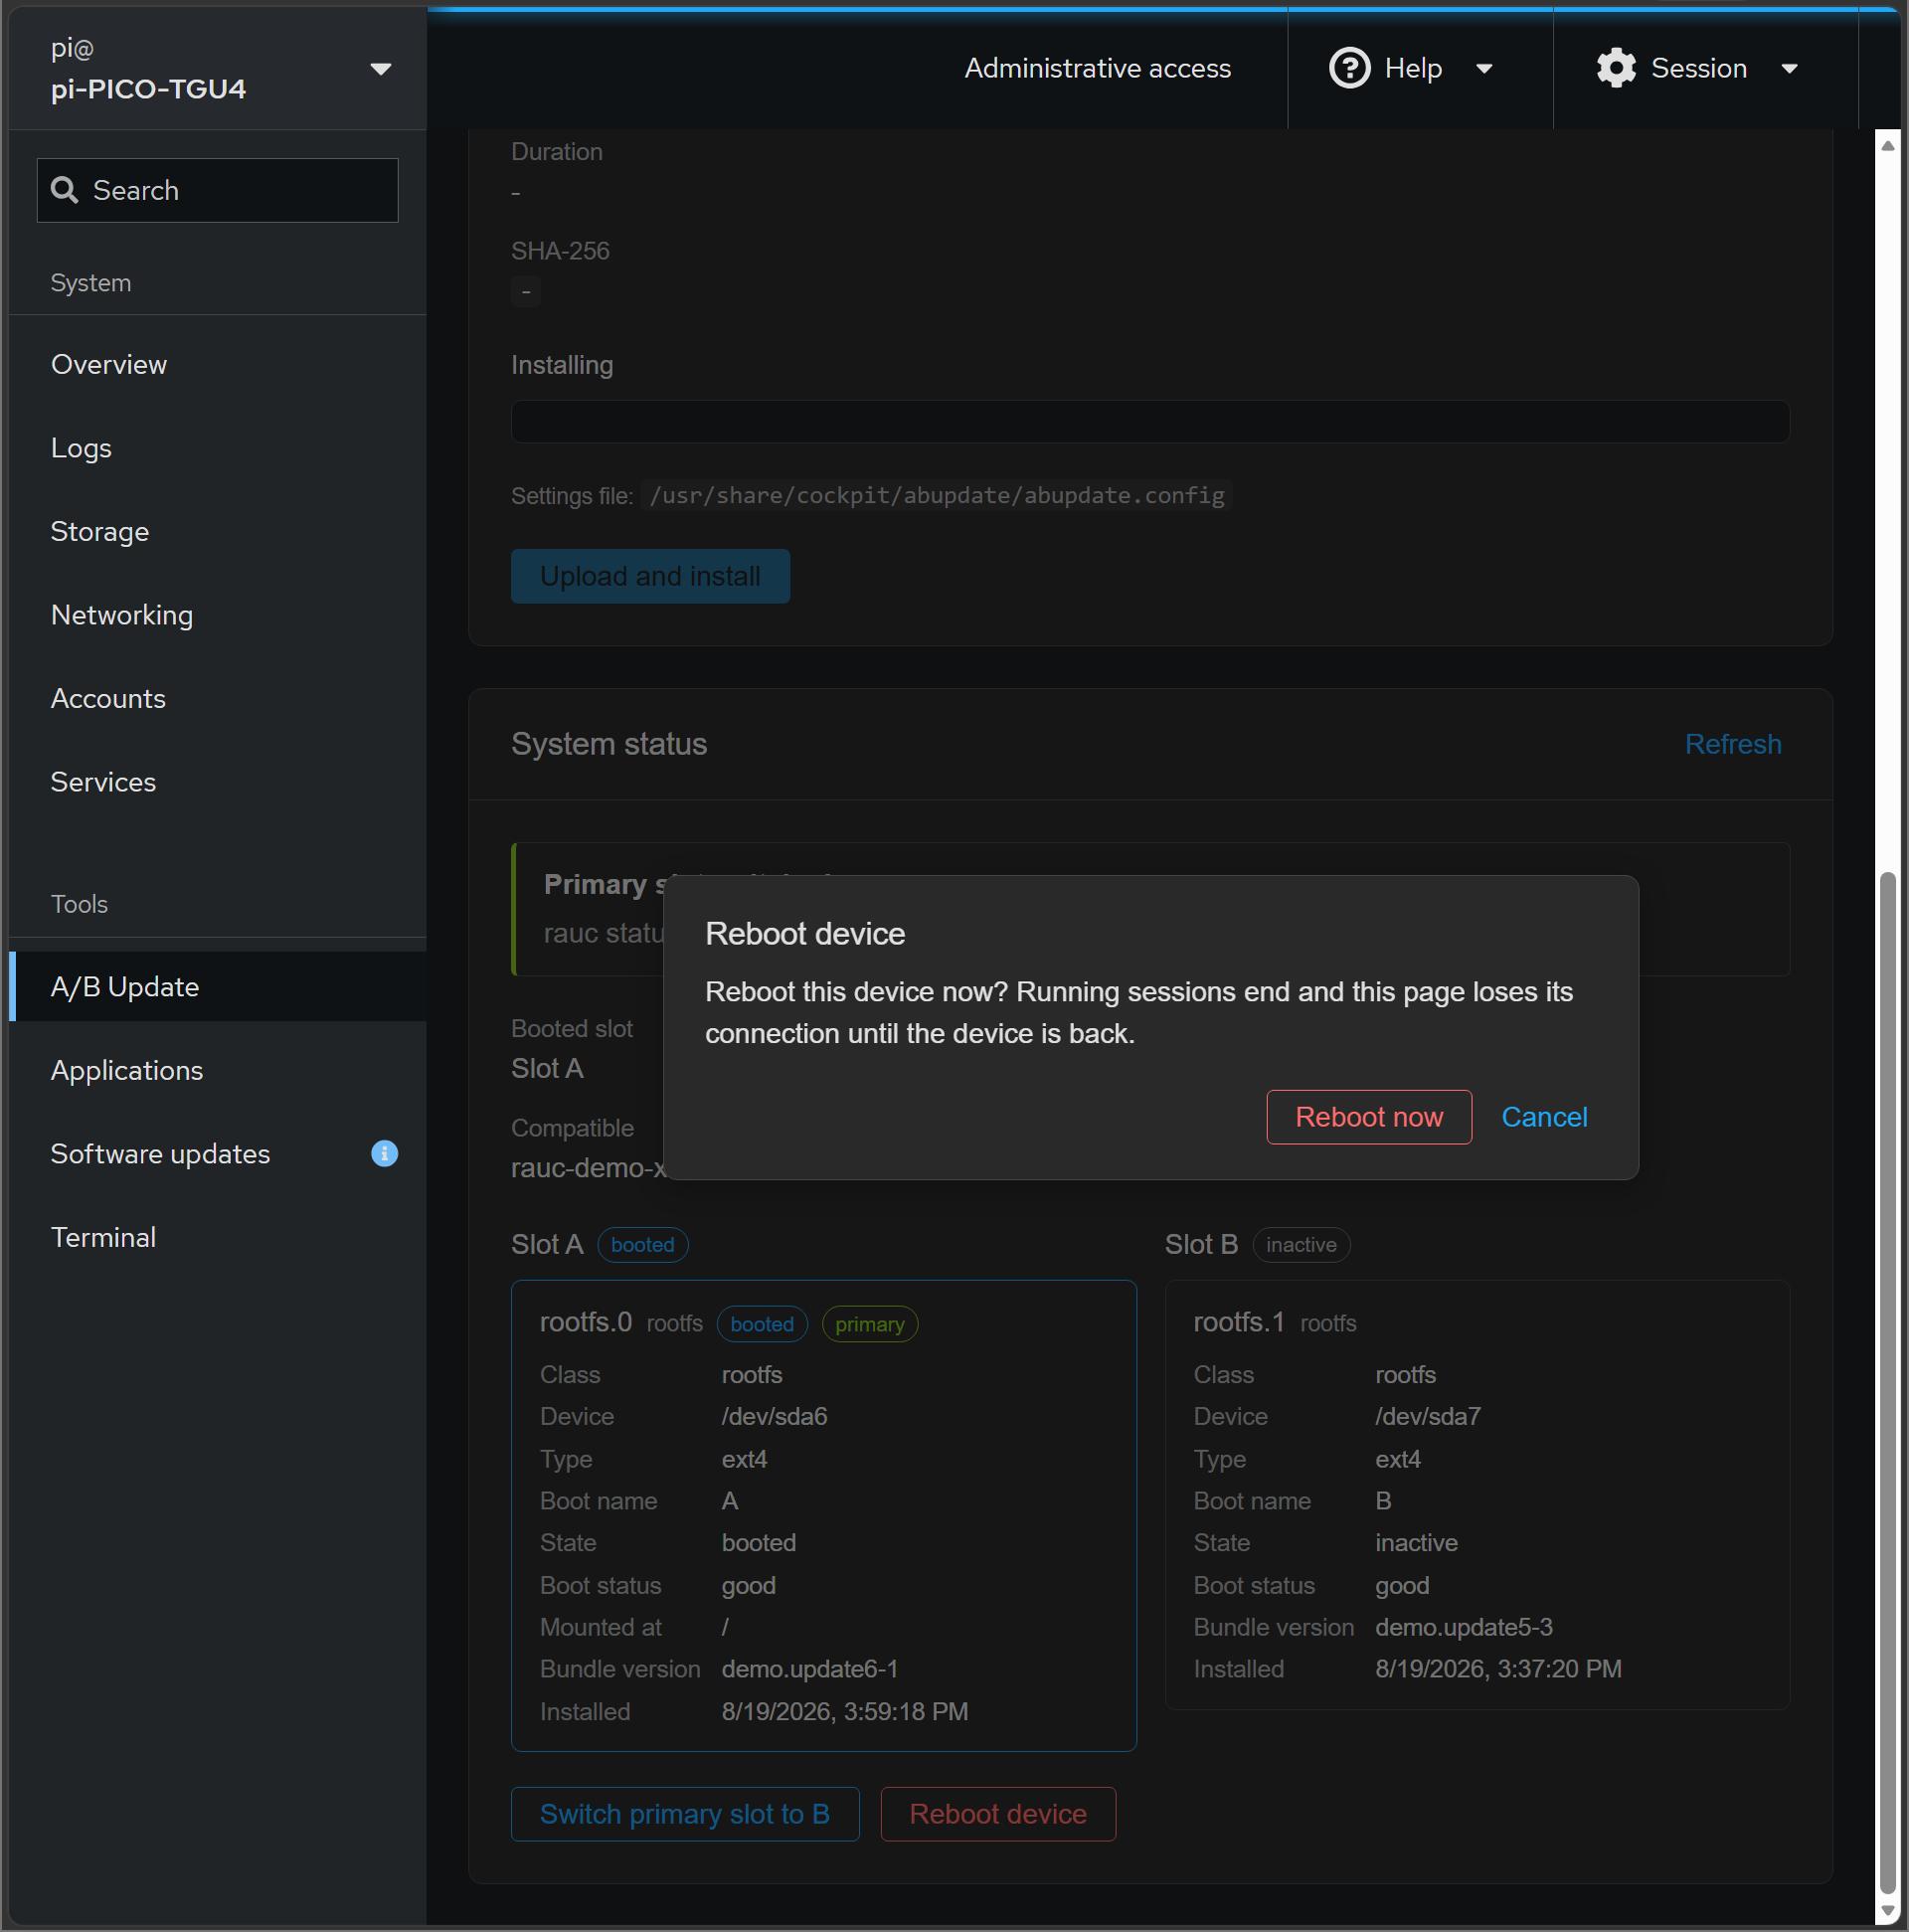
The installed system starts only after a reboot. You can reboot the device with Reboot device in the System status section. It asks for confirmation first.
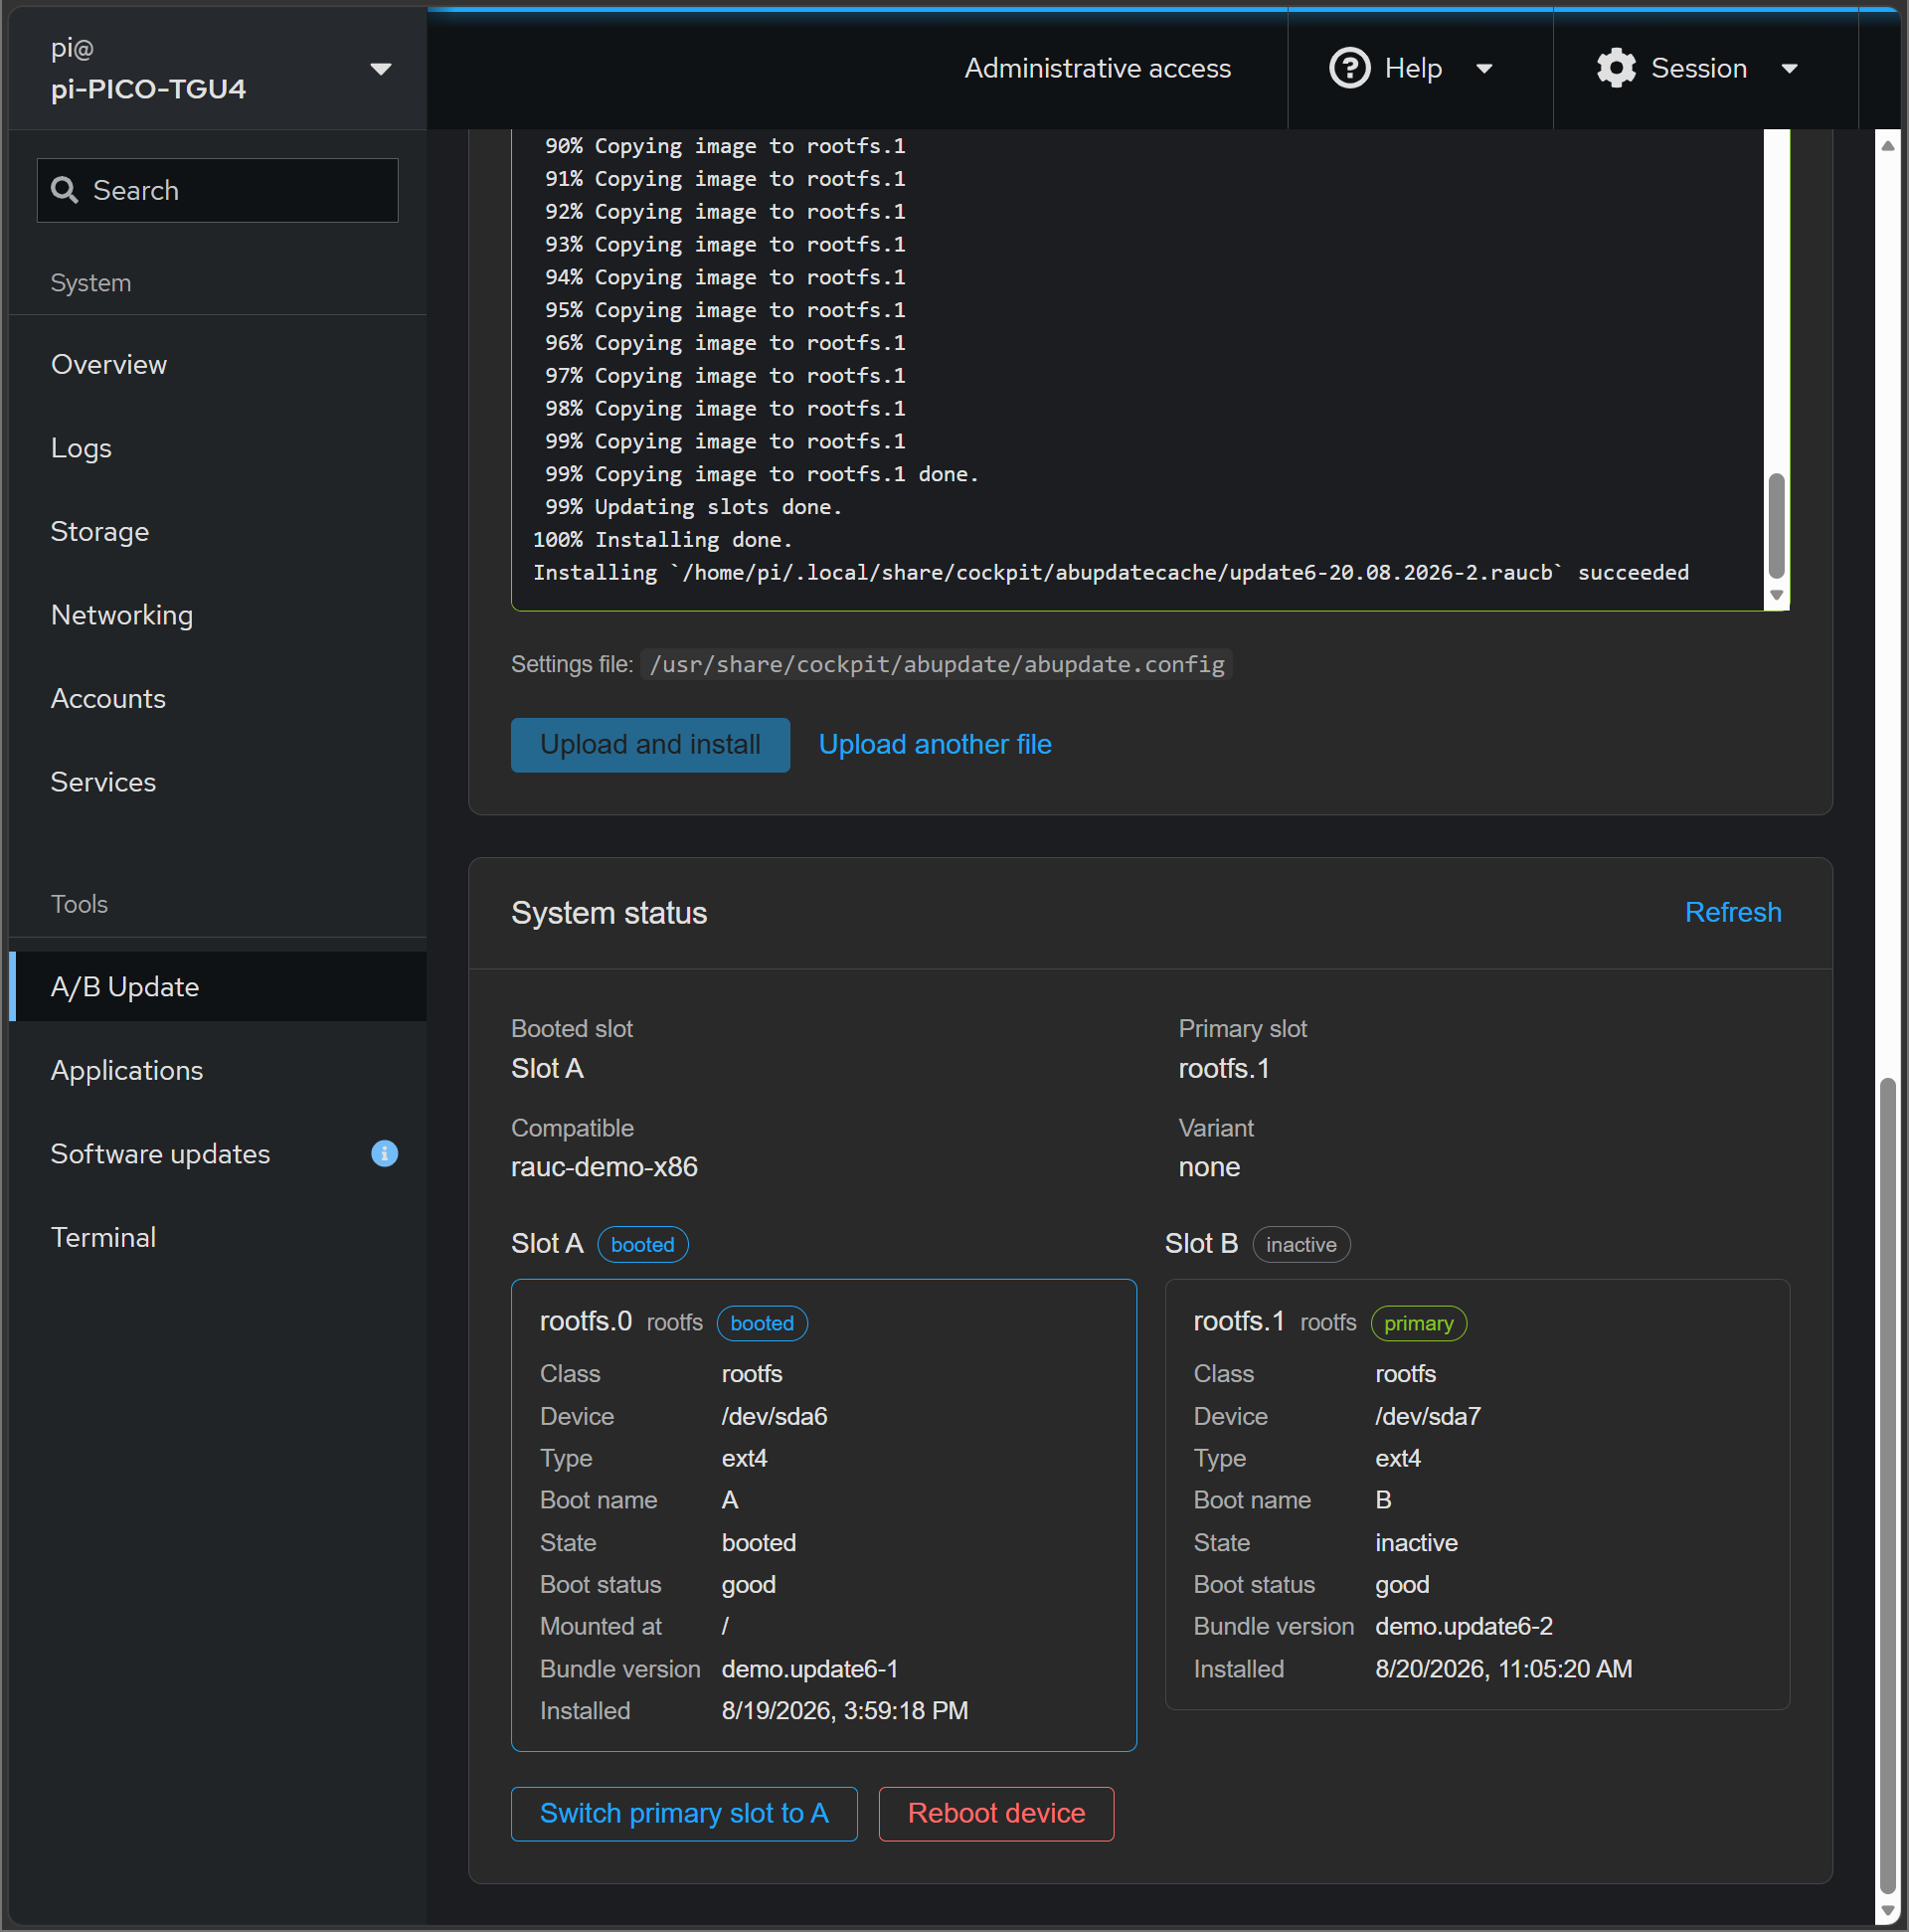
System status menu
Here you can get the following information:
- Booted slot - the slot the device is running from right now.
- Primary slot - the slot the device boots next.
- Compatible - the device code name. It must match the
compatiblefield of the bundle manifest. - Variant - the device variant.
- Slot information. The slots are grouped by boot name, and each of them shows:
- Class - the slot class from
system.conf, for examplerootfs. Slots of the same class replace each other during an update. - Device - the block device of the slot, for example
/dev/sda2. - Type - the filesystem type, for example
ext4. - Boot name - the name the bootloader uses for the slot,
AorB. - State - whether the slot is
booted,activeorinactive. - Boot status -
goodorbad. GRUB does not boot abadslot. - Mounted at - where the slot is mounted, if it is mounted at all.
- Parent - the parent slot, for slots that belong to another slot.
- Bundle version - the
versionfield of the bundle installed into the slot. - Installed - when that bundle was installed.
- Class - the slot class from
Slots without a boot name are listed separately.
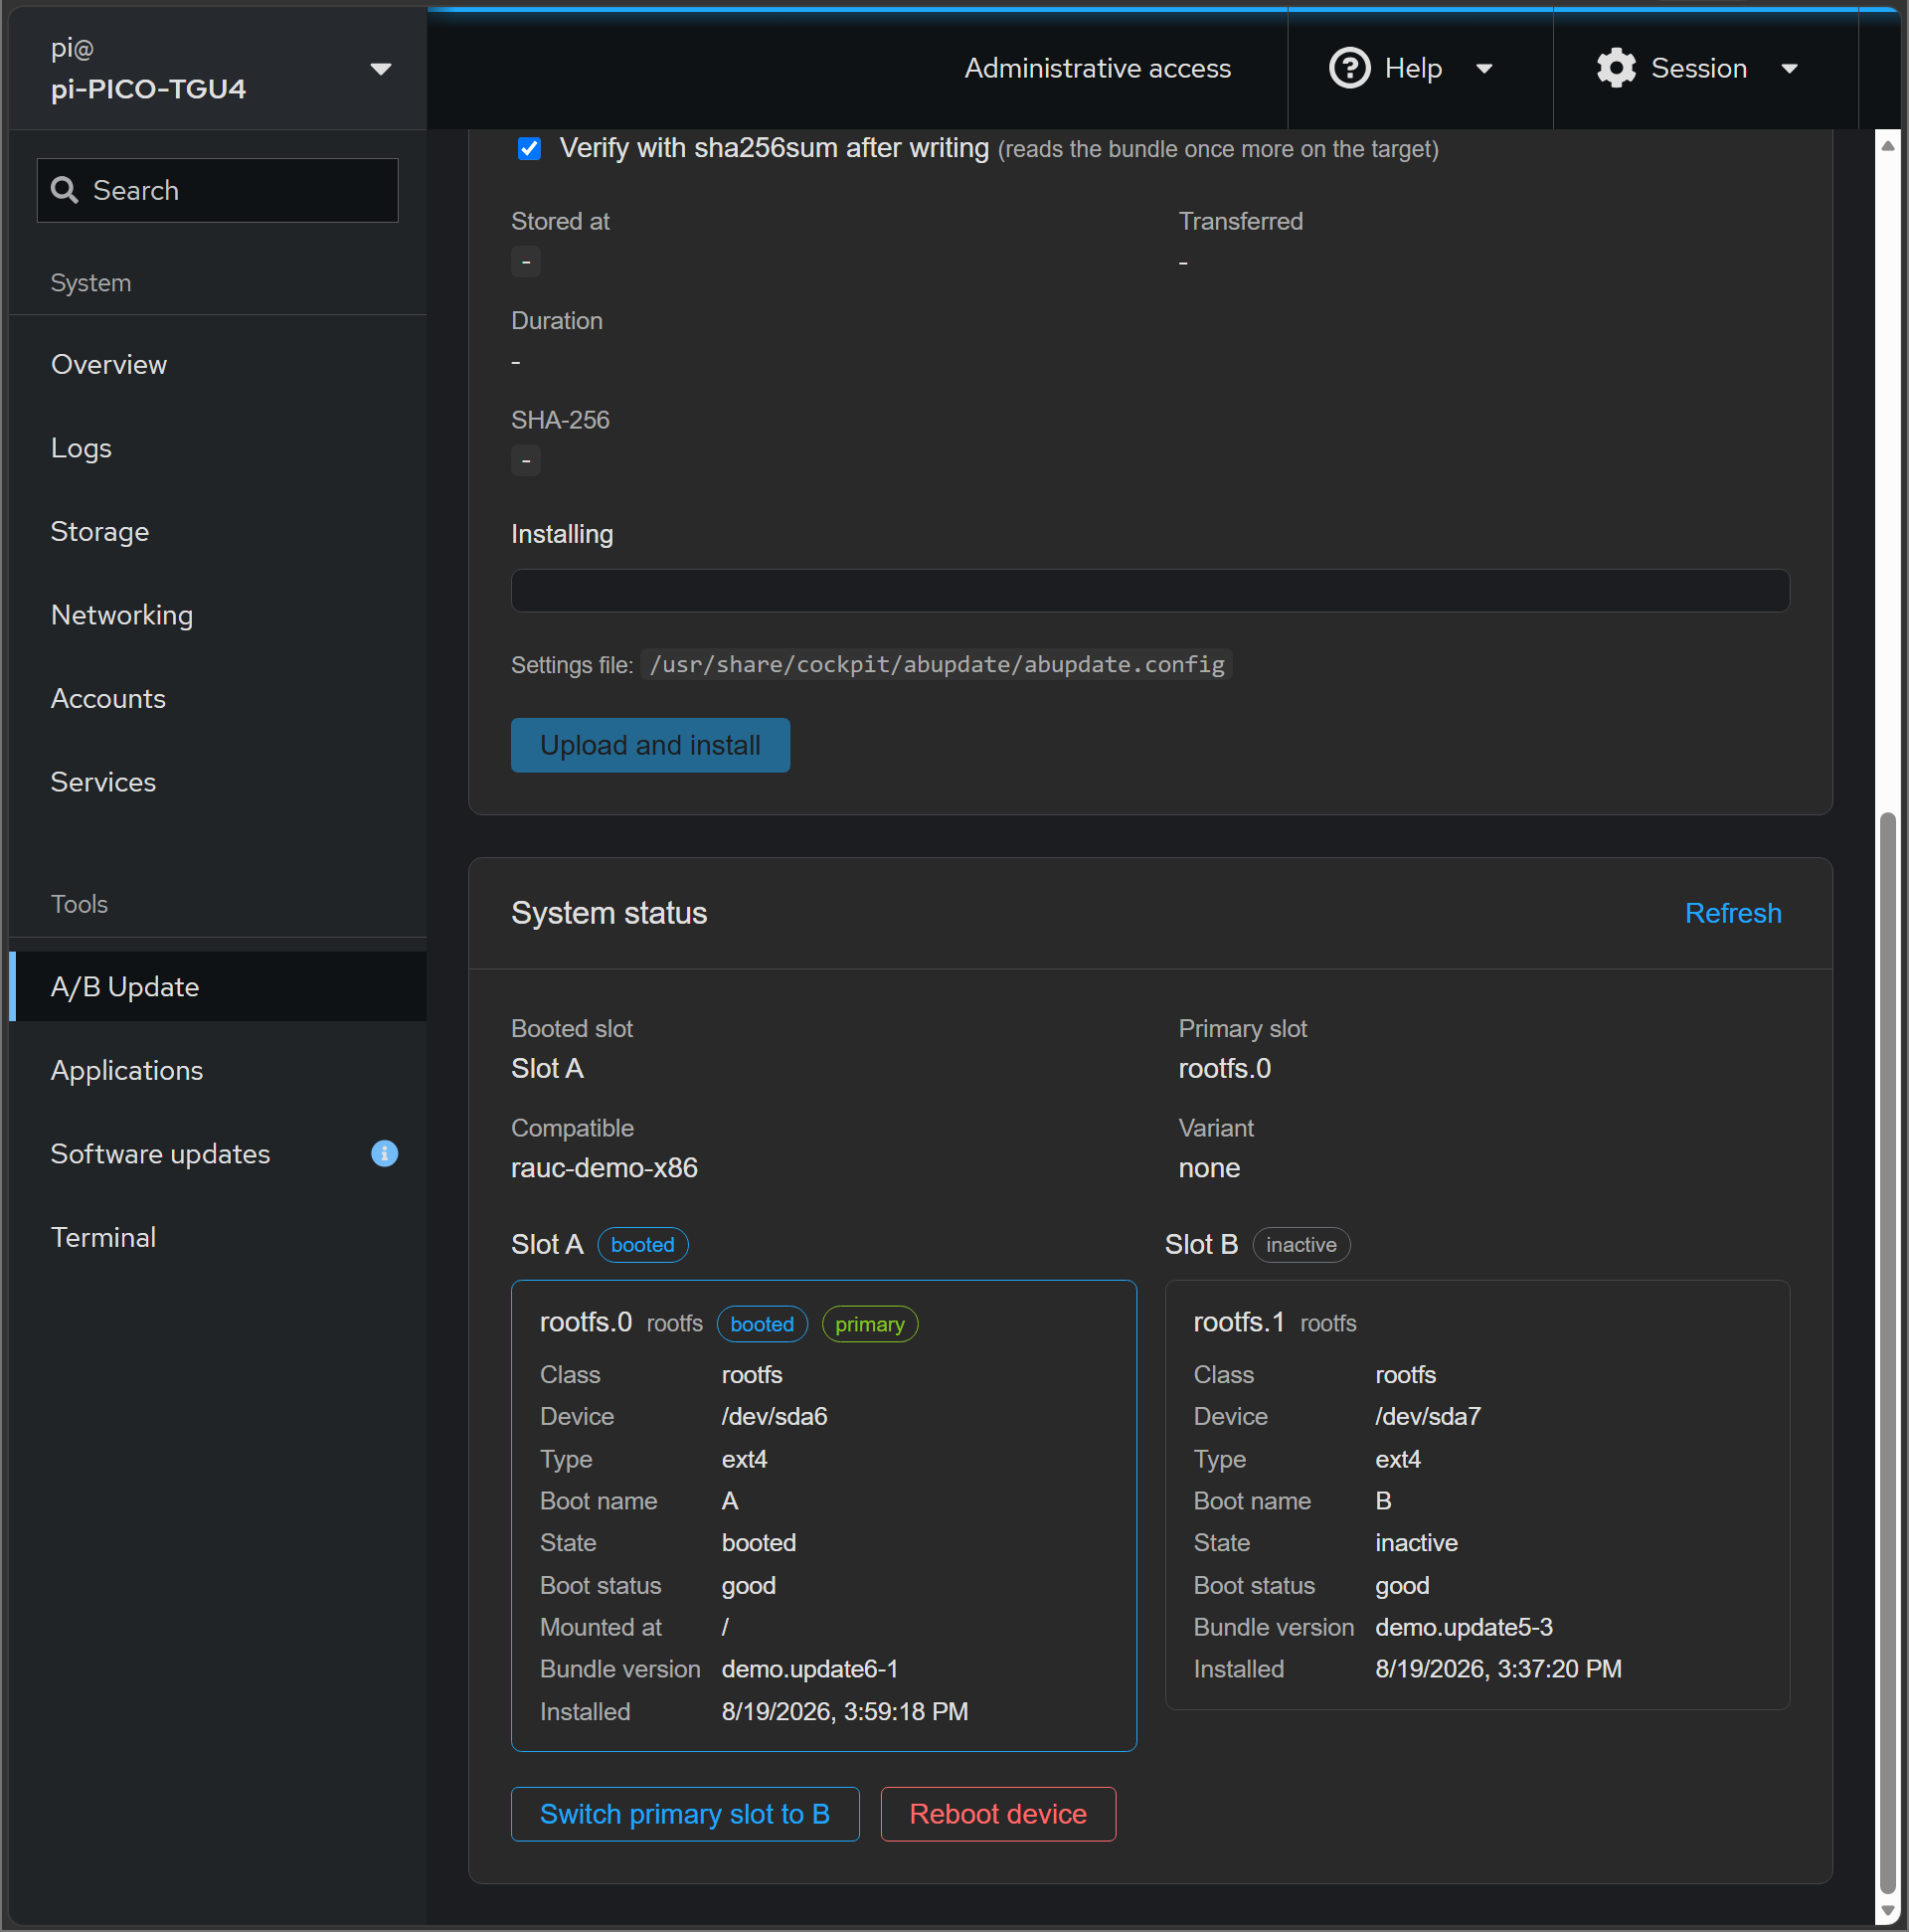
You can switch the primary slot. The running system is left alone; the new slot starts at the next reboot.
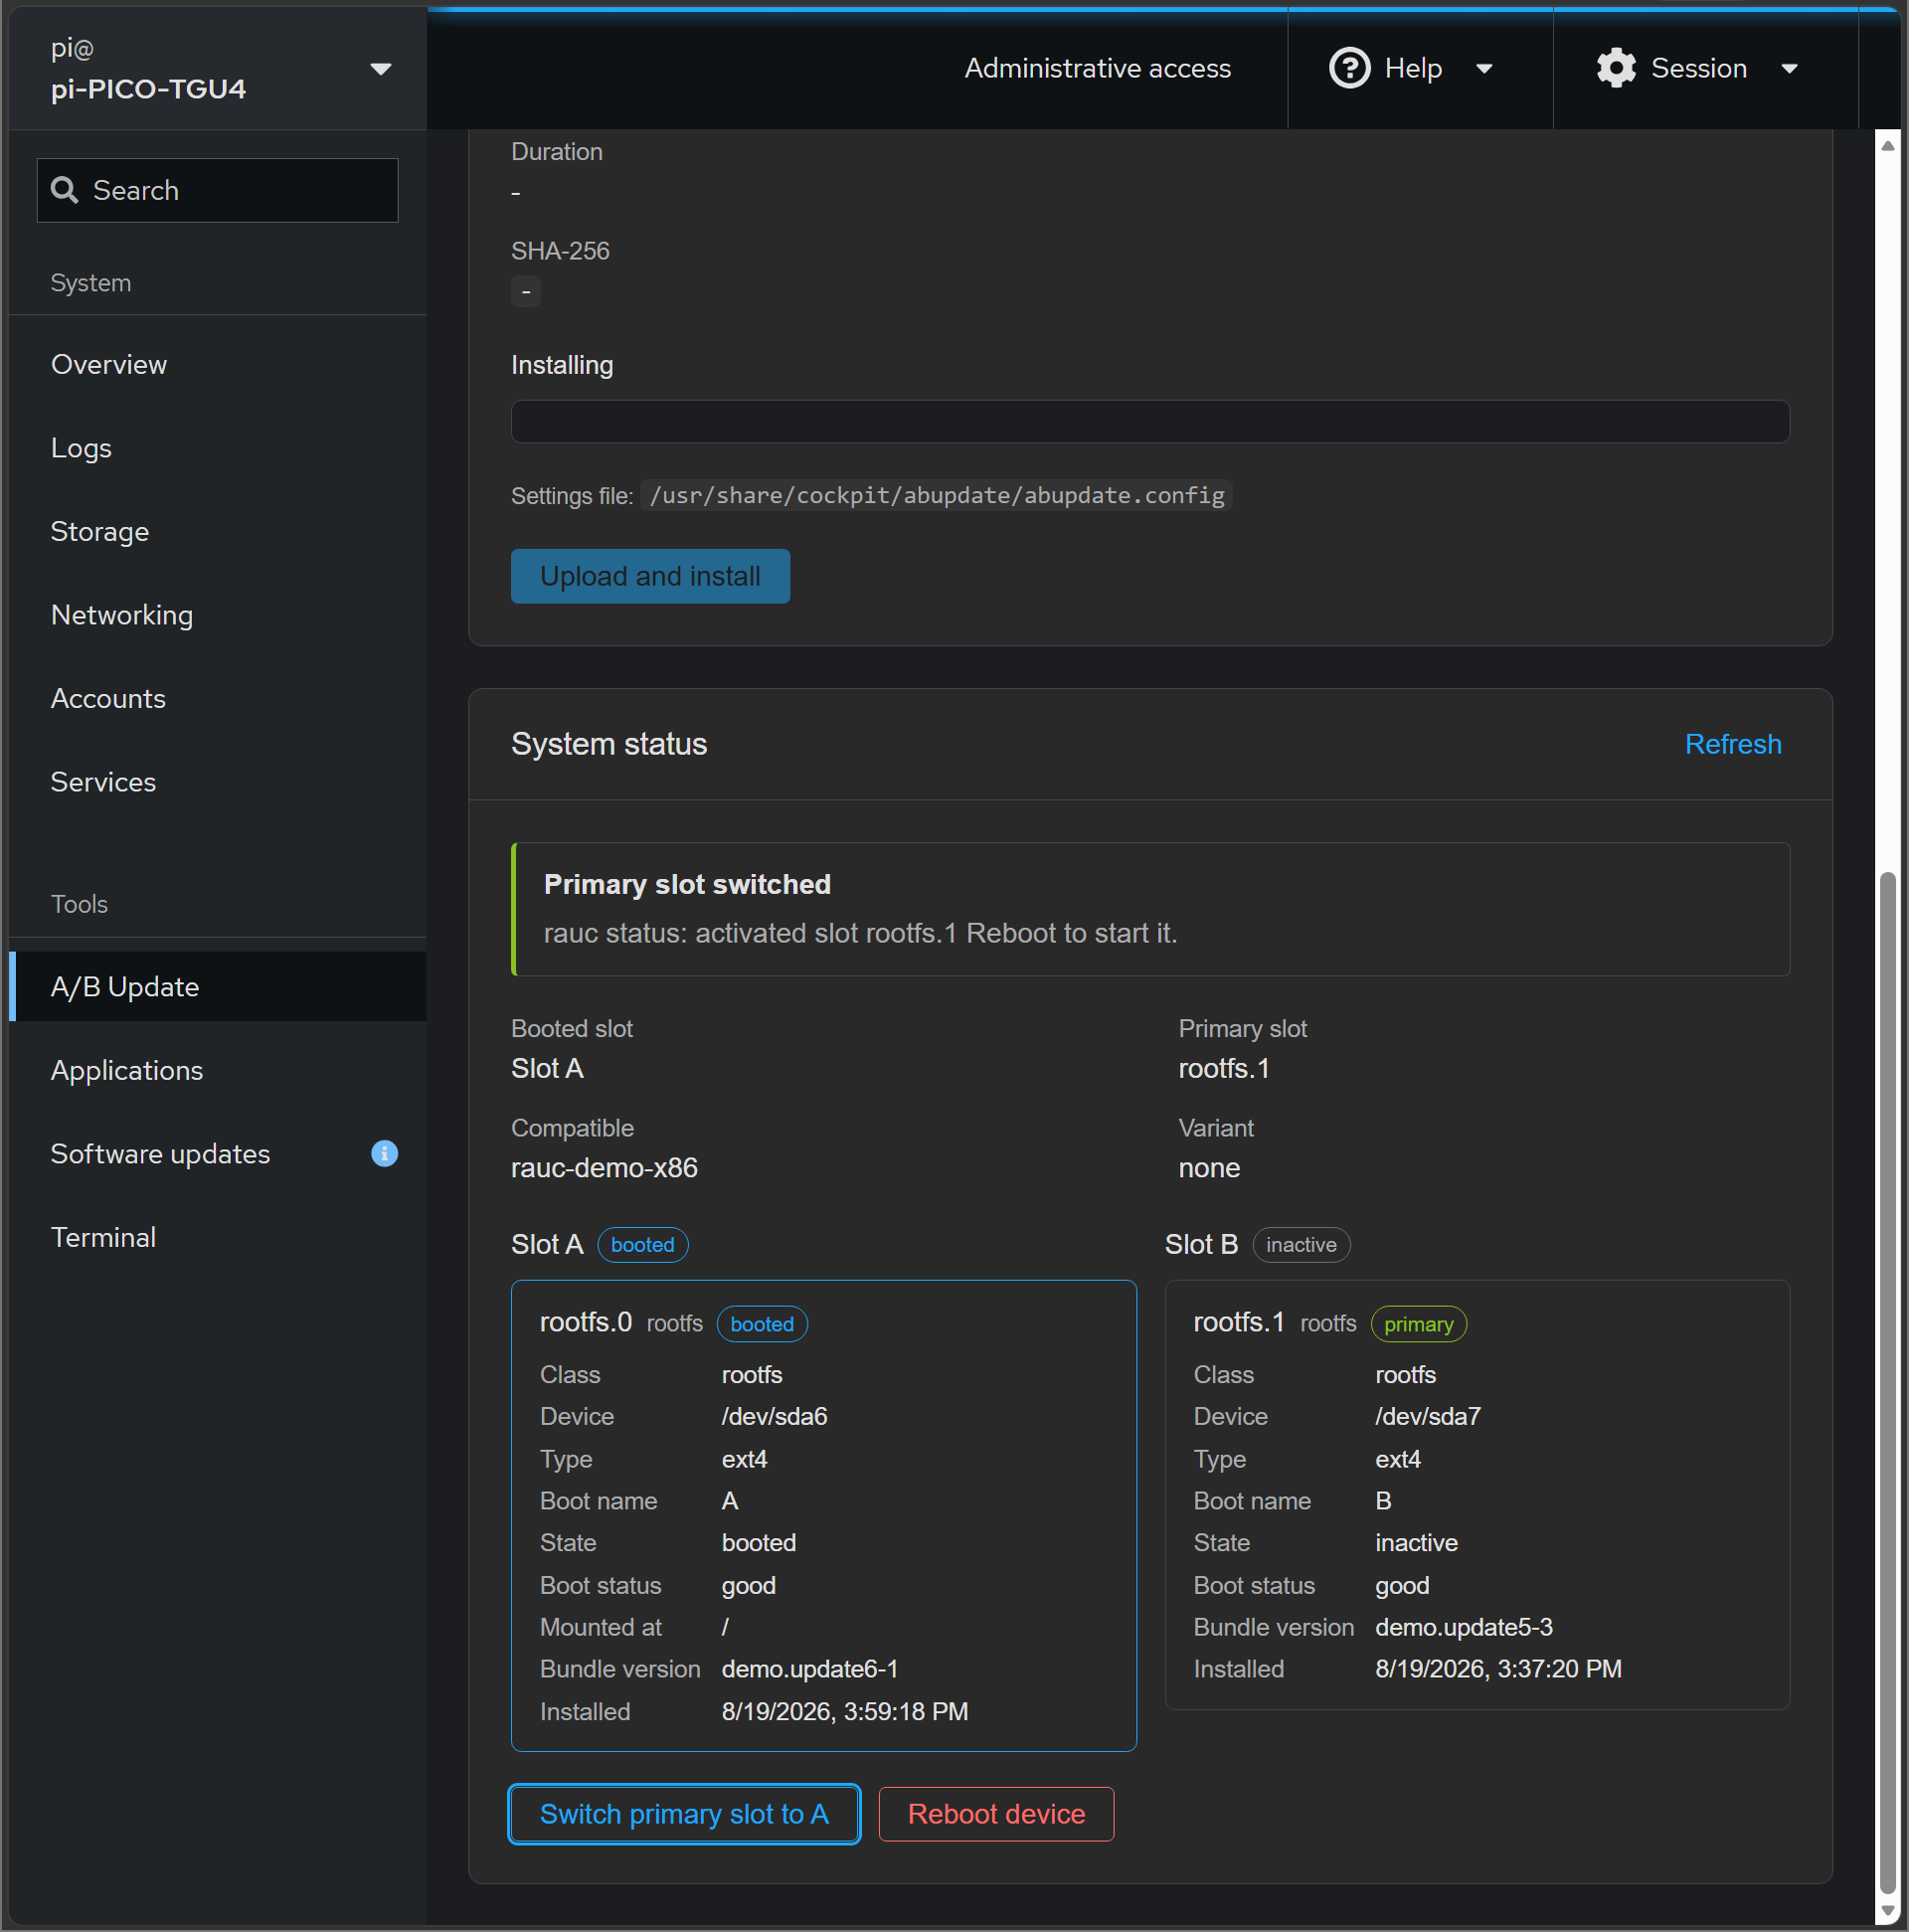
You can reboot the device. Both actions ask for confirmation first.