![]()
VPipelineOnboard application
An example of VPipeline C++ library usage onboard
v1.2.0
Table of contents
- Overview
- Application versions
- Application files
- Build application
- How to create your own example depending on platform
- Launch
- Prepare compiled library files
Overview
The VPipelineOnboard is an example of VPipeline library usage onboard. The repository includes the source code of the application itself and source code of all the libraries required for it to work. The application demonstrates how to initialize and use the VPipeline library. The application (repository) is a CMake project and can be used as a template for your project. It provides VPipeline initialization and streaming all the data through a UDP port. Upon starting, the application initializes VPipeline with the following libraries: ViscaCamera (as camera and lens modules), VSourceOpenCv (as video source module), ImageFlip (as the first video filter), DigitalZoom (as the second video filter), VStabiliserCv (as the video stabilization module), Dehazer (as the fourth video filter), MotionMagnificator (as the fifth video filter), CvTracker (as video tracker module), Gmd (motion detector library as the first object detector) and Ged (video changes detector library as the second object detector). The application does not initialize the third video filter (a dummy video filter will be initialized), the third object detector (a dummy object detector will be initialized) and the fourth object detector (a dummy object detector will be initialized). The application also uses the VCodecLibav library (software codec) for transcoding frames that come from the video source.
NOTE: The application uses VCodecLibav (software codec) for frame encoding. Check the How to create your own example depending on platform chapter to see how to create a VPipeline instance on different platforms.
The application uses C++17 standard. The image below shows the processing pipeline structure:
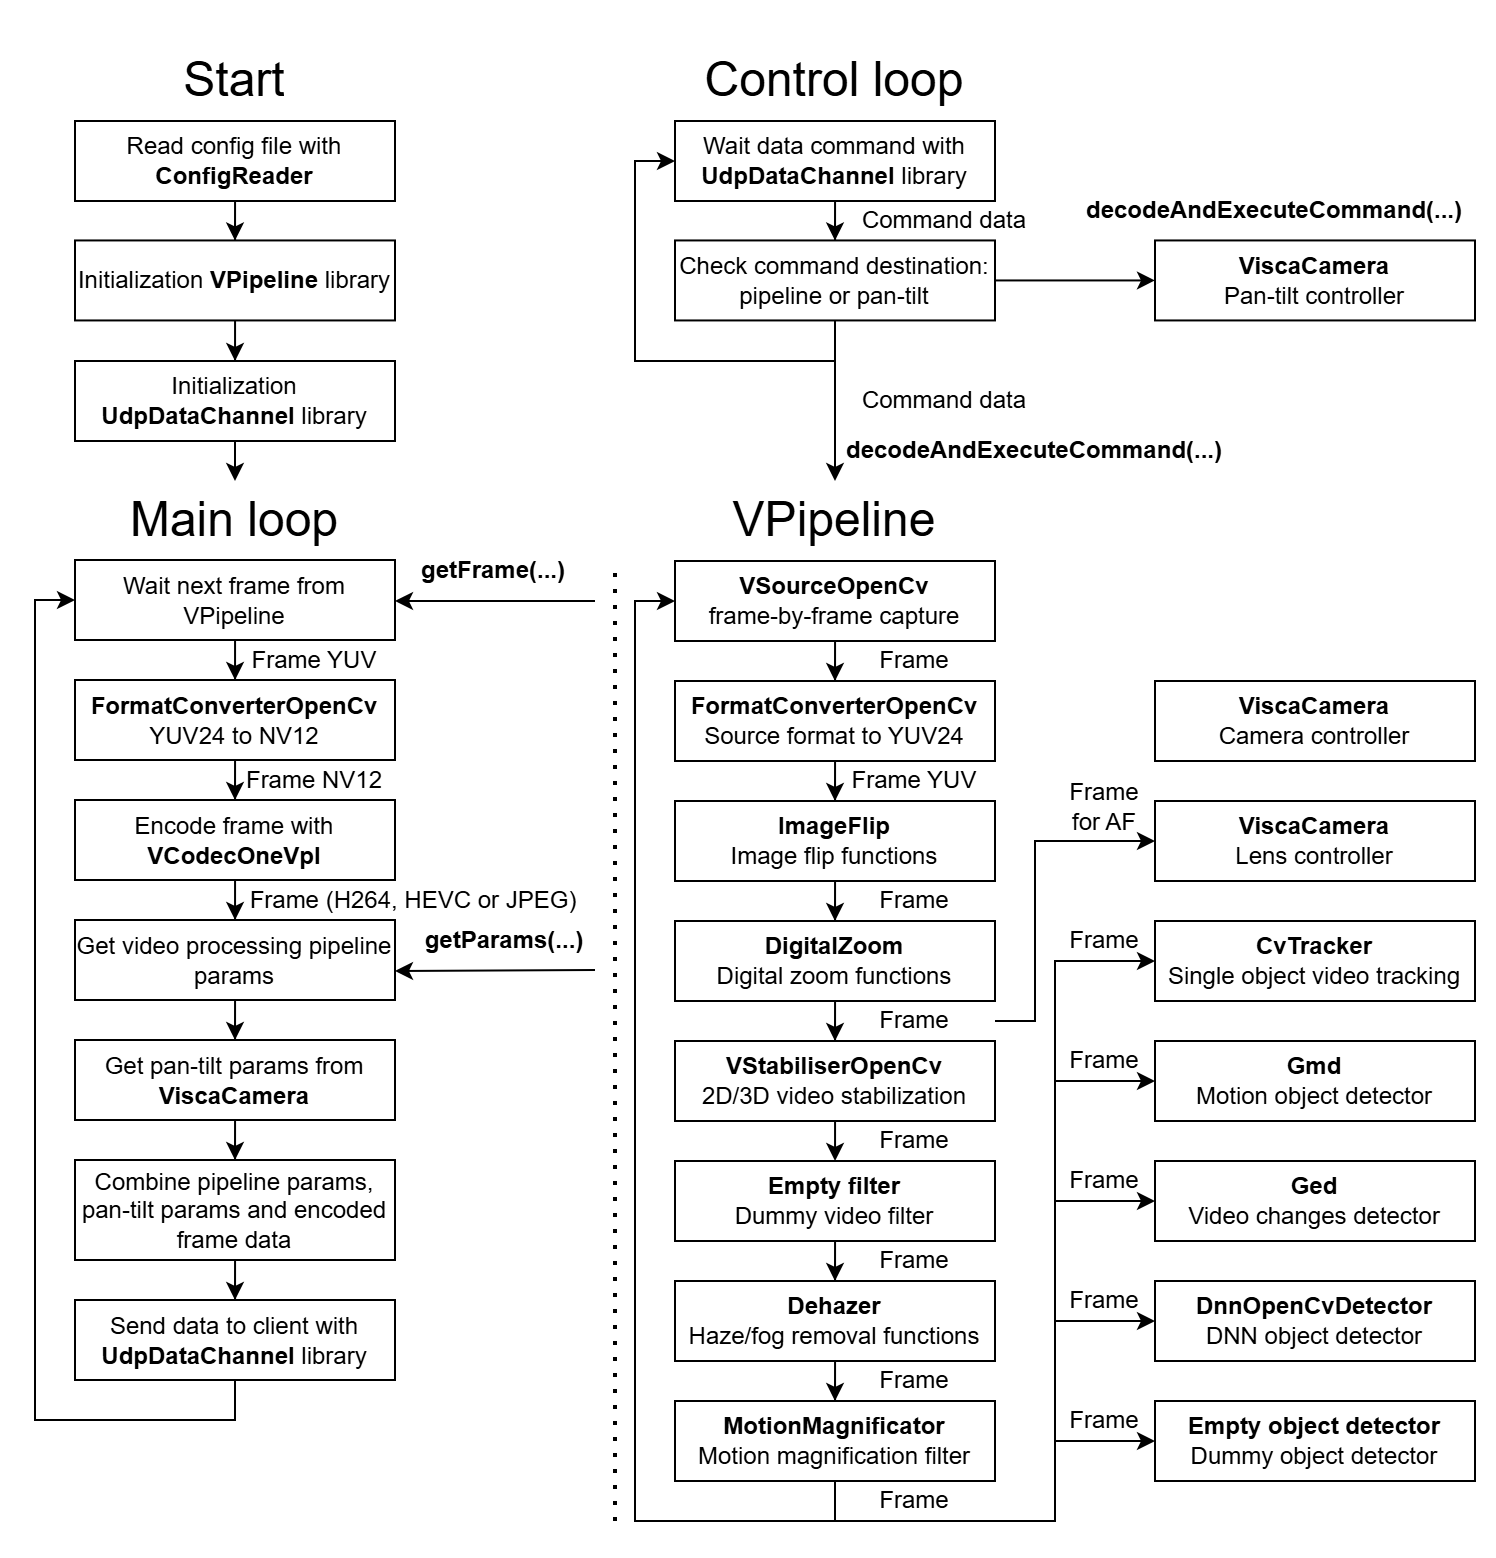
The application reads configuration parameters from the VPipelineOnboard.json file and initializes VPipeline. After initialization of VPipeline and the UdpDataChannel server, the application runs an internal processing loop which includes: camera and lens control, video capture, image flip, digital zoom, video stabilization, defog / dehaze, motion magnification, video tracking (separate thread), motion detection (separate thread) and video changes detection (separate thread). It is worth noting that parameters of each module can be controlled through the UDP port (the best example of controlling VPipeline is presented in the VPipelineControl application). The VPipelineOnboard application also provides control of the PanTilt unit if the received command contains such directions. The user can choose a file dialog to open video files using the SimpleFileDialog library if a video source from a camera is not available. The main application loop waits for a video frame from the VPipeline library, converts it from YUV24 format (native format for the video processing pipeline) to NV12 (native format for transcoding image data), obtains current parameters from the VPipeline library (parameters of all modules and object detection results) and sends the combined data through the UDP port.
Application versions
Table 1 - Application versions.
| Version | Release date | What’s new |
|---|---|---|
| 1.0.0 | 06.06.2024 | First version. |
| 1.0.1 | 06.08.2024 | - Submodules updated. |
| 1.0.2 | 18.09.2024 | - Submodules updated. |
| 1.0.3 | 05.10.2024 | - Update submodules. |
| 1.0.4 | 04.12.2024 | - Update submodules. |
| 1.0.5 | 24.02.2025 | - Update submodules. |
| 1.0.6 | 18.03.2025 | - Update submodules. |
| 1.0.7 | 03.04.2025 | - Multiple submodules update. |
| 1.0.8 | 27.04.2025 | - Multiple submodules update. |
| 1.0.9 | 15.05.2025 | - CvTracker submodule update. |
| 1.0.10 | 26.05.2025 | - DnnOpenVinoDetector submodule update. |
| 1.0.11 | 22.06.2025 | - UdpDataChannel submodule update. |
| 1.0.12 | 19.07.2025 | - CvTracker submodule update. - Gmd submodule update. - ViscaCamera submodule update. |
| 1.0.13 | 10.08.2025 | - CvTracker submodule update. - Gmd submodule update. |
| 1.1.0 | 16.08.2025 | - CMake structure changed. |
| 1.2.0 | 29.03.2026 | - Fixed compilation mistakes. - Fixed documentation. |
Application files
The VPipelineOnboard is provided as source code. The user receives a set of files in the form of a CMake project (repository). The repository structure is outlined below:
CMakeLists.txt ----------- Main CMake file of the application.
src ---------------------- Folder with source code of the application.
    CMakeLists.txt ------- CMake file of the application.
    main.cpp ------------- Source code file of the application.
Build application
The VPipelineOnboard is a complete repository in the form of a CMake project. The application and all included libraries depend on OpenCV. Before compiling, you have to install it into your OS. Also, to compile the application, you have to install CMake.
On Linux
Below are the steps to configure on Linux operating system:
- To install CMake and OpenCV, use the following commands:
sudo apt-get install cmake libopencv-dev
- Commands to build VPipelineOnboard application (Release mode):
cd VPipelineOnboard
mkdir build
cd build
cmake -DCMAKE_BUILD_TYPE=Release ..
make
On Windows
Below are the steps to configure on Windows operating system:
-
Install CMake: Open the link, download the installer and follow the instructions: CMake install. You can use a different version if needed, all above 3.15 are supported.
-
Install OpenCV: Open the link, download the installer and follow the instructions: OpenCV 4.9. Install to “C:/OpenCV”. You can use a different version if needed, all above 4.5 are supported. Locate the OpenCVConfig.cmake file and add to the cmake command OpenCV_DIR that points to the location of this file, as shown below.
-
Commands to build VPipelineOnboard application (Release mode):
cd VPipelineOnboard
mkdir build
cd build
cmake .. -DCMAKE_BUILD_TYPE=Release -D OpenCV_DIR="C:/OpenCV/opencv/build"
cmake --build . --config Release
How to create your own example depending on platform
The VPipelineOnboard is an example of how to use VPipeline on your platform. It currently utilizes the VCodecLibav library (software codec). If you want to create your own VPipelineOnboard example, you can copy the whole structure, but you may want to replace the codec used for transcoding frames depending on your platform. Table 2 demonstrates what codec is recommended for different platforms:
Table 2 - What codec to use depending on platform.
| Device | Codec to use |
|---|---|
| Raspberry Pi 4 Raspberry Pi 2 zero | VCodecV4L2 |
| Raspberry Pi 5 | VCodecLibav |
| NVidia Jetson devices | VCodecJetPack |
Launch
The result of compiling will be VPipelineOnboard.exe executable file on Windows or VPipelineOnboard executable file on Linux. To launch the application on Linux, run the command:
./VPipelineOnboard
Note: On Windows, you may need to copy OpenCV dll files to the application’s executable file folder.
After starting, the application will create a configuration file (if it doesn’t exist already) VPipelineOnboard.json with default VPipeline parameters. The configuration file allows modifying all of the parameters from VPipeline. You can also copy the configuration file (VPipelineOnboard.json) from the static folder of the VPipelineOnboard repository.
The application parameters consist of only VPipeline parameters. Table 3 shows a short description of parameters.
Table 3 - Application parameters.
| Parameter | Description |
|---|---|
| camera | Camera controller parameters. ViscaCamera object will be initialized. |
| lens | Lens controller parameters. ViscaCamera object will be initialized. |
| general | General video processing pipeline parameters. |
| objectDetector1 | First object detector parameters. Gmd object will be initialized. Motion detector parameters. |
| objectDetector2 | Second object detector parameters. Ged object will be initialized. Video changes detector parameters. |
| objectDetector3 | Third object detector parameters. Not used in the application. A dummy object detector will be initialized. |
| objectDetector4 | Fourth object detector parameters. Not used in the application. A dummy object detector will be initialized. |
| videoFilter1 | First video filter parameters. Image flip module. ImageFlip object will be initialized. |
| videoFilter2 | Second video filter parameters. DigitalZoom object will be initialized. Digital zoom parameters |
| videoFilter3 | Third video filter parameters. Not used in the application. A dummy video filter will be initialized. |
| videoFilter4 | Fourth video filter parameters. Dehazer object will be initialized. Defog / dehaze module parameters. |
| videoFilter5 | Fifth video filter parameters. MotionMagnificator object will be initialized. Motion magnification module parameters. |
| videoSource | Video source parameters. Video capture module. VSourceOpenCv object will be initialized. Note: by default the “source” field has the value “test.mp4” which means to open a video file (test file located in static folder). If you change the value to “file dialog”, the application will open a file dialog to choose a video. Also, you can open a camera by its number (“0”, “1” etc.) or you can open an RTSP stream (“rtsp://192.168.1.100:7000/live”) (Note: in the case of an RTSP stream, video capture latency can be high). |
| videoStabiliser | Video stabilizer parameters. VStabiliserOpenCv object will be initialized. |
| videoTracker | Video tracker parameters. CvTracker object will be initialized. |
After starting the application (running the executable file), the user should select the video file in the dialog box (if the parameter “source” in the config file is set to “file dialog”). After that, the UDP channel will start working, sending data from the video source and current parameters and also reading control instructions from VPipelineControl or any UDP port connected to the VPipelineOnboard.
Prepare compiled library files
If you want to compile and collect all libraries from the VPipelineOnboard repository with their header files on Linux, you can create a bash script in the repository root folder which will collect all necessary files in one place. To do this, compile VPipelineOnboard and then follow these steps:
- Create a bash script (you have to have the nano editor installed):
cd VPipelineOnboard
nano prepareCompiled
- Copy the following text there:
#!/bin/bash

# Define the directory where you want to copy all .h files.
# Make sure to replace /path/to/destination with your actual destination directory path.
HEADERS_DESTINATION_DIR="./include"
LIB_DESTINATION_DIR="./lib"

# Check if the destination directory exists. If not, create it.
if [ ! -d "$HEADERS_DESTINATION_DIR" ]; then
    mkdir -p "$HEADERS_DESTINATION_DIR"
fi
# Find and copy all .h files from the current directory to the destination directory.
# The "." specifies the current directory. Adjust it if you want to run the script from a different location.
find . -type f -name '*.h' -exec cp {} "$HEADERS_DESTINATION_DIR" \;


found_dir=$(find . -type d -name "nlohmann" -print -quit)
if [ -n "$found_dir" ]; then
    cp -r "$found_dir" "$HEADERS_DESTINATION_DIR"
    echo "Directory nlohmann has been copied to $HEADERS_DESTINATION_DIR."
fi

# Check if the destination directory exists. If not, create it.
if [ ! -d "$LIB_DESTINATION_DIR" ]; then
    mkdir -p "$LIB_DESTINATION_DIR"
fi

# Find and copy all .a files from the current directory to the destination directory.
# The "." specifies the current directory. Adjust it if you want to run the script from a different location.
find . -type f -name '*.a' -exec cp {} "$LIB_DESTINATION_DIR" \;
- Save “Ctrl + S” and close “Ctrl + X”.
- Make the file executable and run:
sudo chmod +x prepareCompiled
./prepareCompiled