![]()
VPipelineControl application
An example of controlling VPipeline C++ library
v1.2.0
Table of contents
- Overview
- Application versions
- Application files
- Build application
- How to create your own example depending on platform
- Launch
- Control
- Prepare compiled library files
Overview
The VPipelineControl is an example application that shows how to control all parameters from VPipeline, whose instance is run onboard. The repository includes the source code of the application itself and source code of all the libraries required for it to work. The main purpose of the application is to demonstrate how different modules of VPipeline can be controlled. In this particular application, an XBOX Controller is used to change parameters of modules, select a rectangle for tracking purposes or control a connected Pan-Tilt unit. The application (repository) is a CMake project and can be used as a template for your project. It provides UdpDataChannel initialization, basic user interface based on OpenCV, and control of all video processing pipeline modules (camera, lens, filters, video tracker, detectors) alongside the Pan-Tilt unit. If correct data is sent through the UDP port, the user can control parameters of: ViscaCamera (as Camera and Lens modules), ImageFlip (as first video filter), DigitalZoom (as second video filter), VStabiliserOpenCv (as video stabilization module), Dehazer (as fourth video filter), MotionMagnificator (as fifth video filter), CvTracker (as video tracker module), Gmd (motion detector library as first object detector), Ged (video changes detector library as second object detector) and DnnOpenVinoDetector (neural network object detector library as third object detector). The application also uses the VCodecLibav library for deserializing frames that come from the UDP port. The application utilizes C++17 standard.
NOTE: The application uses VCodecLibav (software codec) for frame decoding. Check the How to create your own example depending on platform chapter to see how to create a VPipeline controller on different platforms.
After initialization, the application will run an internal processing loop which reads data from the UDP port, updates the telemetry data, deserializes the frame, checks what buttons were clicked on the controller and sends commands related to them back through the UDP port.
Application versions
Table 1 - Application versions.
| Version | Release date | What’s new |
|---|---|---|
| 1.0.0 | 06.06.2024 | First version. |
| 1.0.1 | 06.08.2024 | - Submodules updated. |
| 1.0.2 | 05.10.2024 | - Update VPipeline submodule. |
| 1.0.3 | 24.02.2025 | - Update UdpDataChannel submodule. |
| 1.0.4 | 03.04.2025 | - Multiple submodules update. |
| 1.0.5 | 27.04.2025 | - VPipeline submodules update. |
| 1.0.6 | 22.06.2025 | - UdpDataChannel submodule update. |
| 1.1.0 | 16.08.2025 | - CMake structure changed. |
| 1.2.0 | 29.03.2026 | - Fixed code mistakes. - Fixed documentation. |
Application files
The VPipelineControl is provided as source code. The user receives a set of files in the form of a CMake project (repository). The repository structure is outlined below:
CMakeLists.txt ----------- Main CMake file of the application.
src ---------------------- Folder with source code of the application.
    CMakeLists.txt ------- CMake file of the application.
    main.cpp ------------- Source code file of the application.
Build application
The VPipelineControl is a complete repository in the form of a CMake project. The application depends on OpenCV to provide visualization of incoming frames. Before compiling, you have to install it into your OS. Also, to compile the application, you have to install CMake.
On Linux
Below are the steps to configure on Linux operating system:
sudo apt-get install cmake libopencv-dev
Typical commands to build VPipelineControl application (Release mode):
cd VPipelineControl
mkdir build
cd build
cmake -DCMAKE_BUILD_TYPE=Release ..
make
On Windows
Below are the steps to configure on Windows operating system:
- Install CMake: Open the link, download the installer and follow the instructions: CMake install. You can use a different version if needed, all above 3.15 are supported.
- Install OpenCV: Open the link, download the installer and follow the instructions: OpenCV 4.9. Install to “C:/OpenCV”. You can use a different version if needed, all above 4.5 are supported. Locate the OpenCVConfig.cmake file and add to the cmake command OpenCV_DIR that points to the location of this file, as shown below.
- Commands to build VPipelineControl application (Release mode):
cd VPipelineControl
mkdir build
cd build
cmake .. -DCMAKE_BUILD_TYPE=Release -D OpenCV_DIR="C:/OpenCV/opencv/build"
cmake --build . --config Release
How to create your own example depending on platform
The VPipelineControl is an example of how to control a VPipeline instance on your platform. It currently utilizes the VCodecLibav library (software codec). If you want to create your own VPipelineControl example, you can copy the whole structure, but you may want to replace the codec used for transcoding frames depending on your platform. Table 2 demonstrates what codec is recommended for different platforms:
Table 2 - What codec to use depending on platform.
| Device | Codec to use |
|---|---|
| Raspberry Pi 4 Raspberry Pi 2 zero | VCodecV4L2 |
| Raspberry Pi 5 | VCodecLibav |
| NVidia Jetson devices | VCodecJetPack |
Launch
After compiling, you will get VPipelineControl.exe executable file on Windows or VPipelineControl executable file on Linux. To run the application on Linux, run the command:
./VPipelineControl
Note: On Windows, you may need to copy OpenCV .dll files to the application’s executable file folder.
Control
To control the application, it is necessary that the main video display window is active (in focus). The program is controlled by the XBOX Controller.
Below you can see the scheme of the XBOX Controller and all buttons described in Table 3.
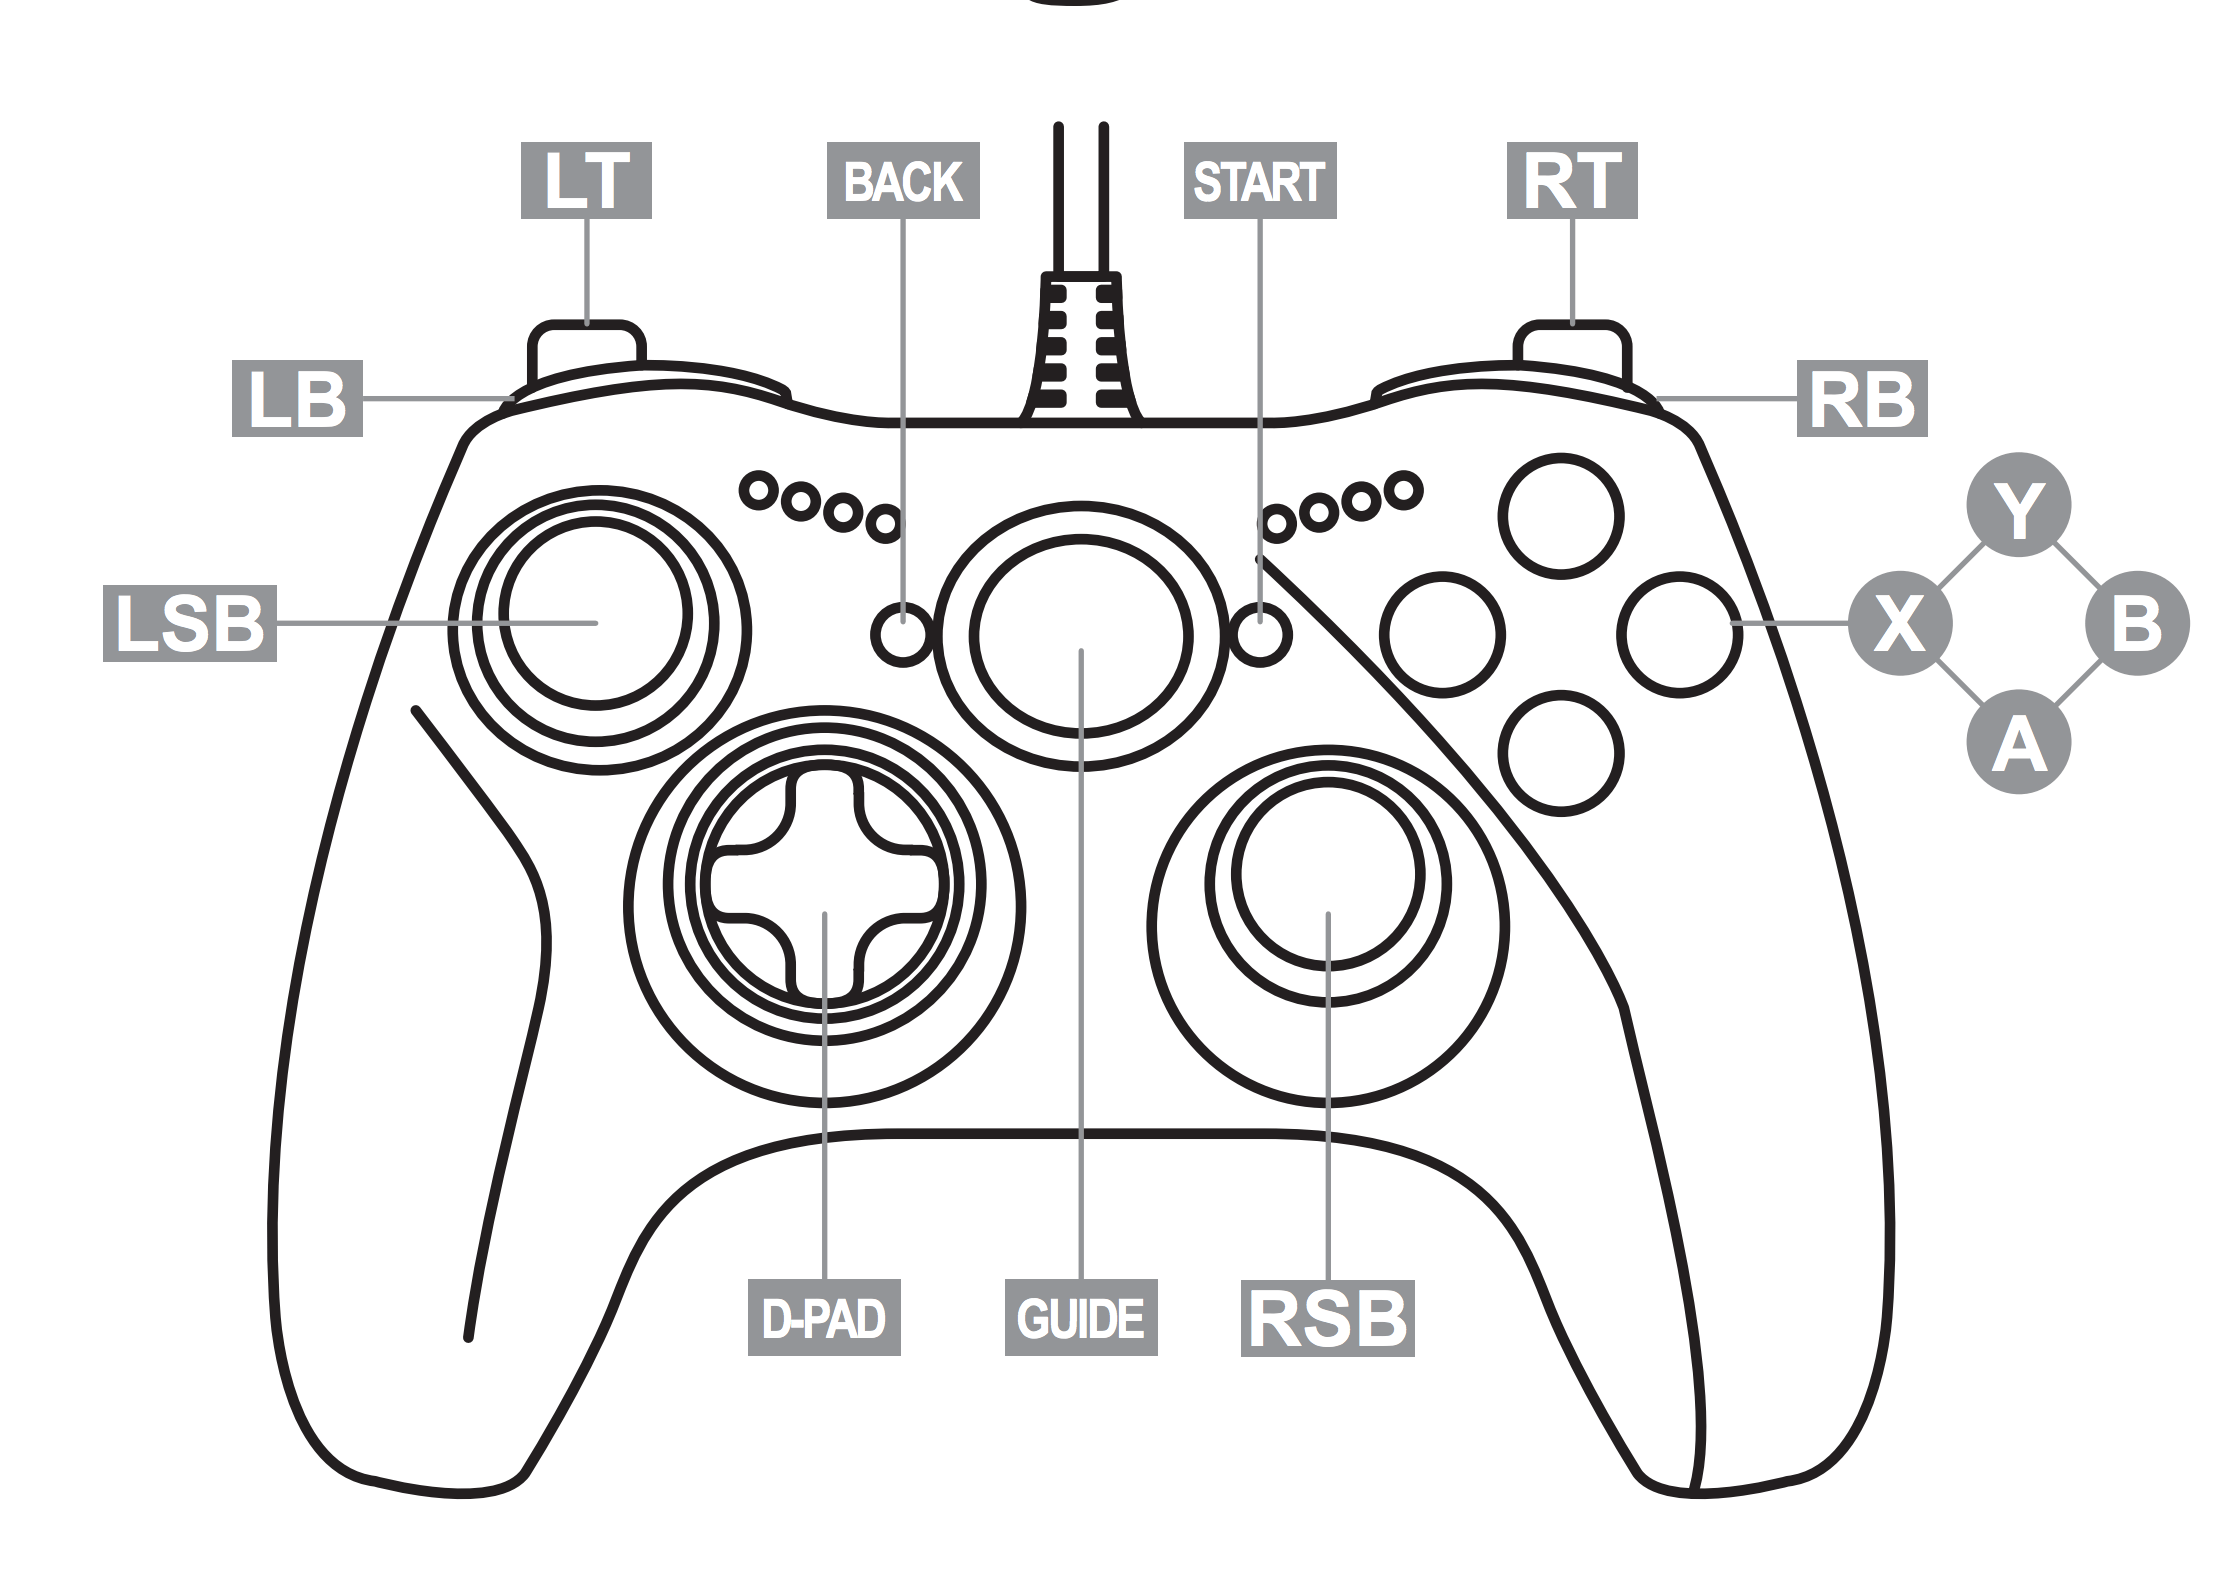
Table 3 - Buttons to control VPipeline instance.
| Button name | Usage |
|---|---|
| X | Move to the previous module menu. |
| B | Move to the next module menu. |
| Y | Move up in selected module menu. |
| A | Move down in selected module menu. |
| RB | Increase selected parameter value. If selected parameter utilizes only ON/OFF values, this button sets the value to ON. |
| LB | Decrease selected parameter value. If selected parameter utilizes only ON/OFF values, this button sets the value to OFF. |
| RSB move | Moving RSB joystick moves tracking rectangle on the screen. If tracking mode is ON (tracking is performed) the movement will be more sensitive. If tracking mode is OFF (tracker module waiting for object to track) the movement will be much faster. |
| RSB click | Clicking the RSB joystick down sends the command “Capture” to the tracking module and starts tracking the object in the rectangle selected by moving the joystick. |
| LSB move | Moving the LSB joystick sends the command to the Pan-Tilt unit to move in the given direction. If tracking mode is ON (tracking is performed), the Pan-Tilt unit will not move. |
| LSB click | Clicking the LSB joystick down sends the command “Reset” to the tracking module and stops tracking. |
| D-PAD | The usage of D-PAD (HAT) button is related to changing the size of tracking rectangle. TOP side of the button - Increase height of tracking rectangle. BOTTOM side of the button - Decrease height of tracking rectangle RIGHT side of the button - Increase width of tracking rectangle. LEFT side of the button - Decrease width of tracking rectangle. |
Prepare compiled library files
If you want to compile and collect all libraries from the VPipelineControl repository with their header files on Linux, you can create a bash script in the repository root folder which will collect all necessary files in one place. To do this, compile VPipelineControl and then follow these steps:
- Create a bash script (you have to have the nano editor installed):
cd VPipelineControl
nano prepareCompiled
- Copy next text there:
#!/bin/bash

# Define the directory where you want to copy all .h files.
# Make sure to replace /path/to/destination with your actual destination directory path.
HEADERS_DESTINATION_DIR="./include"
LIB_DESTINATION_DIR="./lib"

# Check if the destination directory exists. If not, create it.
if [ ! -d "$HEADERS_DESTINATION_DIR" ]; then
    mkdir -p "$HEADERS_DESTINATION_DIR"
fi
# Find and copy all .h files from the current directory to the destination directory.
# The "." specifies the current directory. Adjust it if you want to run the script from a different location.
find . -type f -name '*.h' -exec cp {} "$HEADERS_DESTINATION_DIR" \;


found_dir=$(find . -type d -name "nlohmann" -print -quit)
if [ -n "$found_dir" ]; then
    cp -r "$found_dir" "$HEADERS_DESTINATION_DIR"
    echo "Directory nlohmann has been copied to $HEADERS_DESTINATION_DIR."
fi

# Check if the destination directory exists. If not, create it.
if [ ! -d "$LIB_DESTINATION_DIR" ]; then
    mkdir -p "$LIB_DESTINATION_DIR"
fi

# Find and copy all .a files from the current directory to the destination directory.
# The "." specifies the current directory. Adjust it if you want to run the script from a different location.
find . -type f -name '*.a' -exec cp {} "$LIB_DESTINATION_DIR" \;
- Save “Ctrl + S” and close “Ctrl + X”.
- Make the file executable and run:
sudo chmod +x prepareCompiled
./prepareCompiled