![]()
RpiStreamer application template
v3.2.0
Table of contents
- Overview
- Versions
- Source code files
- Config file
- Run application
- Build application
- Raspberry PI configuration
- Source code
Overview
RpiStreamer is an application template which users can use as a base for their applications. This application implements a basic video processing pipeline: video capture > video stabilization > RTSP server for Raspberry PI4 and PI5. The application combines libraries: VSourceV4L2 (video capture from V4L2 compatible devices), VSourceLibCamera (video capture from Libcamera API compatible devices), VSourceOpenCv (video capture based on OpenCV, supports all video sources that are implemented in OpenCV), VCodecV4L2 (H264 and JPEG video encoder for Raspberry PI4 based on V4L2 API), VCodecLibav (H264, H265 and JPEG encoders for RPI5 since it does not have any hardware codec), VStabiliserCv (video stabilization library) and RtspServer (RTSP server library). The application shows how to use a combination of the libraries listed above. It is built for Raspberry PI4 (Debian Bullseye 11 x64) and PI5 (Debian Bookworm 12 x64) but can be used on any other Linux platform by providing VCodecXXX library with platform compatible VCodec implementation. It supports different video sources and provides real-time video processing. Structure of video processing pipeline:
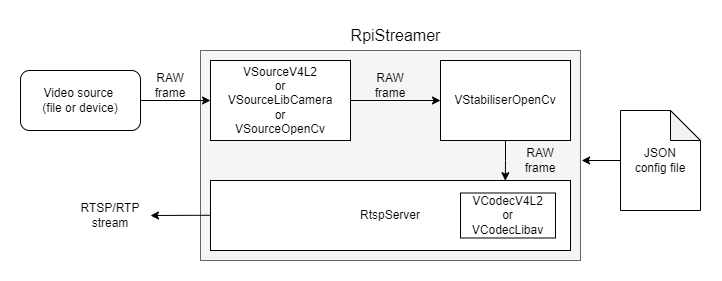
After starting, the application reads a JSON config file which includes video capture parameters, video stabilizer parameters and RTSP server parameters. If there is no config file, the application will create a new one with default parameters. When the config file is read, the application initializes the video source. Depending on configuration params, the application creates a VSourceV4L2 class object (to capture video from V4L2 compatible cameras) or a VSourceLibCamera class object (to capture video from Libcamera API compatible cameras) or a VSourceOpenCv object (to capture video from video files or from RTSP streams). Then the application creates and initializes a VStabiliserCv class object (video stabilization) using parameters from the JSON config file. Then the application creates a board-compatible codec and initializes an RtspServer class object (RTSP server) using parameters from the JSON config file. When all modules are initialized, the application executes the video processing pipeline: capture video frame from video source - video stabilization - send stabilized video frame to RTSP server. The user can connect to the RTSP server with any client (ffmpeg, gstreamer, VLC, Milestone etc.). Additionally, the application creates a “Log” folder to write log information.
The application chooses the right VCodec implementation on its own, based on the board it’s compiled on. If it’s on a Raspberry Pi 4, it picks VCodecV4L2 because this board supports hardware codecs. However, for Raspberry Pi 5, it goes for VCodecLibav since this board doesn’t have hardware codecs and needs a software-based solution.
Versions
Table 1 - Application versions.
| Version | Release date | What’s new |
|---|---|---|
| 1.0.0 | 11.09.2023 | - First version. |
| 1.1.0 | 19.09.2023 | - VSourceLibCamera and VSourceOpenCv libraries added to support different video sources. |
| 2.0.0 | 22.11.2023 | - RTSP server implementation is changed. - External RTSP server app is excluded. RTSP server built in application. |
| 2.1.0 | 15.01.2024 | - RTSP server updated. - Code optimized. |
| 3.0.0 | 24.01.2024 | - Raspberry PI5 support added. - RtspServerLive555 updated. - VSourceLibCamera updated. |
| 3.0.1 | 07.05.2024 | - Code reviewed. - Submodules updated. - Documentation updated. |
| 3.0.2 | 29.05.2024 | - Documentation updated. |
| 3.0.3 | 06.08.2024 | - Submodules updated. |
| 3.0.4 | 18.09.2024 | - VCodecLibav submodule updated. |
| 3.0.5 | 05.10.2024 | - Update VStabiliserOpenCv submodule. |
| 3.0.6 | 04.12.2024 | - Update submodules. |
| 3.0.7 | 02.02.2025 | - Update submodules. |
| 3.0.8 | 24.02.2025 | - Update VStabiliserOpenCv submodule. |
| 3.0.9 | 18.03.2025 | - Update VSourceV4L2 submodule. |
| 3.0.10 | 03.04.2025 | - Multiple submodules update. |
| 3.0.11 | 03.04.2025 | - VStabiliserOpenCv submodule update. |
| 3.0.12 | 27.07.2025 | - RtspServer submodules update. |
| 3.1.0 | 16.08.2025 | - CMake structure changed. |
| 3.2.0 | 28.03.2026 | - Submodules updated. - Fixed compilation errors. |
Source code files
The application is supplied by source code only. The user is given a set of files in the form of a CMake project (repository). The repository structure is shown below:
CMakeLists.txt --------------- Main CMake file.
3rdparty --------------------- Folder with third-party libraries.
    CMakeLists.txt ----------- CMake file to include third-party libraries.
    RtspServer --------------- Source code folder of RtspServer library.
    VCodecV4L2 --------------- Source code folder of VCodecV4L2 library.
    VCodecLibav -------------- Source code folder of VCodecLibav library.
    VSourceLibCamera --------- Source code folder of VSourceLibCamera library.
    VSourceOpenCv ------------ Source code folder of VSourceOpenCv library.
    VSourceV4l2 -------------- Source code folder of VSourceV4l2 library.
    VStabiliserOpenCv -------- Source code folder of VStabiliserOpenCv library.
src -------------------------- Folder with application source code.
    CMakeLists.txt ----------- CMake file.
    RpiStreamerVersion.h ----- Header file with application version.
    RpiStreamerVersion.h.in -- File for CMake to generate version header.
    main.cpp ----------------- Application source code file.
Config file
RpiStreamer application reads the config file RpiStreamer.json in the same folder as the application executable file. Config file content:
{
    "Params": {
        "videoSource": {
            "initString": "/dev/video0;1280;720;30;YUYV"
        },
        "videoStabiliser": {
            "aFilterCoeff": 0.8999999761581421,
            "aOffsetLimit": 10.0,
            "constAOffset": 0.0,
            "constXOffset": 0,
            "constYOffset": 0,
            "cutFrequencyHz": 2.0,
            "enable": true,
            "fps": 30.0,
            "logMod": 0,
            "scaleFactor": 1,
            "transparentBorder": true,
            "type": 2,
            "xFilterCoeff": 0.8999999761581421,
            "xOffsetLimit": 150,
            "yFilterCoeff": 0.8999999761581421,
            "yOffsetLimit": 150
        },
        "videoStream": {
            "bitrateKbps": 3000,
            "bitrateMode": 0,
            "codec": "H264",
            "custom1": 0.0,
            "custom2": 0.0,
            "custom3": 0.0,
            "enable": true,
            "fitMode": 0,
            "fps": 30.0,
            "gop": 30,
            "h264Profile": 0,
            "height": 720,
            "ip": "192.168.0.2",
            "jpegQuality": 80,
            "maxBitrateKbps": 5000,
            "minBitrateKbps": 1000,
            "multicastIp": "224.1.0.1",
            "multicastPort": 18000,
            "overlayMode": true,
            "password": "",
            "port": 7031,
            "suffix": "live",
            "type": 0,
            "user": "",
            "width": 1280
        }
    }
}
Table 2 - Config file parameters description.
| Parameter | Type | Description |
|---|---|---|
| Video source parameters: | ||
| initString | string | Video source initialization string. Based on initialization string the application creates either VSourceV4L2 class object (to capture video from V4L2 compatible cameras) or VSourceLibCamera class object (to capture video from Libcamera API compatible cameras) or VSourceOpenCV (to capture video from video files or from RTSP streams). So, the user can define the backend to capture video: Initialization string for V4l2 or Libcamera compatible video devices (cameras). Valid formats: [full device name];[width];[height];[fps];[fourcc] or [full device name];[width];[height];[fps] or [full device name];[width];[height] or [full device name] Initialization string parameters: [full device name] - Full name of video device file (for example “/dev/video0”) for V4L2 or device number for Libcamera (for example “0”). [width] - Video frame width. [height] - Video frame height. [fourcc] - Pixel format. Valid values: BGR24, RGB24, GRAY, YUV24, YUYV, UYVY, NV12, NV21, YV12, YU12. If fourcc is not set the library will choose appropriate format according to existing video device parameters. In case width and height are unknown to the user, auto detection can be used by setting both to 0. VSource implementation will choose proper width and height with respect to source device. Initialization string for OpenCV video sources can be video file name (for example “test.mp4”) or RTSP stream (for example “rtsp://192.168.0.1:7100/live”). |
| Video stabilizer parameters: | ||
| scaleFactor | int | VStabiliserOpenCv class supports 2D FFT algorithm which scales input image to size 512x512 or 256x256 depends on scale factor. To choose particular size (512x512 or 256x256), the library divides input frame height by scale factor. If result >= 512 the library will use 512x512 size for internal algorithms. Otherwise the library will use 256x256 size. |
| xOffsetLimit | int | Maximum horizontal image shift in pixels per video frame. If image shift is bigger than this limit the library will compensate only xOffsetLimit shift. |
| yOffsetLimit | int | Maximum vertical image shift in pixels per video frame. If image shift is bigger than this limit the library will compensate only yOffsetLimit shift. |
| aOffsetLimit | float | Maximum rotational image angle in radians per video frame. If image absolute rotational angle is bigger than this limit the library will compensate only aOffsetLimit angle. |
| xFilterCoeff | float | Horizontal smoothing coefficient of constant camera movement. Values [0-1]: 0 - the library will not compensate for constant camera motion, video will not be stabilized, 1 - no smoothing of constant camera motion (the library will compensate for the current picture drift completely without considering constant motion). If set 0 the library will detect necessary coefficients automatically. |
| yFilterCoeff | float | Vertical smoothing coefficient of constant camera movement. Values [0-1]: 0 - the library will not compensate for constant camera motion, video will not be stabilized, 1 - no smoothing of constant camera motion (the library will compensate for the current picture drift completely without considering constant motion). If set 0 the library will detect necessary coefficients automatically. |
| aFilterCoeff | float | Rotational smoothing coefficient of constant camera movement. Values [0-1]: 0 - the library will not compensate for constant camera motion, video will not be stabilized, 1 - no smoothing of constant camera motion (the library will compensate for the current picture drift completely without considering constant motion). If set 0 the library will detect necessary coefficients automatically. |
| enable | bool | Enable/disable stabilization. |
| transparentBorder | bool | Enable/disable transparent borders. |
| constXOffset | int | Constant horizontal image offset in pixels. The library will add this offset to each processed video frame. This value is used for boresight correction. |
| constYOffset | int | Constant vertical image offset in pixels. The library will add this offset to each processed video frame. This value is used for boresight correction. |
| constAOffset | float | Constant rotational angle in radians. The library will add this offset to each processed video frame. This value is used for boresight correction. |
| type | int | Three types of stabilization algorithm are implemented in the library: 0 - 2D based on FFT. Fastest algorithm but only for 2D stabilization. Works stable for low light conditions and for low contrast images. 1 - 2D based on optical flow. Gives good accuracy but lower speed than 2D FFT and requires contrast objects on video. 2 - 3D based on optical flow. Gives best accuracy but lower speed than 2D FFT and requires contrast objects on video. |
| cutFrequencyHz | float | Not supported by VStabiliserOpenCv. |
| fps | float | Not supported by VStabiliserOpenCv. |
| RTSP server parameters: | ||
| enable | bool | RTSP server mode: false - Off, true - On. |
| width | int | Video stream width from 8 to 8192. If the resolution of the source video frame is different from that specified in the parameters for the RTSP server, the source video will be scaled. |
| height | int | Video stream height from 8 to 8192. If the resolution of the source video frame is different from that specified in the parameters for the RTSP server, the source video will be scaled. |
| ip | string | RTSP server IP. It is recommended to use “0.0.0.0” independent from board IP. |
| port | int | RTSP server port. RTSP initialization string to receive video will be: “rtsp://IP:port/suffix”. |
| user | string | RTSP server user: “” - no user. |
| password | string | RTSP server password: “” - no password. |
| suffix | string | RTSP stream suffix (stream name). For example “live” or “unicast”. RTSP initialization string to receive video will be: “rtsp://IP:port/suffix”. |
| minBitrateKbps | int | Not supported by RtspServer. |
| maxBitrateKbps | int | Not supported by RtspServer. |
| bitrateKbps | int | Dedicated bitrate, kbps. Will be set to VCodecV4L2 codec or VCodecLibav codec. |
| bitrateMode | int | Not supported by RtspServer. |
| fps | float | Video stream FPS. Regardless of the FPS of the camera, the video stream will be in accordance with the specified FPS. |
| gop | int | GOP size for H264 codecs. Will be set to VCodecV4L2 codec or VCodecLibav codec. |
| h264Profile | int | H264 profile: 0 - baseline, 1 - main, 2 - high. Will be set to VCodecV4L2 codec or VCodecLibav codec. |
| jpegQuality | int | JPEG quality from 1 to 100% for JPEG codec. Will be set to VCodecV4L2 codec. |
| codec | string | Encoding format. PI4 supports : H264. PI5 supports : H264 and HEVC. |
| fitMode | int | Scaling mode: 0 - fit, 1 - cut. Defines how to scale video to RTSP stream resolution. |
| overlayMode | bool | Overlay enable/disable flag. true - enable, false - disable. |
| custom1 | float | Not used by RtspServer. |
| custom2 | float | Not used by RtspServer. |
| custom3 | float | Not used by RtspServer. |
| multicastIp | string | RTSP server multicast IP. In order to enable multicast stream, type should be 1. |
| multicastPort | int | RTSP server multicast port. |
| type | int | RTSP server stream type. Value : 0 - unicast, 1 - multicast. |
Run application
Copy the application (RpiStreamer executable and RpiStreamer.json) to any folder and run:
./RpiStreamer -vv
When the application is started for the first time, it creates a configuration file named RpiStreamer.json if the file does not exist (refer to the Config file section). If the application is run as a superuser using sudo, the file will be owned by the root user. Therefore, to modify the configuration file, superuser privileges will be necessary. You can run the application manually or you can add the application to auto start as a systemd service. To add the application as a systemd service, create a service file:
sudo nano /etc/systemd/system/rpistreamer.service
and add content:
[Unit]
Description=RpiStreamer

Wants=network.target
After=syslog.target network-online.target

[Service]
Type=simple
ExecStart=/home/pi/App/RpiStreamer
Restart=on-failure
RestartSec=10
KillMode=control-group
KillSignal=SIGTERM
[Install]
WantedBy=multi-user.target
Save ctrl + s and close ctrl + x.
Reload systemd services:
sudo systemctl daemon-reload
Command to control service:
Start service:
sudo systemctl start rpistreamer
Enable for auto start:
sudo systemctl enable rpistreamer
Stop service:
sudo systemctl stop rpistreamer
Check status:
sudo systemctl status rpistreamer
Build application
Before building, the user should configure the Raspberry Pi (Raspberry PI configuration). Typical build commands:
cd RpiStreamer
mkdir build
cd build
cmake -DCMAKE_BUILD_TYPE=Release ..
make
Raspberry PI configuration
OS install
-
Download Raspberry PI imager.
-
Choose Operating System: Raspberry Pi OS (other) -> Raspberry Pi OS Lite (64-bit) Debian Bullseye 11 for Raspberry PI4 or Raspberry Pi OS Lite (64-bit) Debian Bookworm 12 for Raspberry PI5.
-
Choose the storage (MicroSD) card.
-
Set additional options: do not set hostname “raspberrypi.local”, enable SSH (Use password authentication), set username ”pi” and password ”pi”, configure wireless LAN according to your settings. You will need Wi-Fi for software installation, set appropriate time zone and wireless zone.
-
Save changes and push the “Write” button. After that, push “Yes” to rewrite data on MicroSD. At the end, remove the MicroSD.
-
Insert the MicroSD into the Raspberry Pi and power it up.
LAN configuration
-
Configure LAN IP address on your PC. For Windows 11, go to Settings -> Network & Internet -> Advanced Network Settings -> More network adapter options. Right-click on the LAN connection used to connect to Raspberry Pi and choose “Properties”. Double-click on “Internet Protocol Version 4 (TCP/IPv4)”. Set static IP address 192.168.0.1 and mask 255.255.255.0.
-
Connect the Raspberry Pi via LAN cable. After power up, you don’t know the IP address of the Raspberry Pi board, but you can connect to it via SSH using the “raspberrypi” name. In Windows 11, open Windows Terminal or PowerShell terminal and type the command ssh pi@raspberrypi. After connection, type yes to establish authenticity. WARNING: If you work with Windows, we recommend deleting information about previous connections. Go to folder C:/Users/[your user name]/.ssh. Open file known_hosts if it exists in a text editor. Delete all lines containing ”raspberrypi”.
-
You have to set a static IP address on the Raspberry Pi, but not NOW. After setting the static IP, you will lose the Wi-Fi connection, which you need for software installation.
Install dependencies
-
Connect to the Raspberry Pi via SSH: ssh pi@raspberrypi. WARNING: If you work with Windows, we recommend deleting information about previous connections. Go to folder C:/Users/[your user name]/.ssh. Open file known_hosts if it exists in a text editor. Delete all lines containing ”raspberrypi”.
-
Install libraries:
sudo apt-get update sudo apt install cmake build-essential libopencv-dev -
If the Libcamera API is not installed, you have to install it. Please note that the RpiStreamer application is compatible with a specific version of libcamera. You can install it using the following commands from source code:
# Remove everything related with libcamera sudo apt-get remove --auto-remove libcamera* libcamera-apps* # Check if the libcamera directory exists and remove it if [ -d "libcamera" ]; then echo "libcamera directory already exists. Removing..." sudo rm -rf libcamera fi # Get libcamera git clone https://github.com/raspberrypi/libcamera.git cd libcamera # Checkout v0.1.0 version git checkout v0.1.0+rpt20231122 # Install required packages sudo apt-get update && sudo apt-get install -y cmake meson ninja-build python3 python3-pip python3-setuptools python3-wheel git pkg-config libgnutls28-dev openssl libjpeg-dev libyuv-dev libv4l-dev libudev-dev libexpat1-dev libssl-dev libdw-dev libunwind-dev doxygen graphviz && pip3 install ply PyYAML #if you get error for ply and PyYAML run following command. #sudo apt-get install -y python3-ply python3-yaml # build libcamera meson build ninja -C build #install libcamera sudo ninja -C build install # update linker cache sudo ldconfig # remove source code. cd ../ sudo rm -rf libcamera echo "libcamera installation complete." -
Install the required libraries for the libav codec. If you are using RPI4, this step can be skipped.
-
Run command :
sudo apt-get install -y ffmpeg libavcodec-dev libavutil-dev libavformat-dev libavdevice-dev libavfilter-dev libcurl4
-
Reboot the system.
sudo reboot
Setup high performance mode (overclock) if necessary
-
Open config file:
sudo nano /boot/config.txt -
Add line at the end of file:
- For RPI4 :
force_turbo=1 arm_freq=2000 arm_freq_min=2000 over_voltage=6- For RPI5 :
force_turbo=1 over_voltage_delta=500000 arm_freq=3000 gpu_freq=800 -
Save changes ctrl+s and close ctrl+x. Reboot raspberry sudo reboot.
V4L2 camera stack configuration
-
To enable legacy (V4L2) camera support in Raspberry PI you have to change system settings. Run configuration manager:
sudo raspi-config -
Select “Interface Options” -> “Legacy camera”. After select yes.
-
Go to Finish menu and close configuration manager.
-
Reboot raspberry sudo reboot.
Static IP configuration on Raspberry.
-
Connect to the Raspberry Pi via SSH ssh pi@raspberrypi after reboot. WARNING: If you work with Windows, we recommend deleting information about previous connections. Go to folder C:/Users/[your user name]/.ssh. Open file known_hosts if it exists in a text editor. Delete all lines containing ”raspberrypi”.
-
Open config file:
sudo nano /etc/dhcpcd.conf -
Scroll down in the file and delete the comments in the following lines and set IP 192.168.0.2:
interface eth0 static ip_address=192.168.0.2/24 static ip6_address=fd51:42f8:caae:d92e::ff/64 static routers=192.168.0.2 static domain_name_servers=192.168.0.2 8.8.8.8 fd51:42f8:caae:d92e::1 -
Save changes with ctrl + s and exit with ctrl + x. Reboot after sudo reboot.
-
After configuring the static IP, you can connect to the Raspberry Pi by IP.
ssh pi@192.168.0.2
Source code
Below is the source code of the main.cpp file:
#include <iostream>
#include "RapidPixel.h"
#include "RpiStreamerVersion.h"
#ifdef isRPI5
    #include <VCodecLibav.h>
#else
    #include <VCodecV4L2.h>
#endif


/// Application parameters.
class Params
{
public:

    /// Stream params.
    class VideoSourceParams
    {
    public:
        /// Video source init string
        std::string initString {"/dev/video0;1280;720;30;YUYV"};

        JSON_READABLE(VideoSourceParams, initString)
    };

    /// Video stream params.
    cr::video::VStreamerParams videoStream;
    /// Video source params.
    VideoSourceParams videoSource;
    /// Video stabiliser params.
    cr::vstab::VStabiliserParams videoStabiliser;

    JSON_READABLE(Params, videoStream, videoSource, videoStabiliser)
};

/// Application params.
Params g_params;
/// Logger.
cr::utils::Logger g_log;
/// Log flag.
cr::utils::PrintFlag g_logFlag{cr::utils::PrintFlag::FILE};

/**
 * @brief Load configuration params from JSON file.
 * @return TRUE if parameters loaded or FALSE if not.
 */
bool loadConfig()
{
    cr::utils::ConfigReader config;

    // Open config json file (if does not exist - create new and exit).
    if(config.readFromFile("RpiStreamer.json"))
    {
        // Read values and set to params
        if(!config.get(g_params, "Params"))
        {
            g_log.print(cr::utils::PrintColor::RED, g_logFlag) <<
                "[" << __LOGFILENAME__ << "][" << __LINE__ << "] ERROR: " <<
                "Params were not read." << std::endl;
            return false;
        }
    }
    else
    {
        // Set default params.
        config.set(g_params, "Params");

        // Save config file.
        if (!config.writeToFile("RpiStreamer.json"))
        {
            g_log.print(cr::utils::PrintColor::CYAN, g_logFlag) <<
                "[" << __LOGFILENAME__ << "][" << __LINE__ << "]: " <<
                "Config file created." << std::endl;
            return false;
        }
    }

    return true;
}

int main(int argc, char **argv)
{
    // Configure logger.
    cr::utils::Logger::setSaveLogParams("Log", "log", 20, 1);

    // Welcome message.
    g_log.print(cr::utils::PrintColor::BLUE, g_logFlag) <<
        "[" << __LOGFILENAME__ << "][" << __LINE__ << "] " <<
        "RpiStreamer application v" << RPI_STREAMER_VERSION << std::endl;

    // Check verbose mode option.
    if (argc > 1)
    {
        std::string str = std::string(argv[1]);
        if (str == "-v" || str == "-vv")
        {
            g_logFlag = cr::utils::PrintFlag::CONSOLE_AND_FILE;
        }
    }

    if (!loadConfig())
    {
        g_log.print(cr::utils::PrintColor::RED, g_logFlag) <<
            "[" << __LOGFILENAME__ << "][" << __LINE__ << "] ERROR: " <<
            "Can't load config file." << std::endl;
        return -1;
    }
    g_log.print(cr::utils::PrintColor::CYAN, g_logFlag) <<
        "[" << __LOGFILENAME__ << "][" << __LINE__ << "] " <<
        "Config file loaded." << std::endl;

    // Create video source object.
    cr::video::VSource *videoSource;
    if (g_params.videoSource.initString.find("/dev/video") != std::string::npos)
    {
        // Create video source based on V4L2 API.
        videoSource = new cr::video::VSourceV4L2();
    }
    else if (std::isdigit(g_params.videoSource.initString[0]))
    {
        // Create video source based on libcamera API.
        videoSource = new cr::video::VSourceLibCamera();
    }
    else
    {
        // Create video source based on OpenCV API.
        videoSource = new cr::video::VSourceOpenCv();
    }

    // Init video source.
    if (!videoSource->openVSource(g_params.videoSource.initString))
    {
        g_log.print(cr::utils::PrintColor::RED, g_logFlag) <<
            "[" << __LOGFILENAME__ << "][" << __LINE__ << "] ERROR: " <<
            "Can't initialise video source with initString: " <<
            g_params.videoSource.initString << std::endl;
        return -1;
    }
    g_log.print(cr::utils::PrintColor::CYAN, g_logFlag) <<
        "[" << __LOGFILENAME__ << "][" << __LINE__ << "] INFO: " <<
        "Video source init." << std::endl;

    // Init video stabilizer.
    cr::vstab::VStabiliser* videoStabiliser = new cr::vstab::VStabiliserCv();
    if (!videoStabiliser->initVStabiliser(g_params.videoStabiliser))
    {
        g_log.print(cr::utils::PrintColor::RED, g_logFlag) <<
            "[" << __LOGFILENAME__ << "][" << __LINE__ << "] ERROR: " <<
            "Can't initialise video stabilizer." << std::endl;
        return -1;
    }
    g_log.print(cr::utils::PrintColor::CYAN, g_logFlag) <<
        "[" << __LOGFILENAME__ << "][" << __LINE__ << "] INFO: " <<
        "Video stabilizer init." << std::endl;

    // Codec for server.
    cr::video::VCodec *codec;

/* VCodecLibav supports software codec that can work both on RPi4 and RPi5.
 * VCodecV4L2 is hardware codec that can work only on RPi4.
 * It is more efficient to use hardware codec for RPi4 and software codec is only option for RPi5.
 */
#ifdef isRPI5
    codec = new cr::video::VCodecLibav();
    codec->setParam(cr::video::VCodecParam::TYPE, 1); // 0 - hardware codec, 1 - software codec.
#else
    codec = new cr::video::VCodecV4L2();
#endif

    // Init RTSP server with codec. So we can feed rtsp server with raw frames.
    // It will encode frames (H264 or H265) and send to clients.
    cr::video::VStreamer *server = new cr::rtsp::RtspServer();
    if(!server->initVStreamer(g_params.videoStream, codec))
    {
        g_log.print(cr::utils::PrintColor::RED, g_logFlag) <<
            "[" << __LOGFILENAME__ << "][" << __LINE__ << "] ERROR: " <<
            "Rtsp server can't init." << std::endl;
        return -1;
    }

    // Init frames.
    cr::video::Frame frame;
    cr::video::Frame stabilizedFrame;

    // Main loop.
    while (true)
    {
        // Wait new video frame 1000 msec.
        if (!videoSource->getFrame(frame, 1000))
        {
            g_log.print(cr::utils::PrintColor::RED, g_logFlag) <<
                "[" << __LOGFILENAME__ << "][" << __LINE__ << "] ERROR: " <<
                "No input video frame." << std::endl;
            continue;
        }

        // Stabilize frame.
        if (!videoStabiliser->stabilise(frame, stabilizedFrame))
        {
            g_log.print(cr::utils::PrintColor::RED, g_logFlag) <<
                "[" << __LOGFILENAME__ << "][" << __LINE__ << "] ERROR: " <<
                "Can't stabilize frame." << std::endl;
        }

        // Send frame to RTSP server.
        if (!server->sendFrame(stabilizedFrame))
        {
            g_log.print(cr::utils::PrintColor::RED, g_logFlag) <<
                "[" << __LOGFILENAME__ << "][" << __LINE__ << "] ERROR: " <<
                "Can't send frame to rtsp." << std::endl;
        }
    }

    return 1;
}