![]()
YoloHailoTemplate
v1.0.1
Table of Contents
- Overview
- Versions
- Repository files
- Object Detection with YOLO
- Conversion of an
.onnxFile to.hef - Model Evaluation
- Preparing the Raspberry Pi with AI HAT+ for running the standard application
- Running an application on the Raspberry Pi with AI HAT+ for object detection using a custom
.heffile - Running an application on the Raspberry Pi using AI HAT+ for object detection with a custom
.heffile on test video - Backup files
Overview
YoloHailoTemplate is a general-purpose template for building an object detection pipeline using the YOLOv8 model and deploying it on the Hailo 8 NPU platform. It covers all essential steps: dataset annotation, data preparation, model training, ONNX export, conversion to Hailo HEF format, and deployment for real-time inference.
Versions
Table 1 - Library versions.
| Version | Release date | What’s new |
|---|---|---|
| 1.0.0 | 07.09.2025 | First version. |
| 1.0.1 | 22.09.2025 | Update CVAT tool install instructions. |
Repository files
The repository is organized as follows:
data_preparation/           # Scripts for dataset preparation and training
  build_dataset.py
  data_building_config.yaml
  prepare_dataset.py
  preprocess_images.py
  resize_images.py
  prepare_train_input.py
model_train_export/
  train_export_yolo_docker.sh
  eval_yolo_docker.sh
ai_raspberry_hat_app/
  main_app.py               # Main application for camera capture, detection, and MAVLink communication
  gstreamer_helpers.py      # Helper functions for GStreamer pipelines
  run_detection_pipeline.py # Core logic for video processing and object detection
  labels.json               # Custom class labels for configuring the model
testing_files/
  custom-labels.json        # Example label file for testing
  yolov8s_test.hef          # Example HEF file for testing
README.md                   # Project overview and instructions
requirements.txt            # Python dependencies list
Table 2 - Main Files and Folders.
| File or Folder | Description |
|---|---|
| data_preparation/ | Scripts for dataset preparation and training |
| ├─ build_dataset.py | Main script to create training/validation datasets, config, calibration data, and summary. |
| ├─ data_building_config.yaml | Configuration file specifying datasets and class names. |
| ├─ prepare_dataset.py | Converts CVAT-exported datasets to training format. |
| ├─ preprocess_images.py | Image resizing/padding module for detection models. |
| ├─ resize_images.py | Prepares image folders with resized images for training/testing. |
| └─ prepare_train_input.py | Creates train/val split files and YAML config for YOLO. |
| model_train_export/ | Model export and evaluation scripts. |
| ├─ train_export_yolo_docker.sh | Script to run YOLO model training and export to ONNX format. |
| └─ eval_yolo_docker.sh | Script for evaluating the accuracy of the trained ONNX model. |
| ai_raspberry_hat_app/ | Application files for Raspberry Pi AI HAT+. |
| ├─ main_app.py | Main application for camera capture, detection, and MAVLink communication. |
| ├─ gstreamer_helpers.py | Helper functions for GStreamer pipelines. |
| ├─ run_detection_pipeline.py | Core logic for video processing and object detection. |
| └─ labels.json | Custom class labels for configuring the model. |
| testing_files/ | Sample videos and configs for testing and validating the detection system. |
| ├─ custom-labels.json | Example label file for testing scenarios. |
| └─ yolov8s_test.hef | Sample Hailo HEF model file for inference on the AI HAT+. |
| README.md | Project overview and instruction manual. |
| requirements.txt | List of Python packages required for installation (training and export). |
Object Detection with YOLO
This template allows you to train a YOLOv8 model for object detection using your own data. The process consists of three main stages:
- Data Annotation
- Data Preparation
- Model Training
Data Annotation
You can use CVAT (Computer Vision Annotation Tool) or any annotation tool that produces a supported format (e.g., COCO, YOLO, VOC). Export your annotations as described below.
How to Install CVAT
For the setup, clone the CVAT repository:
git clone https://github.com/cvat-ai/cvat
cd cvat
git submodule update --init --recursive
Running CVAT Locally
Make sure you have Docker and Docker Compose installed.
Then run:
cd cvat
docker compose -f docker-compose.yml -f docker-compose.dev.yml up -d
CVAT should now be available at http://localhost:8080.
The default admin credentials are:
-
Username:
admin -
Password:
adminIf this username and password don’t work, just complete a simple registration and set your own username and password.
Using CVAT
To learn how to use CVAT for annotation, refer to the official documentation:
https://opencv.github.io/cvat/docs/
Within CVAT:
- Create an annotation project
- Add annotation tasks (upload images or videos)
- Annotate using the built-in tools
- Export annotations using COCO 1.0 format with images – export as
.ziparchives
Data Preparation
Prepare the annotated data for training:
Directory Structure
Create the required folders:
mkdir -p /data/datasets/annotated/extracted
Unzip the annotated .zip archives exported from CVAT into this directory. After extraction, your structure should look like this:
/data/datasets/annotated/extracted/
├── sample_1/
│   ├── images/default/                     # Extracted frames
│   └── annotations/instances_default.json  # Annotation file
├── sample_2/
│   ├── images/default/
│   └── annotations/instances_default.json
...
└── sample_N/
  ├── images/default/
  └── annotations/instances_default.json
Configuration
Navigate to the directory:
cd ~/Projects/YoloHailoTemplate/data_preparation
Edit the configuration file data_building_config.yaml:
sudo nano data_building_config.yaml
You need to specify:
- Classes to train
- Paths to datasets for training and validation
- Output path for the prepared dataset
Note: The --target_classes argument in build_dataset.py is user-customizable. By default, it is set to ["Drone"], but you can specify any list of class names for your use case, e.g., ["Car", "Person", "Dog"].
Build the Dataset
Open the folder:
cd data_preparation
Run the script:
python3 build_dataset.py data_building_config.yaml
This script will:
- Generate training, validation, and calibration datasets
- Print paths to:
- YOLO data config (needed for training)
- Calibration images (needed for Hailo export)
Found 31910 images in total.
Saved 1000 resized images to '/data/datasets/yolo/calib_data'.
Calibration images have been saved to /data/datasets/yolo/calib_data
##################################################
To run model training use next yolo data config full path: /data/datasets/yolo/yolo_data_config/yolo.yaml
The overall structure is as follows:
/data/datasets/yolo/
├── calib_data/
├── train_val_data/
└── yolo_data_config/
    ├── datasets_summary.csv
    ├── train.txt
    ├── val.txt
    └── yolo.yaml
The path /data/datasets/yolo/yolo_data_config/yolo.yaml must be saved, as it will be needed later during the training stage.
Model Training
To train the model:
-
Install NVIDIA Container Toolkit on your machine.
-
Open the
~/Projects/hailo_aidirectory:cd ~/Projects/hailo_ai -
Create the
yolo_scriptsdirectory:mkdir yolo_scripts -
Get our prepared images for training and evaluation from this link: IMAGES_YOLO_HAILO
Note: If the link has expired or you encounter any problems, contact us at: info@constantrobotics.com
Copy the images into the yolo_scripts folder.
-
Load the Docker image:
sudo docker load -i <path to ulcs1306.tar>
sudo docker load -i ~/Projects/hailo_ai/yolo_scripts/ulcs1306.tar
- Next, you need to run the
yolo_trainer:latestcontainer by executing the following command:
sudo docker run --rm -it \
    --runtime=nvidia --gpus all \
    -v /data:/data \
    yolo_trainer:latest bash
The result is as follows:
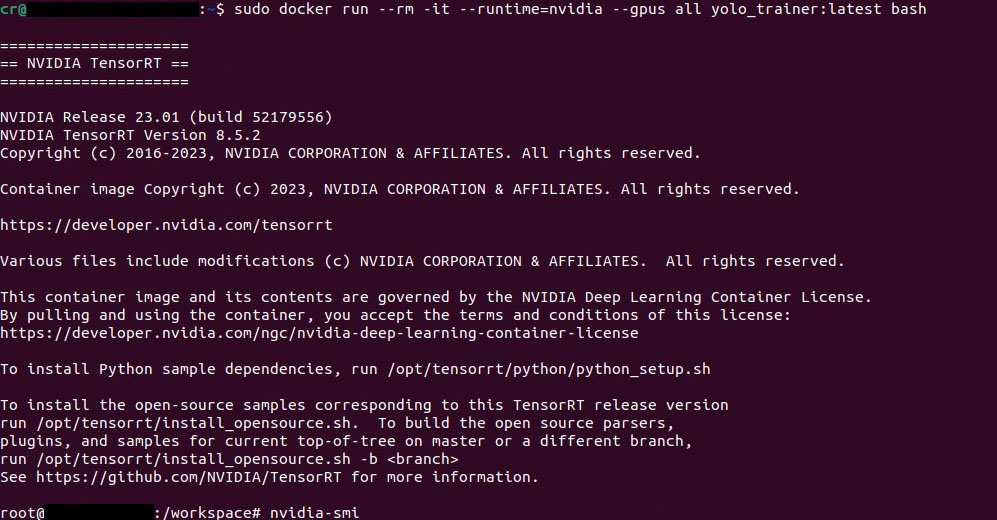
- Inside the container, verify GPU availability:
nvidia-smi
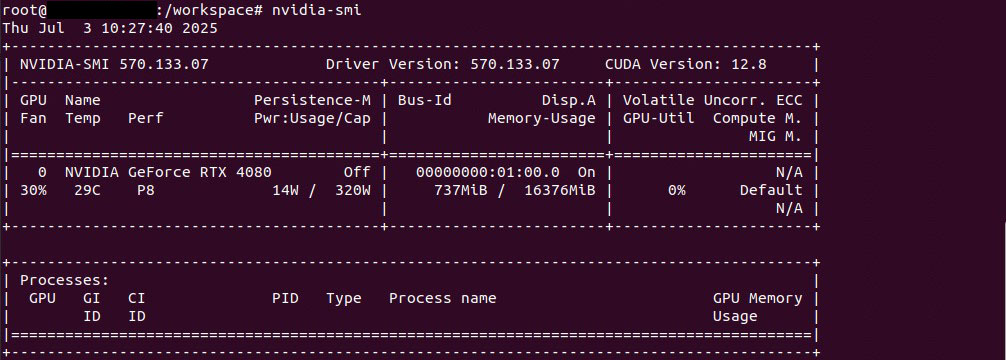
Since we started the container with -v /data:/data, all the necessary files prepared earlier are available inside the container.
Start the training process
Then, return to the local computer, open a second terminal window, and navigate to the directory:
cd ~/Projects/hailo_ai/model_train_export
Execute the command:
./train_export_yolo_docker.sh \
    <path to YOLO data config> \
    <path to output folder within /data, e.g., /data/trained_model>
Example of command execution for our case:
./train_export_yolo_docker.sh \
    /data/datasets/yolo/yolo_data_config/yolo.yaml \
    /data/trained_model
Once the training completes, the resulting model will be saved as:
/data/trained_model/weights/best.onnx
This best.onnx model can then be exported to Hailo format.

For convenience, rename the resulting file best.onnx to yolov8s.onnx and use this filename in the following steps for clarity and ease of use.
Conversion of an .onnx File to .hef
After preparing and obtaining the .onnx file from the dataset, it is necessary to convert it to the .hef format. The .hef format is used as the primary format for working with hailo.ai.
Installation of the required software for conversion
To begin, you need to register on the website and download the software. To download the software, navigate to the Software Downloads section. At the time of preparing this guide, the current version of the Docker image was Hailo AI Software Suite – Docker (2025-04). Detailed installation instructions are available here.
Software Launch
After downloading the Hailo AI Software Suite – Docker (2025-04) image to a computer with a GPU where you plan to perform the conversion from .onnx to .hef, you need to extract it to a directory, for example, Projects/hailo, and start Docker.
- The following command is used to extract the Hailo AI Software Suite – Docker (2025-04):
cd ~/Projects/hailo
unzip hailo_ai_sw_suite_2025-04_docker.zip
- To import the Docker image, run the following command:
sudo docker load -i hailo_ai_sw_suite_2025-04.tar.gz
This command imports the Hailo AI Software Suite – Docker (2025-04) image from the hailo_ai_sw_suite_2025-04.tar.gz archive into the local Docker repository on your machine. After the import, the image can be started using the docker run command or used to create containers. It takes approximately one minute, after which the following output will be displayed:
Loaded image: hailo_ai_sw_suite_2025-04:1
- Next, Docker itself needs to be started. An example command for starting Docker is shown below:
sudo docker run -it --rm \
  --privileged \
  --net=host \
  -v /dev:/dev \
  -v /tmp:/tmp \
  -v ~/Projects/hailo:/mnt \
  hailo_ai_sw_suite_2025-04:1
The option -v ~/Projects/hailo:/mnt mounts the local directory ~/Projects/hailo into the container at the path /mnt and is used for transferring files between the local machine and Docker in the following steps.
The result of a successful Docker launch looks as follows:

Preparation of the necessary files for conversion
- A folder named
data_conversionis created on the local machine and then moved to the~/Projects/hailodirectory. The folder structure is shown below:
cd ~/Projects/hailo/data_conversion/
The structure is as follows:
~/Projects/hailo/data_conversion/
├── calib           # Calibration images in 640×640 px format (at least 1,000 images)
└── yolov8s.onnx    # Prepared .onnx file
Executing the conversion process to the .hef format
- Inside the Docker container hailo_ai_sw_suite_2025-04:1, navigate to the
/mntdirectory, where the previously createddata_conversionfolder is located. This folder contains the calibration files and the.onnxfile. It is necessary to check that all required files are present.
cd /mnt
ls
└── data_conversion
- A directory named
my_hailo_projectis created with write permissions inside the Docker container. Use the following command to create it:
cd ~
mkdir my_hailo_project
cd my_hailo_project
- The folder
~/mnt/data_conversionis copied to the~/my_hailo_project/data_conversion/directory.
cp -r /mnt/data_conversion ~/my_hailo_project/
- Inside the Docker container, navigate to the
~/my_hailo_project/data_conversion/directory and verify the presence of thedata_conversionfolder and its files. The directory structure is shown below:
~/my_hailo_project/data_conversion/
├── calib           # Calibration images in 640×640 px format (at least 1,000 images)
└── yolov8s.onnx    # Prepared .onnx file
- Navigate to the
~/my_hailo_project/data_conversion/directory and run the final command to convert the.onnxfile to the.hefformat.
hailomz compile yolov8s --ckpt=yolov8s.onnx --hw-arch hailo8 --calib-path calib --classes 1 --performance
The estimated time required for the conversion process is approximately 7 hours. Upon completion, you will obtain the .hef file, which can then be used to run on the AI HAT+ - Raspberry Pi.
The result is as follows:

- Navigate to the
~/my_hailo_project/data_conversion/directory, run the command, and verify the presence of the.heffile.
ls
The result is as follows:

The conversion of the .onnx file to the .hef format was successful. You can now copy the yolov8s.hef file for further use on your Raspberry Pi AI HAT+ platform (as in our example).
Model Evaluation
If you need to evaluate the model performance on a dataset, there is a dedicated tool for this purpose. Below is how to set it up and use it.
Install NVIDIA Container Toolkit
To run the container with GPU support, install the NVIDIA Container Toolkit on your machine.
-
Prepare the project directory
~/Projects/hailo_ai:cd ~/Projects/hailo_ai -
Create a directory for evaluation scripts:
mkdir yolo_scripts_evaluation cd yolo_scripts_evaluation -
Copy the Docker image file
ulcs0907.tarinto theyolo_scripts_evaluationdirectory from the specified path.
Load the Docker image
To load the Docker image into your local Docker installation, run:
sudo docker load -i <path to ulcs0907.tar>
For example:
sudo docker load -i ~/Projects/hailo_ai/yolo_scripts_evaluation/ulcs0907.tar
After loading, check the list of available images:
docker images
Run the evaluation container
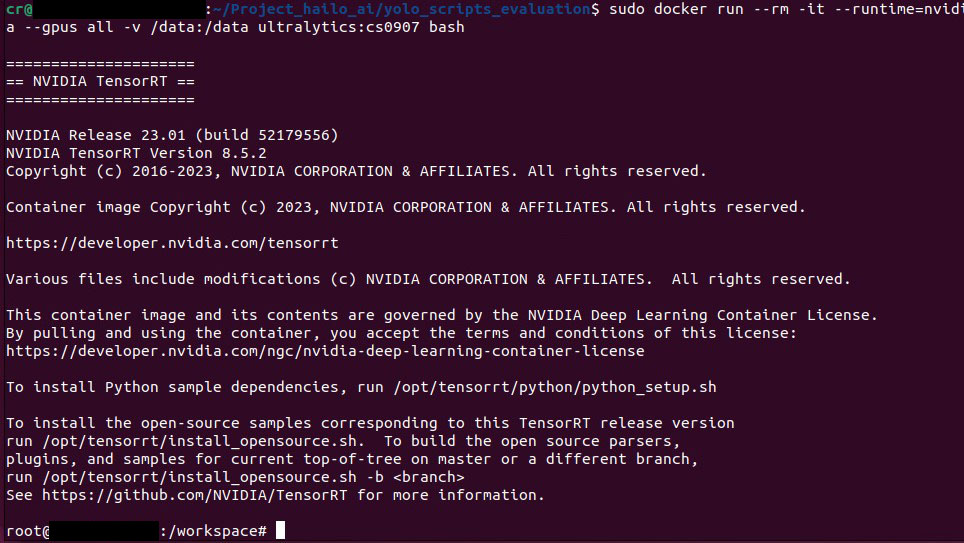
Start the evaluation container with the following command:
sudo docker run --rm -it \
    --runtime=nvidia --gpus all \
    -v /data:/data \
    ultralytics:cs0907 bash
- The
--runtime=nvidiaoption enables GPU usage inside the container. - The
-v /data:/dataoption mounts your local/datafolder inside the container so all required files are accessible.
Check GPU availability
Inside the container, run:
nvidia-smi

If everything is set up correctly, you’ll see information about your GPU. If you get an error, you may need to install the NVIDIA drivers or container toolkit.
Run the model evaluation process
Go back to your local machine (open a second terminal window) and follow these steps.
-
Navigate to the evaluation scripts directory:
cd ~/Projects/hailo_ai/model_train_export -
Execute the evaluation script:
./eval_yolo_docker.sh \
    <path to validation data list file (val.txt)> \
    <path to ONNX model> \
    <path to output folder within /data>
The validation data list file
val.txtis created during the Build the Dataset stage. It is automatically generated by the scriptbuild_dataset.pyand is typically located at:/data/datasets/yolo/yolo_data_config/val.txtThis file contains the list of validation images used to evaluate the model’s performance on data not seen during training.
The ONNX model file is generated during the Start the training process stage. After running the script
train_export_yolo_docker.sh, the trained YOLOv8 model is saved as an ONNX file, usually located at:/data/trained_model/weights/best.onnxThis file contains the trained YOLOv8 model ready for inference or evaluation.
The path to the output folder defines where the evaluation results will be saved. You can choose any folder inside
/data, for example:/data/estimation_resultsAfter the evaluation process, a CSV file with all metric results will be stored in this folder, typically named:
metrics_results_yolo.csvAn example command for your case would look like this:
./eval_yolo_docker.sh \
    /data/datasets/yolo/yolo_data_config/val.txt \
    /data/trained_model/weights/best.onnx \
    /data/estimation_results
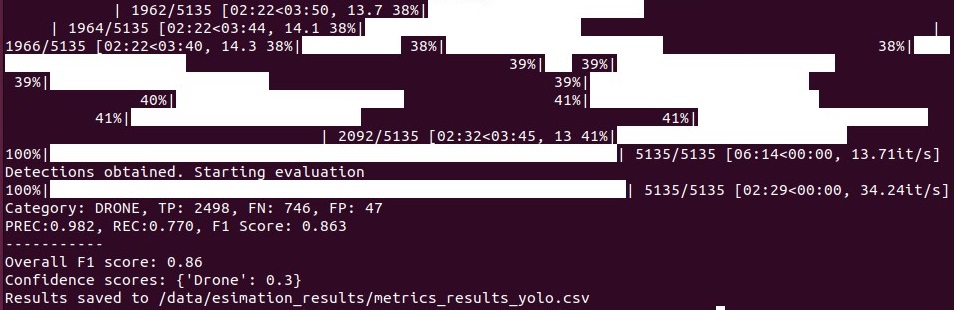
Evaluation results
Once the evaluation completes, all metric results will be saved to the file:
/data/estimation_results/metrics_results_yolo.csv
To run the evaluation on a different dataset, repeat the steps for preparing the data and launching the container.
Preparing the Raspberry Pi with AI HAT+ for running the standard application
First, the Raspberry Pi needs to be assembled according to the AI HAT+ instructions, and the initial software modules should be installed as described in the installation guide. It is also necessary to connect two cameras for testing purposes.
After the software installation, its functionality should be verified. To do this, run the command that starts the standard application, which ensures that both the hardware and software components are operating correctly. As a result, you should see video output from one of the cameras with object detection running.
rpicam-hello -t 0 --post-process-file /usr/share/rpi-camera-assets/hailo_yolov8_inference.json
Next, you need to clone the Hailo Raspberry Pi 5 Examples repository into a chosen directory, for example, Downloads, and install the software as specified in the repository’s instructions.
Additionally, to verify functionality and ensure that all required modules are correctly installed, you should run the following command.
cd ~/Downloads/hailo-rpi5-examples && source setup_env.sh

Additionally, you may choose to run the demo application from the provided examples to further verify the system’s functionality, although this step is optional.
python basic_pipelines/detection.py --input rpi
Running an application on the Raspberry Pi with AI HAT+ for object detection using a custom .hef file
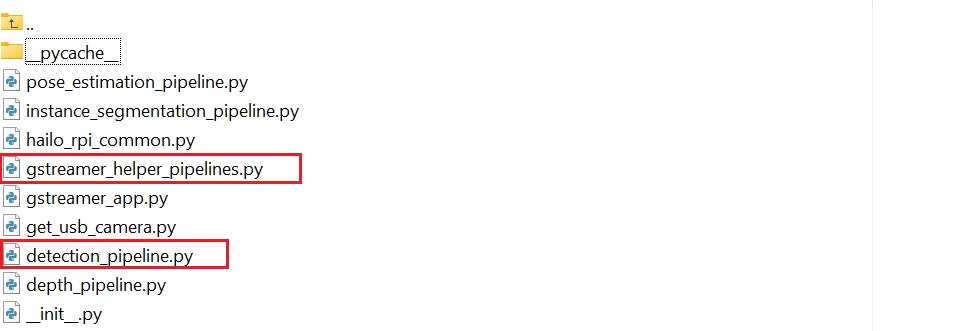
The software tools are provided exclusively as source code. The user is given the ai_raspberry_hat_app directory containing a set of files. The folder structure is shown below:
ai_raspberry_hat_app/
├── main_app.py -------------------- Main application for camera capture, detection, and MAVLink communication.
├── gstreamer_helpers.py ----------- Helper functions for GStreamer pipelines.
├── run_detection_pipeline.py ------ Core logic for video processing and object detection.
└── labels.json -------------------- Custom class labels for configuring the model.
Launching the application with the test-mode option and verifying functionality
-
Navigate to the
/hailo-rpi5-examples/resourcesdirectory and copy the previously preparedyolov8s.hefandlabels.jsonfiles into it. -
Navigate to the
/hailo-rpi5-examples/basic_pipelinesdirectory and copy the previously preparedmain_app.pyfile into it. -
To run the
main_app.pyapplication with the--test-modeoption, it is necessary to install additional libraries.cd ~/Downloads/hailo-rpi5-examples && source setup_env.sh sudo apt update sudo apt install python3-pip pip3 install MAVProxy # Installs the package for the current user # If you encounter permission errors, run with sudo: sudo pip3 install MAVProxy # Installs the package with administrator rights mavproxy.py --version # Check if MAVProxy is installed and view its version which mavlogdump.py # Check if mavlogdump.py utility is available in PATH
Additionally, a test mode --display is provided for running the main_app.py application with video and object detections displayed on the monitor. When running the application, you will see object detections on the screen, while the rest of the process remains unchanged. This mode allows for visual monitoring of the application’s operation.
Launching the application with connection established via the MAVLink protocol
For the final launch of the main_app.py application without using the test module, you can connect to an external system (e.g., FMU) via the MAVLink protocol. Set the connection parameters as needed:
FMU_IP = "192.168.10.25"      # IP address of the external system
FMU_TCP_PORT = 5790           # TCP port for MAVLink communication
Ensure the external system is accessible at the specified IP address and port for proper data exchange.
Running an application on the Raspberry Pi using AI HAT+ for object detection with a custom .hef file on test video
For further testing and verification of different prepared .hef files on previously recorded videos, you need to create an additional virtual environment in a separate folder.
Creating the Test Folder
First, create the Test folder and navigate into it:
mkdir Test
cd Test
Next, clone the Hailo Raspberry Pi 5 Examples repository into the Test folder and install all necessary software modules as described in the instructions here, similar to the previous steps.
Note: A backup of the Hailo Raspberry Pi 5 Examples repository was created as of June 1, 2025. It can be used if needed (reserve): hailo-rpi5-examples.zip
To verify the environment and ensure that all required modules are installed correctly, run the following command:
cd ~/Test/hailo-rpi5-examples && source setup_env.sh
This way, a separate virtual environment is created for testing various prepared .hef files on previously recorded videos.
In our repository, the following example files are provided for testing:
/testing_files
├── video.mp4
├── custom-labels.json
└── yolov8s_test.hef
Next, open the resources folder, which contains various configuration files, model files, and other assets required for running the detection application. This directory is used to store your custom .hef models, label files, and any video inputs that you want to test.
To navigate to the folder, run the following command:
cd ~/Test/hailo-rpi5-examples/resources
Navigate to the /hailo-rpi5-examples/resources directory and copy the example files yolov8s_test.hef, video.mp4, and custom-labels.json that have been prepared in the repository for testing purposes.
After that, launch the detection.py application with the following command (make sure to activate the virtual environment first using cd ~/Test/hailo-rpi5-examples && source setup_env.sh):
python3 detection.py \
    --labels-json resources/custom-labels.json \
    --hef-path resources/yolov8s_test.hef \
    --input resources/video.mp4
After successfully launching the detection.py application, the test video video.mp4 will start playing on the monitor, showing detection results with the provided labels.
Similarly, you can test different .hef files on other videos (e.g., video1.mp4, video2.mp4, videoX.mp4) by simply changing the input parameter in the command:
--input resources/videoX.mp4
This enables flexible testing of various models and analyzing results using your own video footage.
Note: During testing, it is possible to run videos with high resolution; however, we have observed that videos with a resolution of 640×640 pixels perform most reliably.
Occasionally, when re-running detection.py with high-resolution videos, the Raspberry Pi may require a reboot to function properly. After rebooting, subsequent runs generally proceed without issues. This behavior is related to the operation of the AI HAT+.